Original Link: https://www.anandtech.com/show/7603/mac-pro-review-late-2013
The Mac Pro Review (Late 2013)
by Anand Lal Shimpi on December 31, 2013 3:18 PM EST
The year was 2004. I was enrolled in ECE 466 at NCSU, a compiler optimization/scheduling class. I remember walking into the lecture hall and seeing far too many PowerBooks and white iBooks. This was the computer engineering department right? It wasn’t much later that I started my month with a Mac experiment. I spent most of my life at that point staying away from Apple hardware. I wanted to give the platform a fair shake so I bought the fastest thing Apple offered back then: a 2GHz PowerMac G5.
More recently, in 2012, I was talking to my friend Lyle who was setting out to build a new gaming PC. Without any coercion on my part, he opted for a mini-ITX build. I’d been on a mini-ITX kick for a while, but motherboard and case vendors kept reiterating as exciting as mini-ITX was, the sales volumes just weren’t there. I was surprised when my gamer friend settled on building a new desktop that was seriously small. He used a BitFenix Prodigy case, a great choice.
The last Mac Pro I reviewed was in 2010. Little had changed externally since the PowerMac G5 I bought years ago. I lamented the chassis’ lack of support for 2.5” drives. A year later I abandoned the Mac Pro entirely for a Sandy Bridge MacBook Pro. I was a late adopter for the notebook as a desktop usage model, but a lack of progress on the Mac Pro drove me away from the design.

From left to right: Apple PowerMac Dual G5, Apple Mac Pro (Mid 2006), Apple Mac Pro (Early 2009), Apple Mac Pro (Late 2013)
Apple tends to be pretty early to form factor revolution, but given the company’s obsession with mobile it’s understandable that the same didn’t hold true for the Mac Pro. When it finally came time to redesign the system, I’m reminded of the same realization Lyle came to when building his most recent desktop: why does a modern desktop need to be big?
The answer is, for a lot of users, that it really doesn’t. Notebooks already outsell desktops by a healthy margin, and there’s no room for expansion inside a notebook. You may be able to swap out a drive or fiddle around with some sticks of DRAM, but no one is adding discrete cards (at least internally) to a notebook.
The situation for Mac desktops is even more cut and dry. With the exception of the occasional aftermarket Mac video card and the more adventurous users who are fine with modifying/flashing PC video cards to work on a Mac, I suspect there’s little GPU upgrading going on in the Mac desktop market. That leaves other PCIe devices that get cut out if you go to a design with less internal flexibility. In the spirit of the of the MasterCard commercials: for everything else, there’s Thunderbolt.
You can do roughly 1.5GB/s over a single Thunderbolt 2 connector. The protocol passes unmodified PCIe and it’s a technology that Apple has strongly backed since its introduction. Other than a GPU, virtually anything you’d want to connect over PCIe you can do externally via Thunderbolt 2.
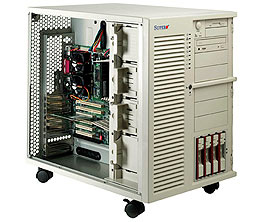
I think you can adequately make the argument for a smaller form factor Mac Pro desktop, after all, that’s where the market is headed. I remember coveting (and eventually owning) Super Micro’s SC830 chassis for my personal machine years ago. I wanted a huge desktop. Regardless of whether I’m talking about a Mac or PC today, I no longer want something massive.
The argument for even building a high-end desktop is easy to make. It all boils down to TDP. Regardless of what device you’re building for, assuming you have competent architects, you’re limited by power. The bigger the device, the greater your ability to remove heat and the more performance you can unlock. I’m surprised by how much performance you can cram into a 15-inch MacBook Pro, but there’s still room for more - particularly if you care about CPU and GPU performance.
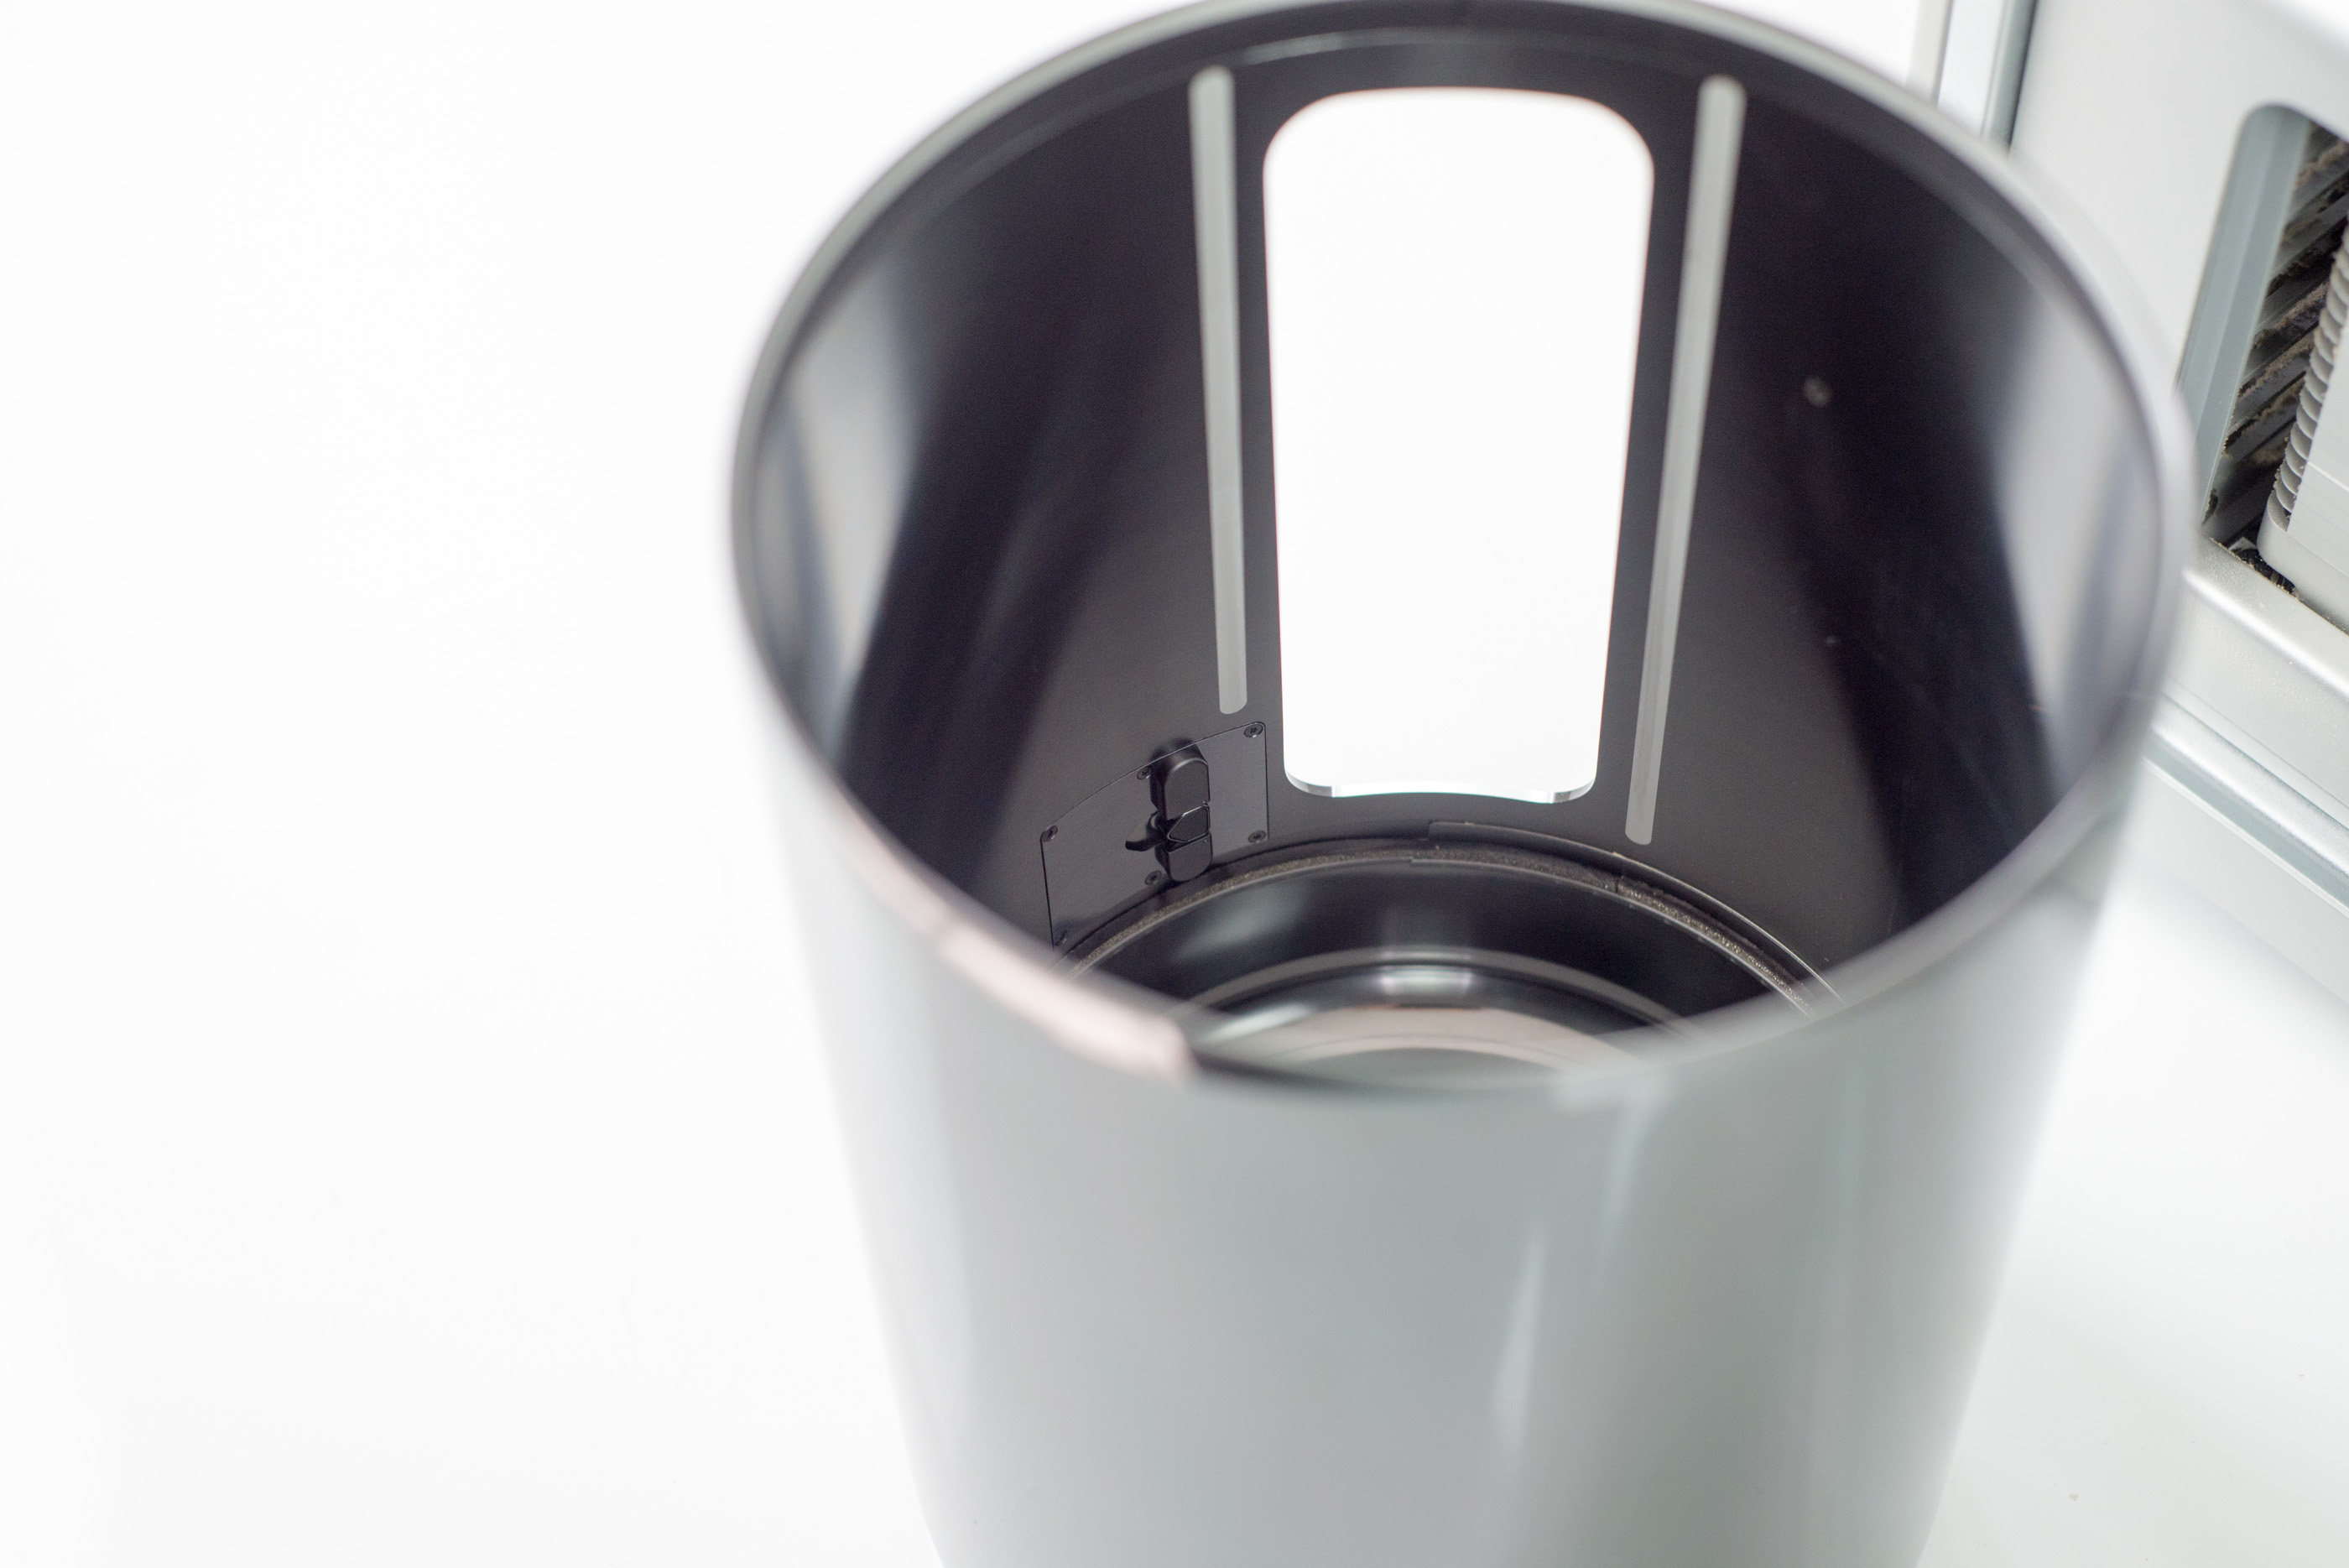
Given how power limited everything else, it’s no surprise that Apple focuses so heavily on the new Mac Pro’s thermal core. It’s single, unified heatsink that is directly responsible for cooling the three major processors in the new Mac Pro: CPU and two GPUs. The thermal core is in the shape of a triangular prism, with each lateral surface attaching directly to one of the three processors. The shared heatsink makes a lot of sense once you consider how Apple handles dividing compute/display workloads among all three processors (more on this later).
A single fan at the top of the Mac Pro’s cylindrical chassis pulls in cool air from the bottom of the machine and exhausts it, quietly, out the top.
Ultimately it’s the thermal core that the new Mac Pro is designed around. It’s the most area efficient dual-GPU setup I’ve ever seen. There’s little functional benefit to having a desktop chassis that small, but you could say the same about Apple’s recent iMac redesign that focused on making a thinner all-in-one. If the desktop market is to not just stick around but grow as well, it needs to evolve - and that also includes design.

Mac Pro Thermal Core - iFixit
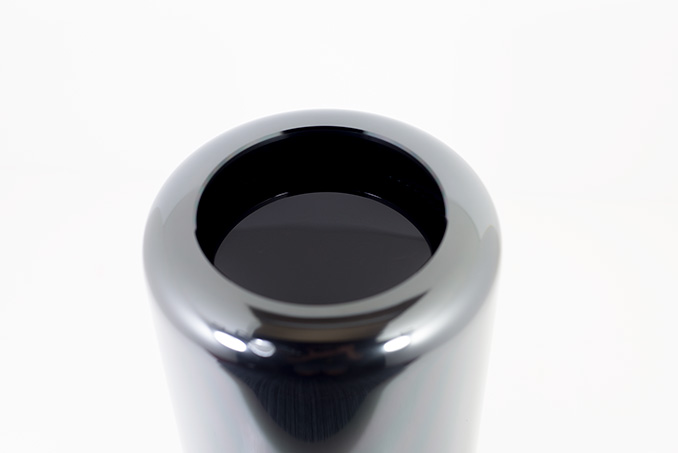
The new Mac Pro is a dramatic departure from its predecessors. The chassis is still all aluminum (with the exception of a plastic cover over the fan) but it features a dark anodized finish vs. the bright silver finish of its predecessors. It’s a glossy finish but the good news is that unlike a mobile device it’s pretty easy to ensure that the system remains looking clean. The surface of the new Mac Pro is also incredibly smooth. There's a heft and quality to the design that is at odds with how small and portable it is. I'm hardly an art critic but I do feel like there's a lot to appreciate about the design and construction of the new Mac Pro. I needed to move the system closer to my power testing rig so it ended up immediately to the left of me. I have to admit that I've been petting it regularly ever since. It's really awesomely smooth. It's actually the first desktop in a very long time that I want very close to me. It feels more like a desk accessory than a computer, which is funny to say given just how much power is contained within this tiny package.
Thanks to its small size (9.9” tall with a 6.6” diameter), the Mac Pro belongs on your desk - not underneath it. The design doesn’t attempt to hide IO, but rather draws careful attention to it. All IO ports are located on the same side of the machine. There’s an integrated sensor that can detect tilt/rotation and illuminates the IO panel on the Mac Pro to help you plug in cables. Admittedly port density is so high back there that I don’t know if illuminating it helps all that much, but it’s a nice effect nonetheless. Otherwise there’s only the power button LED that indicates the system is on.
Internal expansion is more or less out of the question. The Mac Pro remains the easiest Mac to get into. There’s no special screwdriver needed, just a simple latch on the back that unlocks the external housing.
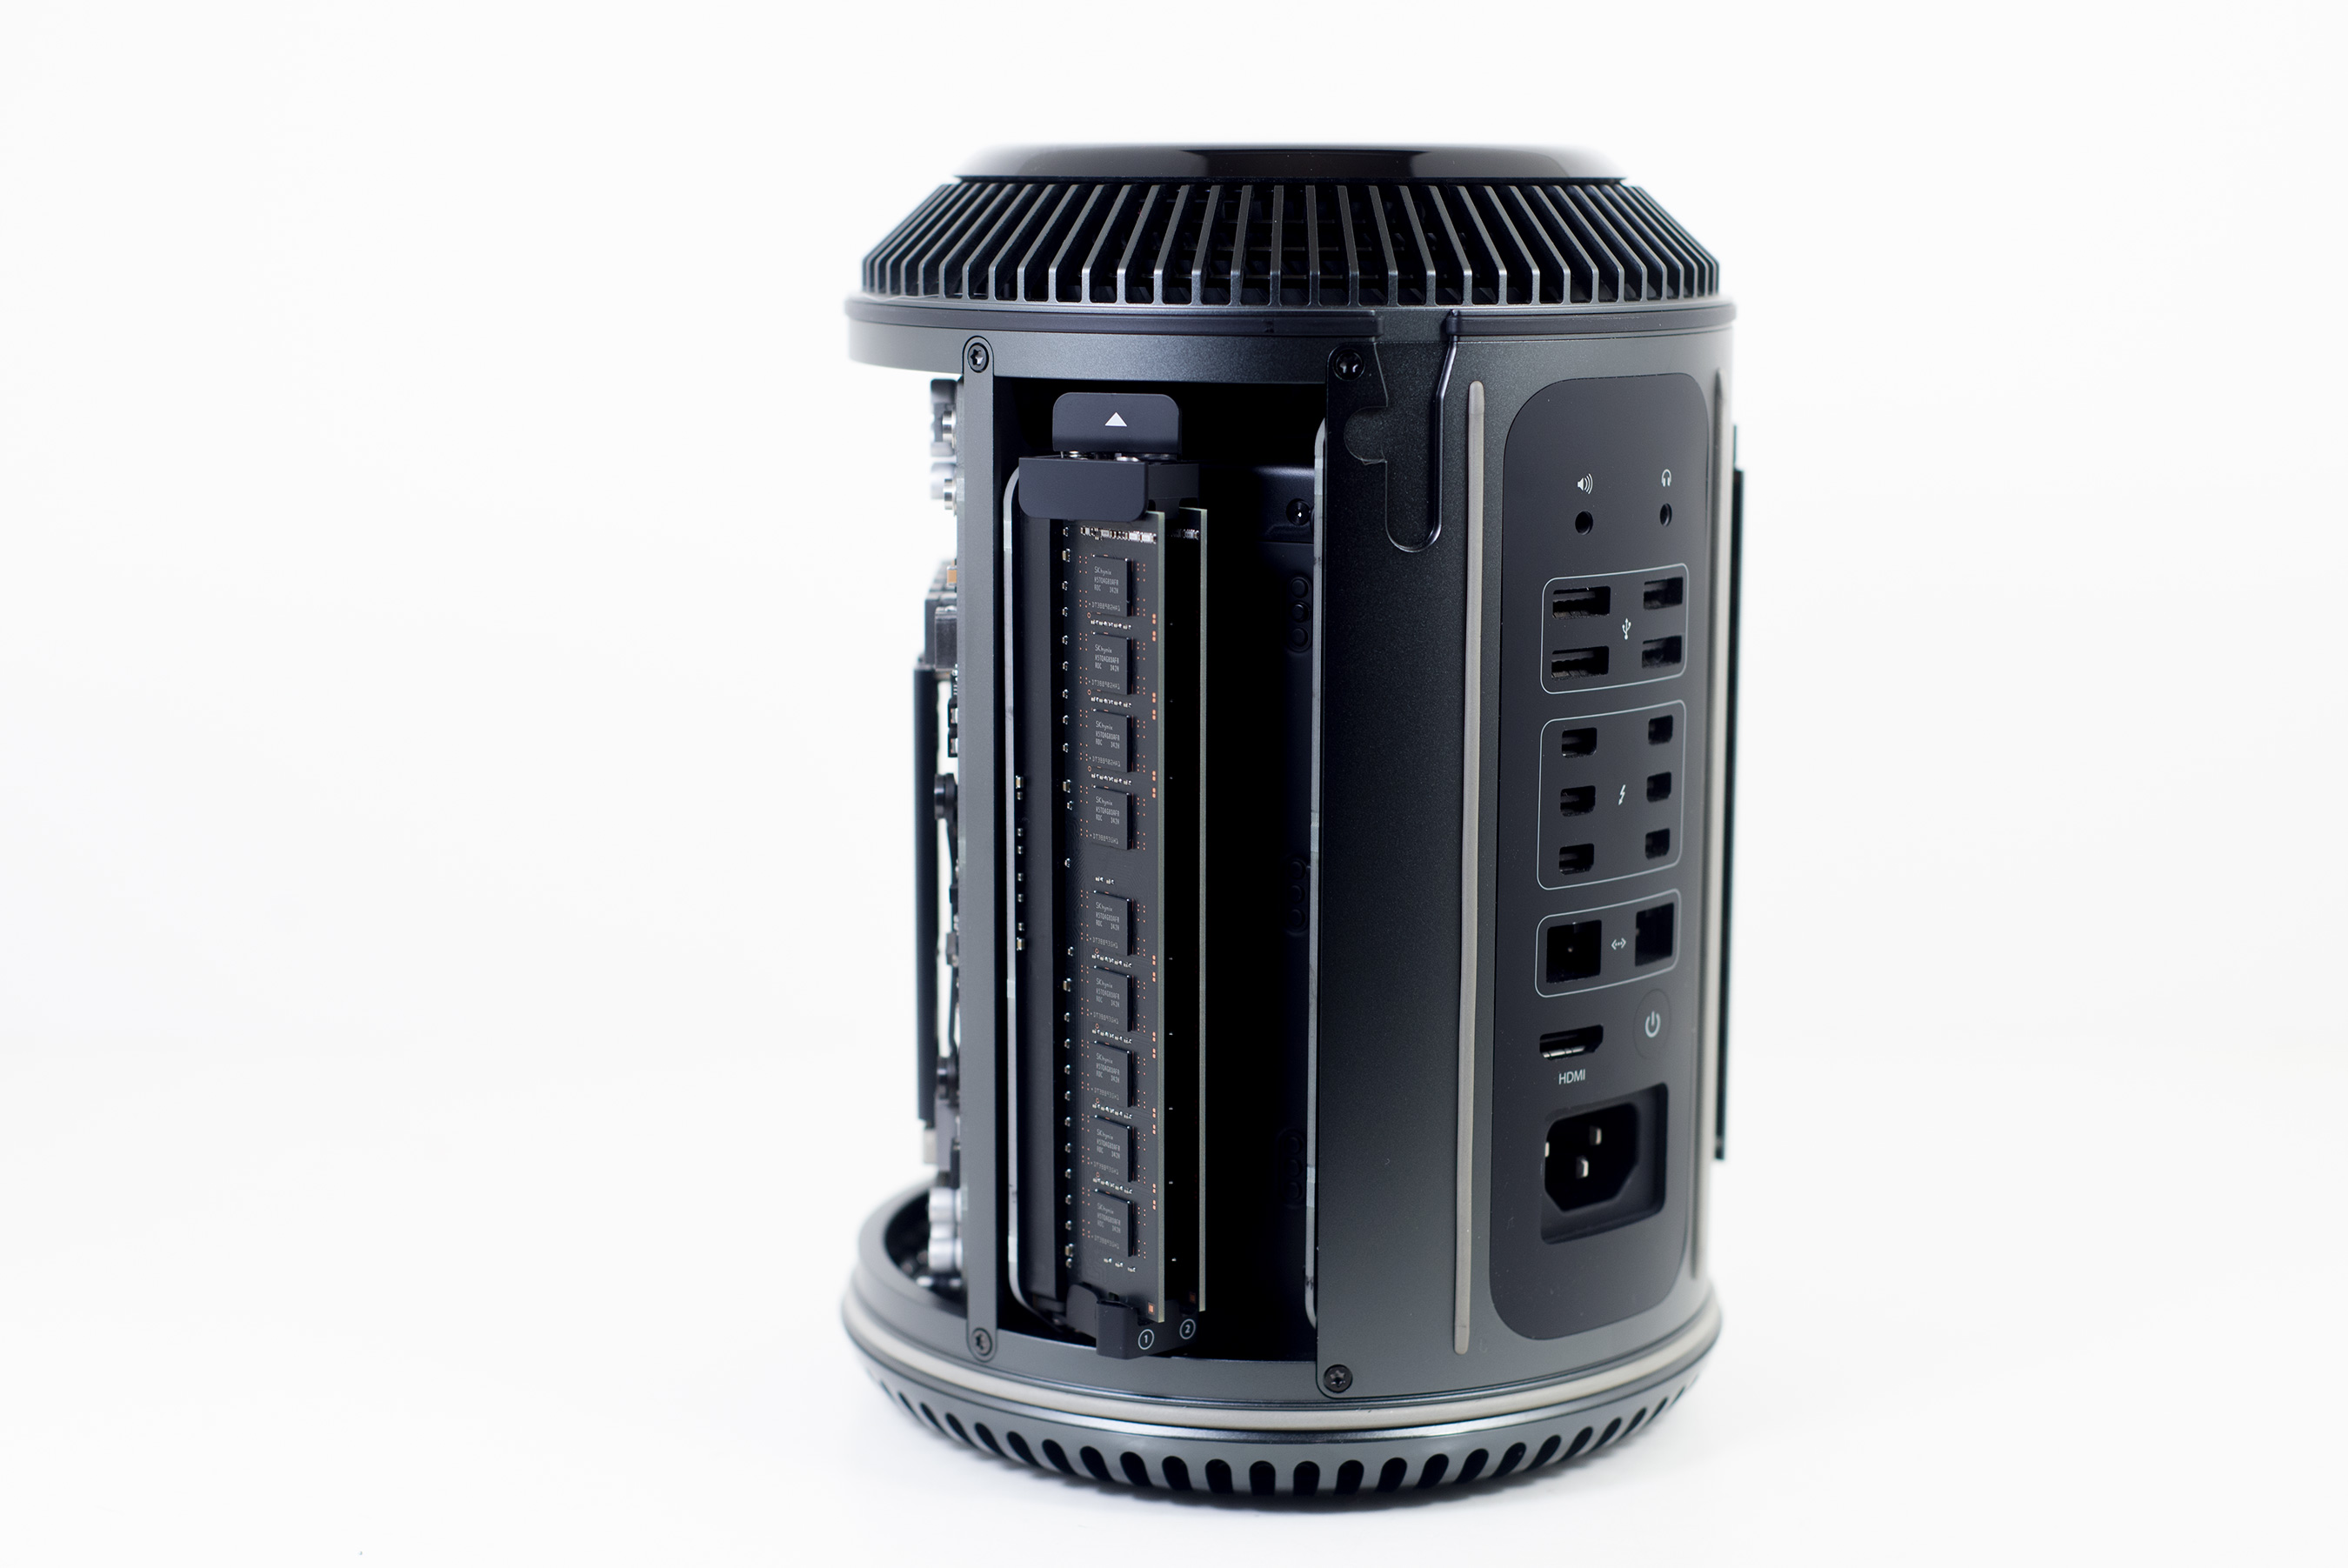
Lift it up and you’re presented with the backs of the CPU and GPU cards. Behind one of the GPUs is the removable PCIe SSD, and flanking the IO panel are four user accessible DDR3 DIMM slots. Push down on the lever marked with an arrow and you’ll release the angled DIMM slots, giving you access to remove/upgrade memory. The Mac Pro supports up to 64GB of memory, which you’ll want to install in groups of four in order to populate all memory channels stemming from the Ivy Bridge-EP CPU.
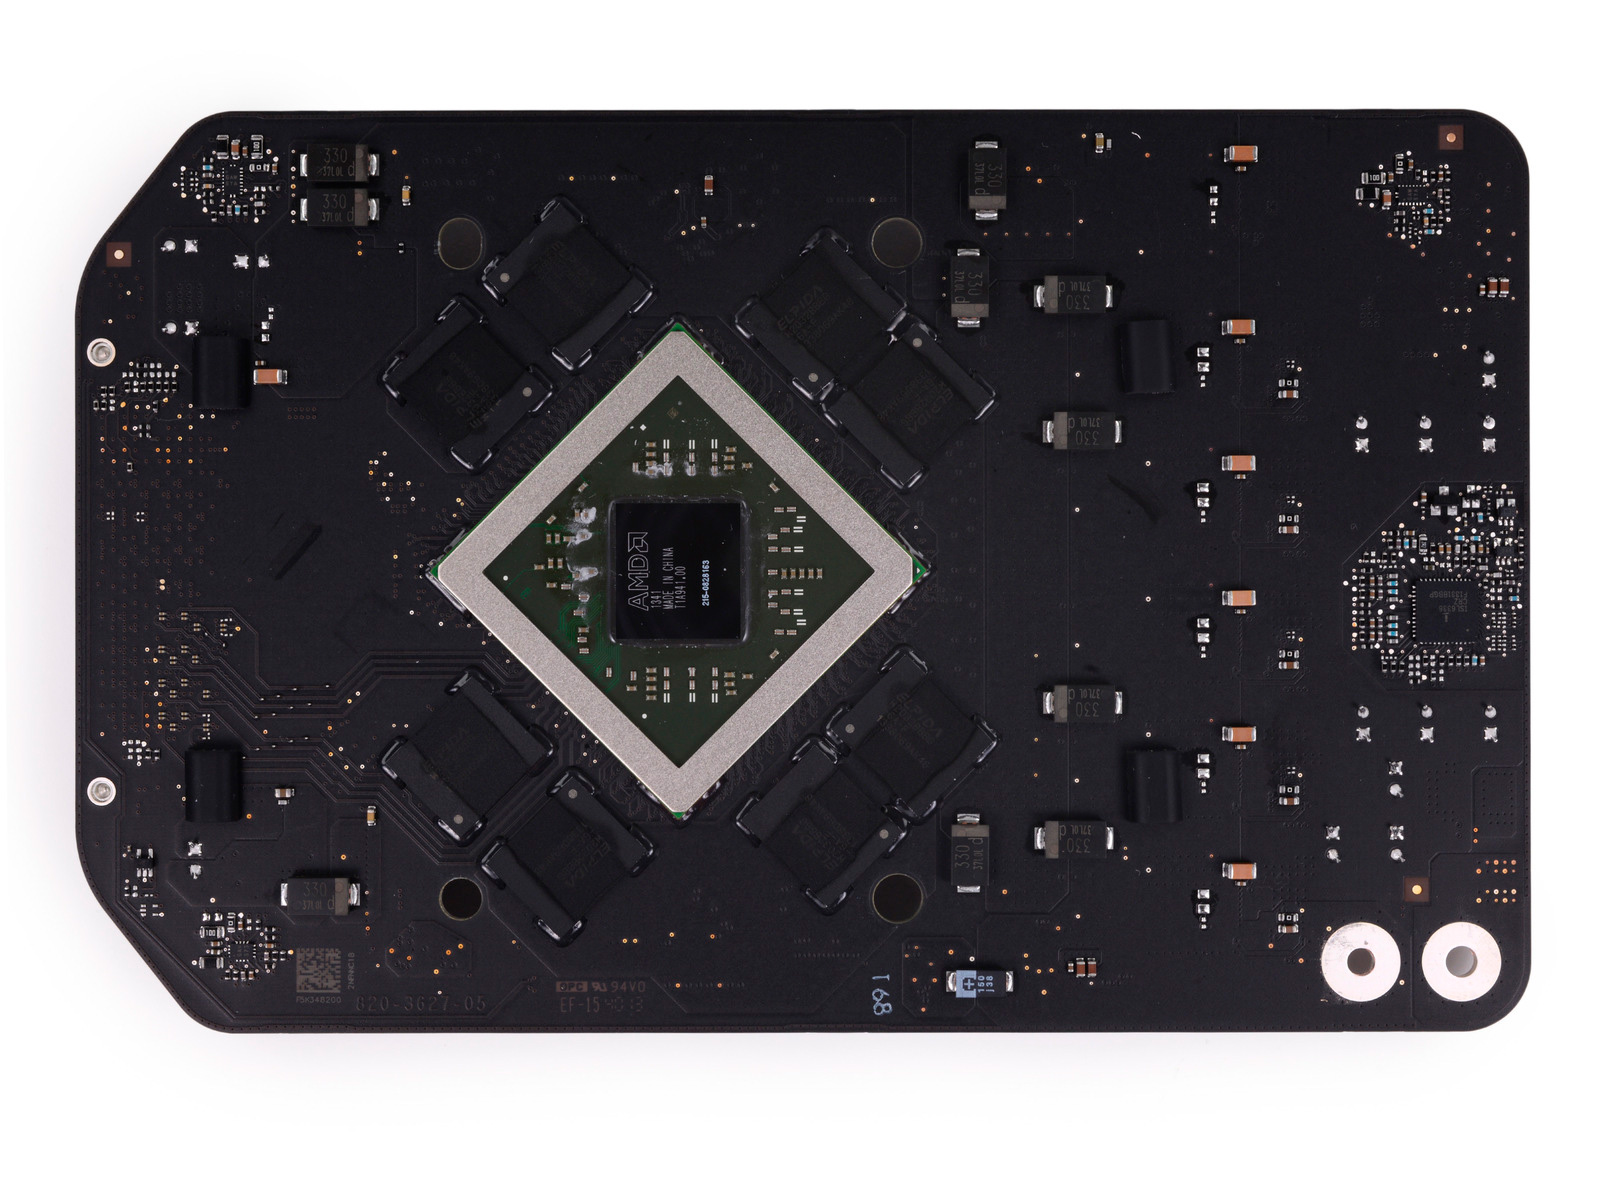
Mac Pro custom FirePro D300 GPU board - iFixit
Both GPU boards are custom, so it would appear that Apple has effectively killed the limited 3rd party Mac GPU upgrade market. It’s entirely possible that someone will clone Apple’s GPU card design here, but that seems like a lot of effort for very limited potential sales.
The CPU board is the only one fully obscured from view; it’s behind the IO panel. There’s only a single LGA-2011 CPU socket on that board, capable of supporting Intel’s latest Ivy Bridge-EP Xeon CPUs. Interestingly enough, Apple appears to be using unmodified Xeon processors with their integrated heat spreader attached. Long time readers of our Mac Pro reviews will remember that the Nehalem Mac Pro actually featured Xeons sans IHS, which made aftermarket upgrades a little trickier (and potentially dangerous). What this means is that you should, in theory, be able to upgrade the Mac Pro’s CPU down the road should you want to. It’s definitely not a simple task but at least feasible. Especially as Xeon pricing drops down the road, this may be a good way of extending the lifespan of your Mac Pro.

Mac Pro Main Logic Board - iFixit
All three boards connect to the main logic board (MLB) at the bottom of the mini tower. It’s on the MLB that you’ll find Intel’s C602 PCH (Platform Controller Hub) along with high density connectors (CPU board) and flex cables (GPUs) for all of the daughter boards.
The new Mac Pro still has an internal speaker. There's not much to say about it, it's ok in a pinch if you need audio and don't want to hook up external speakers. I've had one weird issue with the internal speaker: it occasionally produces a high pitched noise, requiring a power cycle to clear. I haven't been able to root cause the problem yet, it seems to happen while the speaker is muted (only to surface once I've unmuted the speaker) and after I've been torturing/benchmarking the machine. I'm not sure if it's tied to plugging/unplugging Thunderbolt 2 devices while it's on or if it's something in software that's triggering it. Either way if you see it on your system, know that you can clear it by a full power cycle (not soft reset).
Pricing and Configurations
| Mac Pro (Late 2013) Default Configurations | ||||||
| 4-Core Config | 6-Core Config | |||||
| CPU | Intel Xeon E5-1620 v2 | Intel Xeon E5-1650 v2 | ||||
| Base CPU Clock | 3.7GHz | 3.5GHz | ||||
| Max Turbo | 3.9GHz | 3.9GHz | ||||
| Cores / Threads | 4 / 8 | 6 / 12 | ||||
| L3 Cache | 10MB | 12MB | ||||
| Memory | 12GB ECC DDR3-1866 (3 x 4GB) | 16GB ECC DDR3-1866 (4 x 4GB) | ||||
| SSD | 256GB PCIe SSD | 256GB PCIe SSD | ||||
| GPU | Dual AMD FirePro D300 | Dual AMD FirePro D500 | ||||
| GPU Memory | 2GB GDDR5 per card | 3GB GDDR5 per card | ||||
| Network | Dual Gigabit LAN + 3-stream 802.11ac | Dual Gigabit LAN + 3-stream 802.11ac | ||||
| Thunderbolt 2 | 6 x Thunderbolt 2 Ports | 6 x Thunderbolt 2 Ports | ||||
| Display Support | 2 x 4K/60Hz + 1 x 4K/30Hz or up to 6 x 2560 x 1440 Thunderbolt/DisplayPort Displays | 2 x 4K/60Hz + 1 x 4K/30Hz or up to 6 x 2560 x 1440 Thunderbolt/DisplayPort Displays | ||||
| USB 3.0 | 4 x USB 3.0 Ports | 4 x USB 3.0 Ports | ||||
| Other IO |
Optical digital/analog audio out Headphone jack w/ headset+mic support Integrated speaker |
Optical digital/analog audio out Headphone jack w/ headset+mic support Integrated speaker |
||||
| Dimensions | 6.6 x 6.6 x 9.9" (L x W x H) | 6.6 x 6.6 x 9.9" (L x W x H) | ||||
| Weight | 11 lbs | 11 lbs | ||||
| Warranty | 1 Year Limited | 1 Year Limited | ||||
| Price | $2999 | $3999 | ||||
Apple offers two Mac Pro configurations with several upgrade options from the factory. The entry level machine remains a quad-core configuration with 12GB of RAM, while the high end model moves to a 6-core design with 16GB of RAM. Both ship with two GPUs by default, but you can upgrade the pair’s potency.
The Mac Pro’s pricing is point of contention given that the cheapest configuration starts at $2999 and can go all the way up to $9848 before adding in a display. Given the lower volumes we’re talking about here and the fact that Apple continues to only spec workstation hardware for the Mac Pro on the CPU (and somewhat on the GPU side, more on that later) I’m not sure we’ll see the same aggressive price drops that we’ve seen in other Mac segments.
The last time I did a Mac Pro vs. OEM PC comparison, Apple came out quite competitive on pricing although a DIY system wins by a huge margin. The same is true for the new Mac Pro. I poked around Dell, HP and Lenovo websites looking for comparable systems. It seems like Ivy Bridge EP systems are still a bit rare, with Dell not offering any. Both HP and Lenovo offered fairly comparable systems:
| Mac Pro vs. HP Z420 vs Lenovo S30 Pricing Comparison | |||||||
| Entry Level Mac Pro | HP Z420 | Lenovo ThinkStation S30 | |||||
| CPU | Intel Xeon E5-1620 v2 | Intel Xeon E5-1620 v2 | Intel Xeon E5-1620 v2 | ||||
| Memory | 12GB ECC DDR3-1866 (3 x 4GB) | 12GB ECC DDR3-1866 (3 x 4GB) | 12GB ECC DDR3-1600 (3 x 4GB) | ||||
| SSD | 256GB PCIe SSD | 256GB SATA SSD | 128GB SATA SSD | ||||
| GPU | Dual AMD FirePro D300 | Dual AMD FirePro W7000* | Dual NVIDIA Quadro K4000 | ||||
| GPU Memory | 2GB GDDR5 per card | 4GB GDDR5 per card | 3GB GDDR5 per card | ||||
| Network | Dual Gigabit LAN + 3-stream 802.11ac | Dual Gigabit LAN | Dual Gigabit LAN | ||||
| Thunderbolt 2 | 6 x Thunderbolt 2 Ports | 1 x Thunderbolt 2 Port | - | ||||
| USB 3.0 | 4 x USB 3.0 Ports | 4 x USB 3.0 Ports + 5 x USB 2.0 Ports | 2 x USB 3.0 Ports + 10 x USB 2.0 Ports | ||||
|
Dimensions (D x W x H) |
6.6 x 6.6 x 9.9" | 17.5 x 7.0 x 17.63" | 19.0 x 6.89 x 18.8" | ||||
| Weight | 11 lbs | ? | 38.5 lbs | ||||
| Warranty | 3 Year Limited (w/ AppleCare) | 3 Year Limited | 3 Year Limited | ||||
| Price | $3248 | $3695 + $795 for second W7000 GPU | $4373 | ||||
As I learned last time, there are typically some hefty discounts associated with workstation orders so take this pricing with a grain of salt. I also had to fudge the HP numbers a bit as I can only get a single FirePro W7000 in the Z420 configuration - I just doubled the W7000 adder in order to simulate what a theoretical dual GPU version would cost. There are other imbalances between the comparison (HP supports more displays, Apple features more Thunderbolt 2 ports, FirePro W7000 features ECC GDDR5, etc…), but the point here is to see if Apple’s pricing is out of touch with reality. It’s not.
The DIY PC route is still going to be more affordable. If we go the Ivy Bridge E route and opt for a Core i7-4930K, you get more cores than either of the options above for around $600 for the CPU. Adding in another $330 for a motherboard, $180 for 12GB of DDR3-1866 memory, $1400 for two W7000 GPUs and $220 for a fast SATA SSD (Samsung 840 Pro) we’re at $2730 for a configuration that would cost at least $3499 from Apple. That’s excluding case, PSU and OS, but adding another ~$350 takes care of that and still saves you some money. If you opt for Radeon HD 7870s instead of the W7000 you can knock another $1000 off of that total price. All of that being said, I don’t expect there to be a lot of cross shopping between DIY builders and those looking for a Mac Pro.
Setting Expectations: A Preview of What's to Come in Mobile
Sitting in the audience at the iPhone 5s launch I remember seeing this graph showing iPhone CPU performance increase since the first iPhone. Apple claimed a 41x increase in CPU performance if you compared the Cyclone cores in its A7 SoC to the ARM11 core in the first iPhone. What’s insane is just how short of a time period that comparison spans: 2007 - 2013.
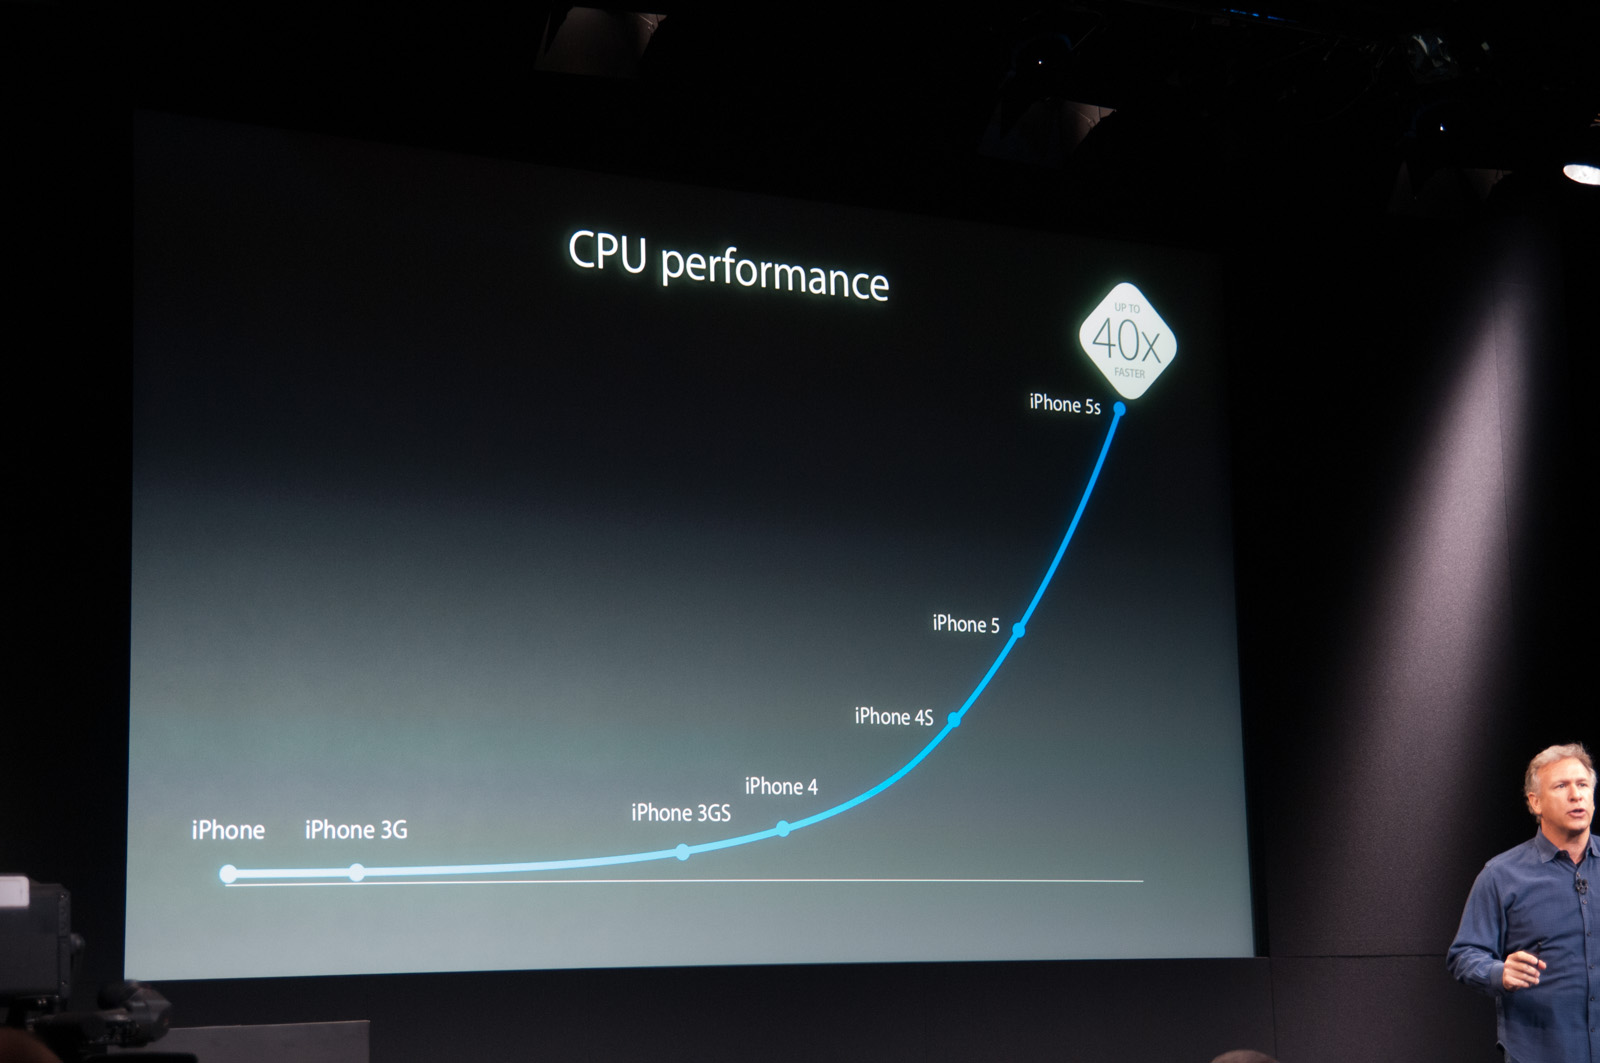
I ran SunSpider on all of the iPhones in our 5s review to validate Apple’s numbers. I came out with roughly a 100x increase in performance, or something closer to half of that if you could run later versions of iOS (with Safari/js perf improvements). SunSpider is a very CPU and browser bound workload, but even if we turn to something a bit closer to real world usage like Browsermark 2.0 I measured a 5x increase in CPU performance over the past 6 years of iPhones.
I frequently refer to the progress we’ve seen in mobile as being hyper-moore’s-law. Until recently, the gains in mobile hadn’t yet approached a point where they were limited by process technology. Instead it’s variables like cost or time to market that govern how much performance was delivered each year. We’re at the beginnings of all of this changing, and it’ll eventually look a lot like what we’ve had in the desktop and mobile CPU space for years now.
When performance results from the new Mac Pro first hit, there seemed to be disappointment in how small some of the gains were. If you compare it to the progress in CPU performance Apple has demonstrated on the other side of the fence, you’re bound to be underwhelmed.
Having personally reviewed every CPU architecture that has gone into the Mac Pro since its launch, I had a rough idea of what to expect from each generation - so I decided to put it all in a chart.
I went back through all of my Conroe, Penryn, Nehalem, Westmere and Ivy Bridge data, looked at IPC improvement in video encoding/3D rendering workloads and used it to come up with the charts below. I made a table of every CPU offered in the Mac Pro, and scaled expected performance according to max single and multicore turbo.
Let’s first start by looking at what you can expect if you always buy the absolute cheapest Mac Pro. That means starting off with the Xeon 5130, moving to the E5462, then the W3520, W3530, W3565 and ending up with the E5-1620 v2 in today’s Mac Pro. I’ve put all of the choices in the table below:
| Mac Pro - Cheapest Configuration Upgrade Path | ||||||||||
| CPU | Chips | Cores per Chip | Total Cores / Threads | Clock Base/1CT/MaxCT | Launch Price | |||||
| Mid 2006 | Xeon 5130 | 2 | 2 | 4 / 4 | 2.0/2.0/2.0 GHz | $2199 | ||||
| Early 2008 | Xeon E5462 | 1 | 4 | 4 / 4 | 2.8/2.8/2.8 GHz | $2299 | ||||
| Early 2009 | Xeon W3520 | 1 | 4 | 4 / 8 | 2.66/2.93/2.8 GHz | $2499 | ||||
| Mid 2010 | Xeon W3530 | 1 | 4 | 4 / 8 | 2.8/3.06/2.93 GHz | $2499 | ||||
| Mid 2012 | Xeon W3565 | 1 | 4 | 4 / 8 | 3.2/3.46/3.33 GHz | $2499 | ||||
| Late 2013 | Xeon E5-1620 v2 | 1 | 4 | 4 / 8 | 3.7/3.9/3.7GHz | $2999 | ||||
If you always bought the cheapest Mac Pro CPU offering, this is what your performance curve in both single and multithreaded workloads would look like:
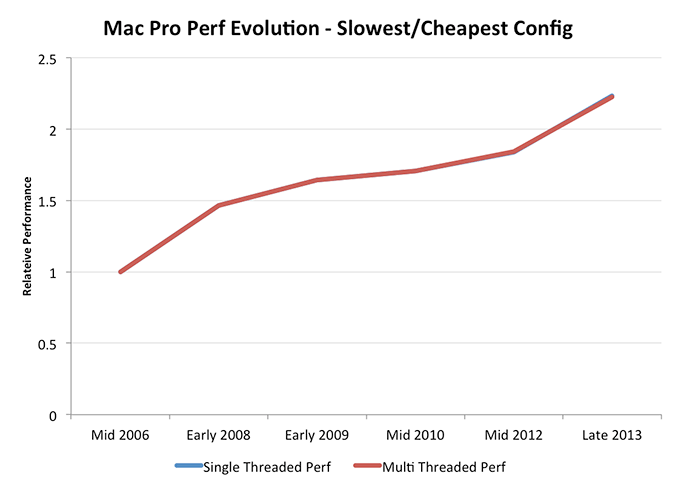
The first thing that stands out is both workloads follow roughly the same curve. The entry-level Mac Pro has always been a quad-core option, so you get no increased MT scaling (if you exclude the initial Nehalem bump from enabling Hyper Threading, which all subsequent Mac Pros have supported).
If you’ve always bought the slowest Mac Pro you’ll end up with a Mac Pro today that’s roughly 2.2x the performance of the very first Mac Pro. It’s a substantial increase in performance, but definitely not the sort of gains we’ve seen in mobile. For anyone who has been following the x86 CPU evolution over the past decade, this shouldn’t come as a surprise. There are huge power tradeoffs associated with aggressively scaling single threaded performance. Instead what you see at the core level is a handful of conservatively selected improvements. Intel requires that any new microarchitectural feature introduced has to increase performance by 2% for every 1% increase in power consumption. The result is the end of unabated increase in single threaded performance. The gains you see in the curve above are more or less as good as they get. I should point out that this obviously ignores the ~10% IPC gains offered by Haswell (since we don’t yet have a Haswell-EP). It’s also worth noting that Intel presently delivers the best single threaded performance in the industry. Compared to AMD alone you’re looking at somewhere around a 40% advantage, and ARM doesn’t yet offer anything that competes at these performance levels. It’s bound to be harder to deliver big gains when you’re at this performance level.
Back to the curve at hand, the increase in performance the 2013 Mac Pro offers is arguably one of the best upgrades over the life of the system - assuming you always opted for the entry level quad-core configuration.
What if you always did the opposite though and picked the highest-end CPU configuration? Same deal as before, I’ve documented the upgrade path in the table below:
| Mac Pro - Most Expensive Configuration Upgrade Path | ||||||||||
| CPU | Chips | Cores per Chip | Total Cores / Threads | Clock Base/1CT/MaxCT | Launch Price | |||||
| Mid 2006 | Xeon X5365 | 2 | 4 | 8 / 8 | 3.0/3.0/3.0 GHz | $3999 | ||||
| Early 2008 | Xeon X5482 | 2 | 4 | 8 / 8 | 3.2/3.2/3.2 GHz | $4399 | ||||
| Early 2009 | Xeon X5570 | 2 | 4 | 8 / 16 | 2.93/3.33/3.06 GHz | $5899 | ||||
| Mid 2010 | Xeon X5670 | 2 | 6 | 12 / 24 | 2.93/3.33/3.06 GHz | $6199 | ||||
| Mid 2012 | Xeon X5675 | 2 | 6 | 12 / 24 | 3.06/3.46/3.2 GHz | $6199 | ||||
| Late 2013 | Xeon E5-2697 v2 | 1 | 12 | 12 / 24 | 2.7/3.5/3.0 GHz | $6999 | ||||
Now things start to get interesting. For starters, single and multithreaded performance scaling is divergent. The high-end CPU option started as two quad-core CPUs but after three generations moved to a total of twelve cores. What this means is that after the early 2009 model you see a pretty significant increase in multithreaded performance for the fastest Mac Pro configuration. Scaling since then has been comparatively moderate as you’re looking at IPC and frequency improvements mostly with no change in core count.
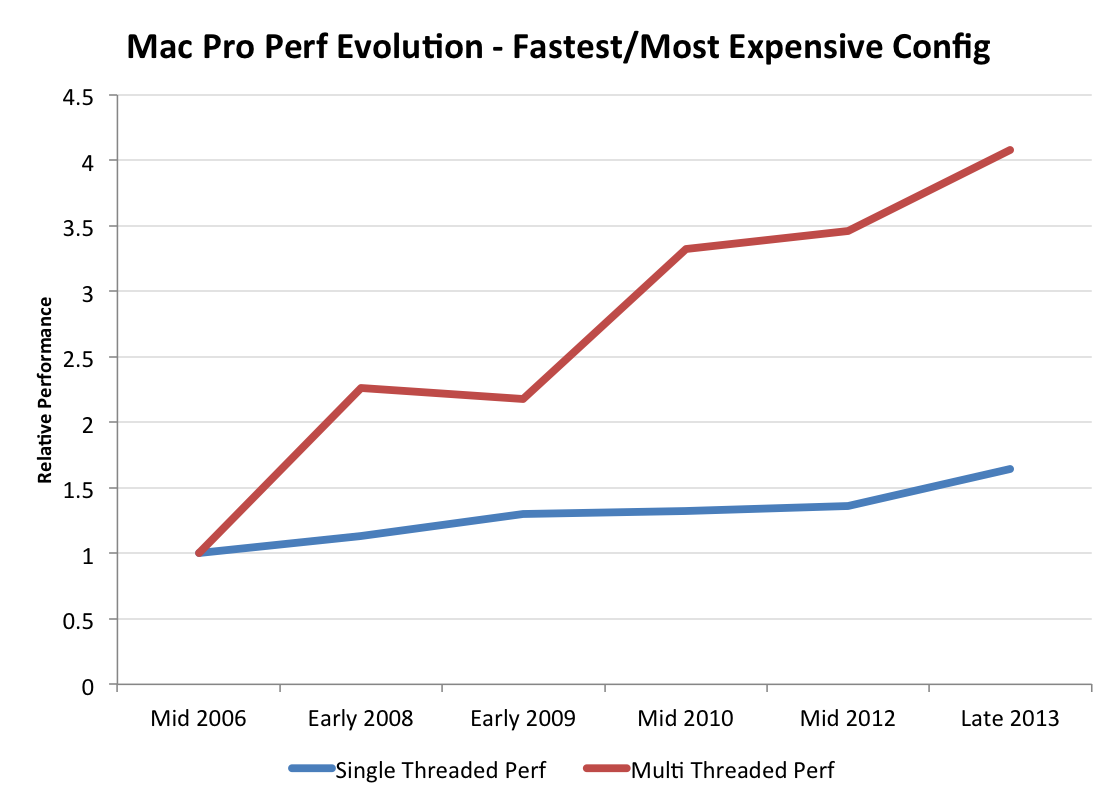
The single threaded performance improvement, by comparison, is fairly mild. If you bought the most expensive Mac Pro configuration back in 2006 you had a 3GHz part. In the past 7 years peak single core turbo has only improved by 30% to 3.9GHz. Granted there are other efficiency gains that help push the overall improvement north of 50%, but that’s assuming you haven’t purchased anything since 2006. If you bought into the Mac Pro somewhere in the middle and opted for a high-end configuration, you definitely won’t see an earth shattering increase in single threaded CPU performance. Note that we’re only looking at one vector of overall performance here. We aren’t taking into account things like storage and GPU performance improvements (yet).
For the third configuration I wanted to pick something in the middle. The issue is that there is no middle config for entirety of the Mac Pro’s history. In some cases shooting for the middle meant you’d end up with 4 cores, while other times it meant 6, 8 or 12. We settled on trying to shoot for a $4000 configuration each time and never go above it. It turns out that if you always had a $4000 budget for a Mac Pro and tried to optimize for CPU performance you’d end up with a somewhat bizarre upgrade path. The path we took is listed in the table below:
| Mac Pro - Mid-Range Configuration Upgrade Path | ||||||||||
| CPU | Chips | Cores per Chip | Total Cores / Threads | Clock Base/1CT/MaxCT | Launch Price | |||||
| Mid 2006 | Xeon 5160 | 2 | 2 | 4 / 4 | 3.0/3.0/3.0 GHz | $3299 | ||||
| Early 2008 | Xeon E5472 | 2 | 4 | 8 / 8 | 3.0/3.0/3.0 GHz | $3599 | ||||
| Early 2009 | Xeon W3580 | 1 | 4 | 4 / 8 | 3.33/3.6/3.46 GHz | $3699 | ||||
| Mid 2010 | Xeon W3680 | 1 | 6 | 6 / 12 | 3.33/3.6/3.46 GHz | $3699 | ||||
| Mid 2012 | Xeon E5645 | 2 | 6 | 12 / 24 | 2.4/2.67/2.4 GHz | $3799 | ||||
| Late 2013 | Xeon E5-1650 v2 | 1 | 6 | 6 / 12 | 3.5/3.9/3.6 GHz | $3999 | ||||
Around $4000 the Mac Pro went from a quad-core system to eight-cores, back down to four cores, then up to six, then twelve and finally settling back at six cores this generation. What this means is a cycling between improving single and multithreaded performance over the course of the past 7 years:
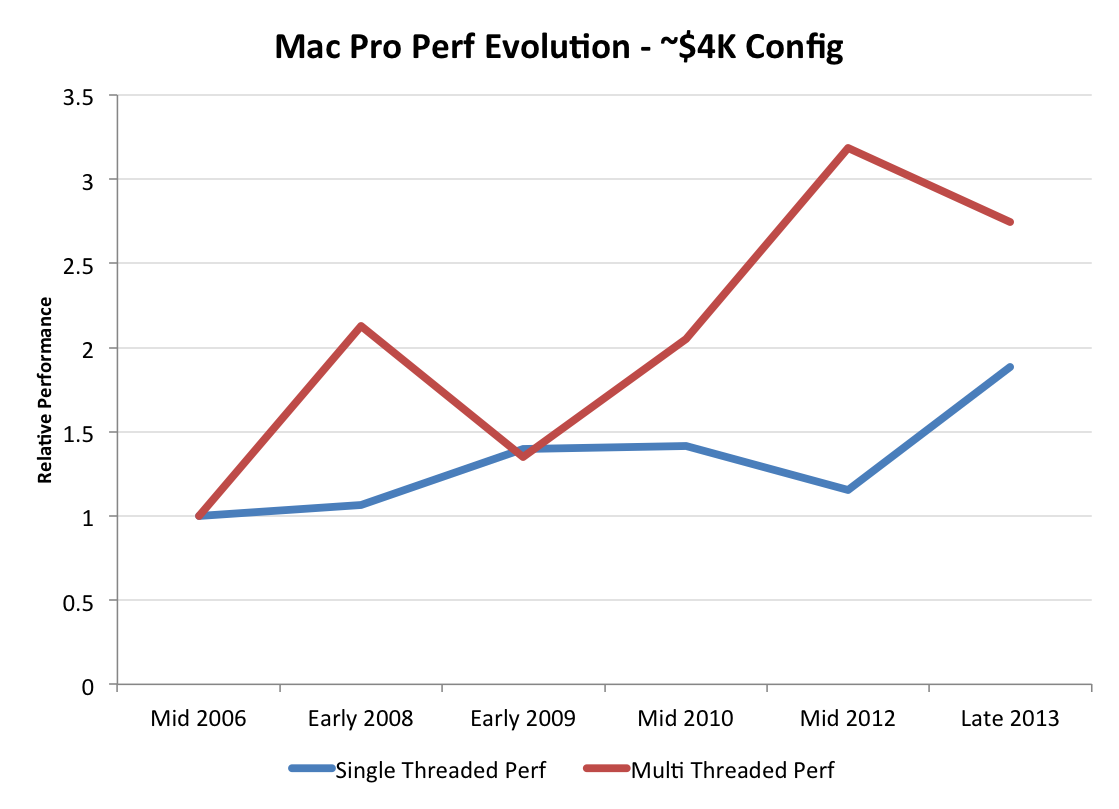
Here’s where the comparison gets really interesting. If you spent $3799 on a Mac Pro last year, in order to see a multithreaded performance uplift on the CPU side you’d need to spend more this year. Single threaded performance on the other hand sees a big uptick compared to last year. The 2012 $4K config is the outlier however, if you have a budget fixed at $4000 then a 2013 Mac Pro will be quicker in all aspects compared to any previous generation Mac Pro at the same price point.
The bigger takeaway from this is the following: the very same limited gains in CPU performance will eventually come to ultra mobile devices as well. It’s only a matter of time before those CPU curves flatten out. What that does to the smartphone/tablet market is a discussion for another day.
Plotting the Mac Pro’s GPU Performance Over Time
The Mac Pro’s CPU options have ballooned at times during its 7 year history. What started with four CPU options grew to six for the early 2009 - mid 2010 models. It was also during that time period that we saw an expansion of the number of total core counts from 4 up to the current mix of 4, 6, 8 and 12 core configurations.
What’s particularly unique about this year’s Mac Pro is that all configurations are accomplished with a single socket. Moore’s Law and the process cadence it characterizes leave us in a place where Intel can effectively ship a single die with 12 big x86 cores. It wasn’t that long ago where you’d need multiple sockets to achieve the same thing.
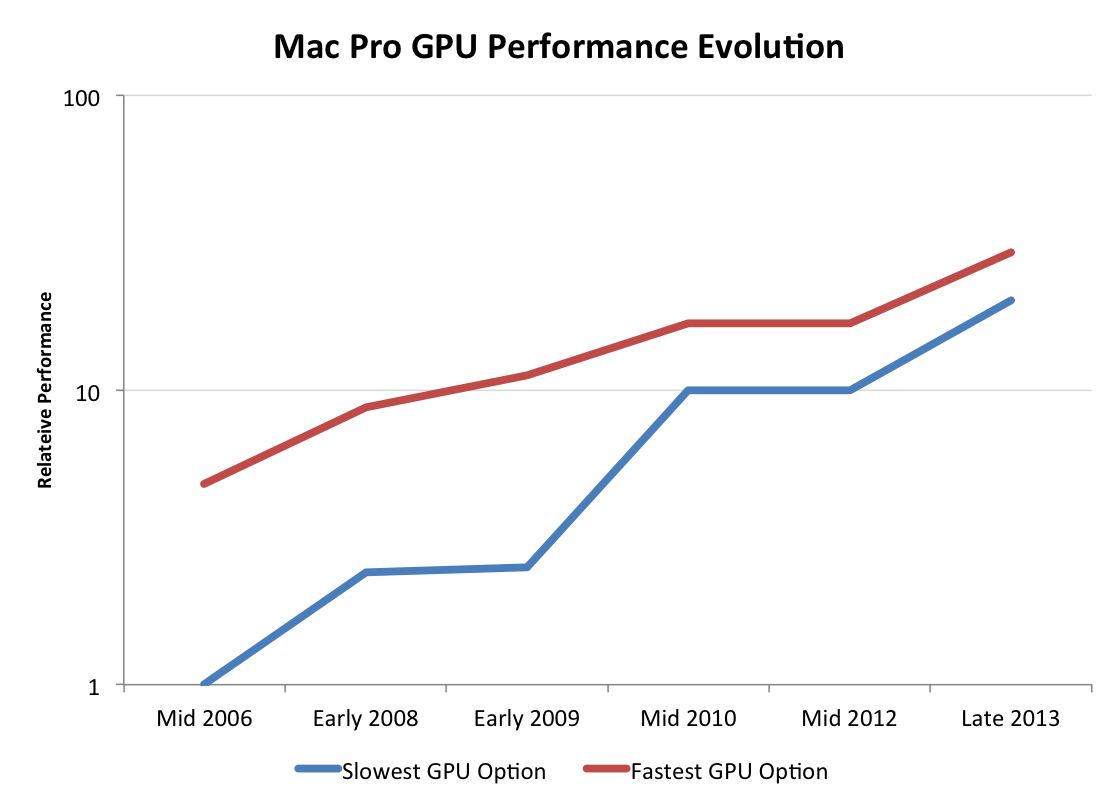
While the CPU moved to a single socket configuration this year, the Mac Pro’s GPU went the opposite direction. For the first time in Mac Pro history, the new system ships with two GPUs in all configurations. I turned to Ryan Smith, our Senior GPU Editor, for his help in roughly characterizing Mac Pro GPU options over the years.
| Mac Pro - GPU Upgrade Path | ||||||||||
| Mid 2006 | Early 2008 | Early 2009 | Mid 2010 | Mid 2012 | Late 2013 | |||||
| Slowest GPU Option | NVIDIA GeForce 7300 GT | ATI Radeon HD 2600 XT | NVIDIA GeForce GT 120 | ATI Radeon HD 5770 | ATI Radeon HD 5770 | Dual AMD FirePro D300 | ||||
| Fastest GPU Option | NVIDIA Quadro FX 4500 | NVIDIA Quadro FX 5600 | ATI Radeon HD 4870 | ATI Radeon HD 5870 | ATI Radeon HD 5870 | Dual AMD FirePro D700 | ||||
Since the Mac Pro GPU offerings were limited to 2 - 3 cards per generation, it was pretty easy to put together comparisons. We eliminated the mid range configuration for this comparison and only looked at scaling with the cheapest and most expensive GPU options each generation.
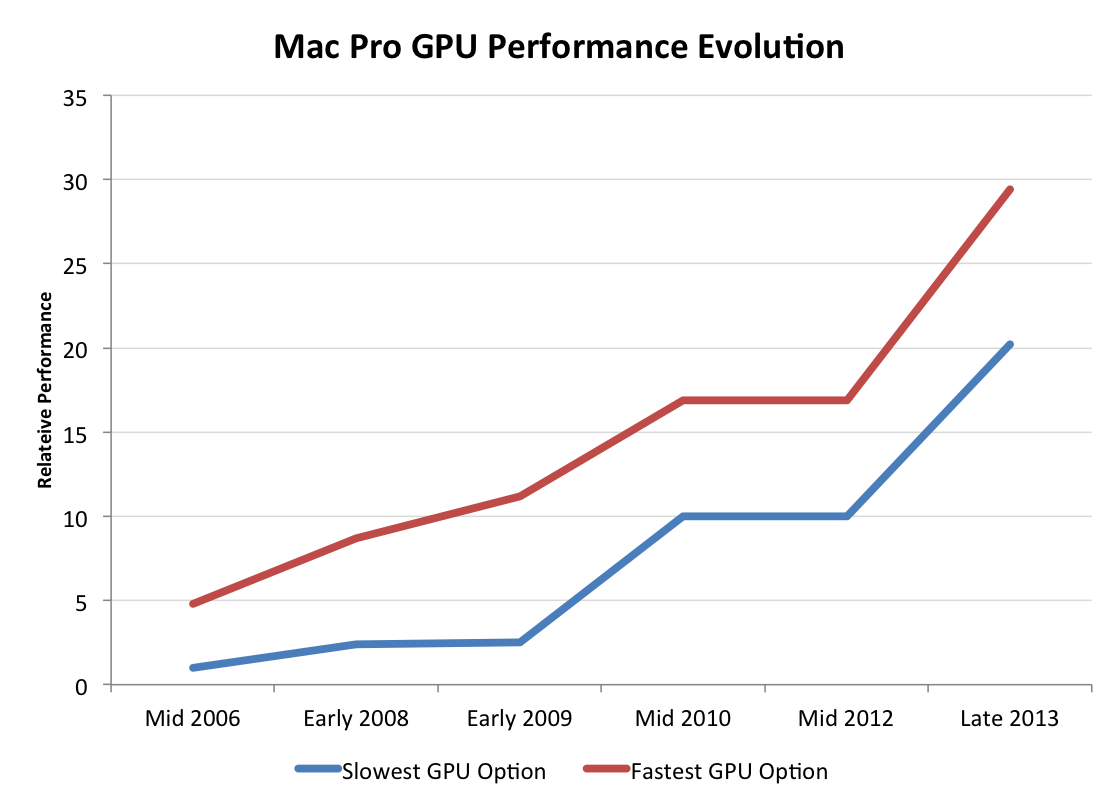
Now we’re talking. At the low end, Mac Pro GPU performance improved by 20x over the past 7 years. Even if you always bought the fastest GPU possible you'd be looking at a 6x increase in performance, and that's not taking into account the move to multiple GPUs this last round (if you assume 50% multi-GPU scaling then even the high end path would net you 9x better GPU performance over 7 years).
Ryan recommended presenting the data with a log scale as well to more accurately depict the gains over time:
Here you see convergence, at a high level, between the slowest and fastest GPU options in the Mac Pro. Another way of putting it is that Apple values GPU performance more today than it did back in 2006, so even the cheapest GPU is a much higher performing part than it would be.
If you’re a GPU company (or a Senior GPU Editor), this next chart should make you very happy. Here I’m comparing relative increases in performance for both CPU and GPU on the same graph:
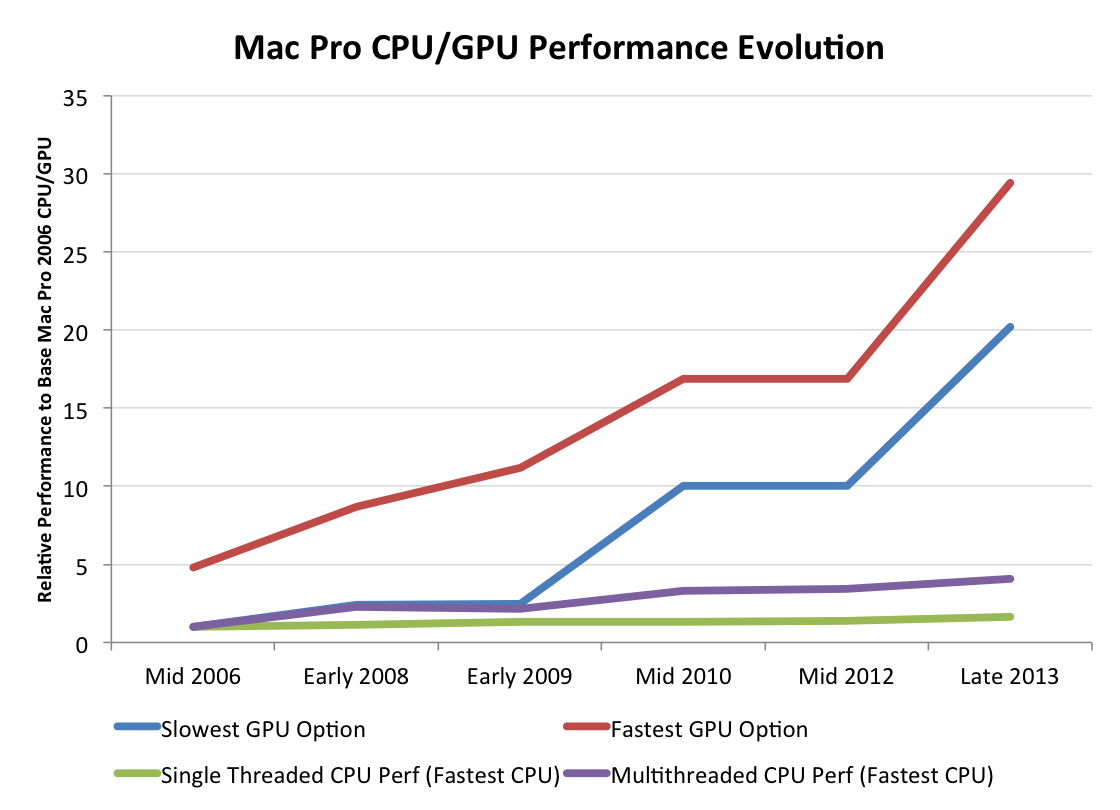
This is exactly why Apple (and AMD) is so fond of ramping up GPU performance: it’s the only way to get serious performance gains each generation. Ultimately we’ll see GPU performance gains level off as well, but if you want to scale compute in a serious way you need to heavily leverage faster GPUs.
This is the crux of the Mac Pro story. It’s not just about a faster CPU, but rather a true shift towards GPU compute. In a little over a year, Apple increased the GPU horsepower of the cheapest Mac Pro by as great of a margin as it did from 2006 - 2012. The fastest GPU option didn’t improve by quite as much, but it’s close.
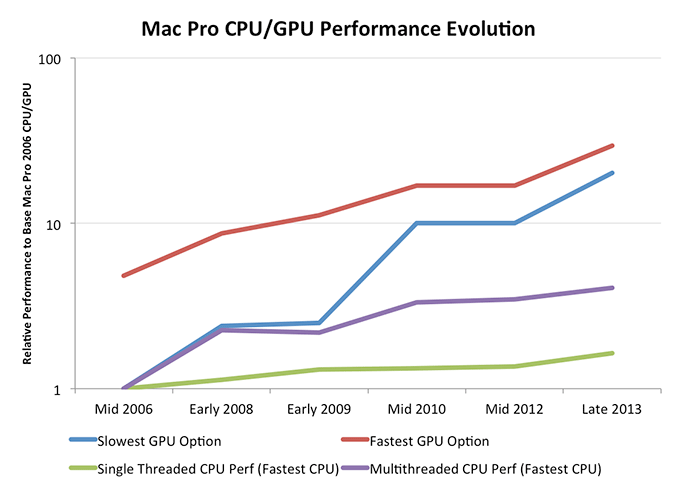
Looking at the same data on a log scale you’ll see that the percentage increase in GPU performance is slowing down over time, much like what we saw with CPUs, just to a much lesser extent. Note that this graph doesn't take into account that the Late 2013 Mac Pro has a second GPU. If we take that into account, GPU performance scaling obviously looks even better. Scaling silicon performance is tough regardless of what space you’re playing in these days. If you’re looking for big performance gains though, you’ll need to exploit the GPU.
The similarities between what I’m saying here about GPU performance and AMD’s mantra over the past few years aren’t lost. The key difference between Apple’s approach and those of every other GPU company is that Apple spends handsomely to ensure it has close to the best single threaded CPU performance as well as the best GPU performance. This is an important distinction, and ultimately the right approach.
CPU Choices
Had I gotten around to publishing my rMBP review prior to this one you would’ve seen my praise Apple’s CPU selection abilities as of late. Outfitting all 15-inch rMBPs with Crystalwell was a very wise move on Apple’s part. With the Mac Pro the CPU selection is good, but the decision of what to buy is far more complex than in any other product line.
The Mac Pro not only serves as Apple’s ultra high end Mac, but it’s the only option if your needs exceed that of an iMac or 15-inch MacBook Pro. Literally anyone who needs more performance than Apple offers in an all-in-one or a notebook inevitably is pushed to consider the Mac Pro. With a relatively broad professional audience in mind, Apple offers more CPU options for the Mac Pro than on any other shipping Mac:
| Mac Pro (Late 2013) CPU Options | ||||||
| Intel CPU | Xeon E5-1620 v2 | Xeon E5-1650 v2 | Xeon E5-1680 v2 | Xeon E5-2697 v2 | ||
| Cores / Threads | 4 / 8 | 6 / 12 | 8 / 16 | 12 / 24 | ||
| CPU Base Clock | 3.7GHz | 3.5GHz | 3.0GHz | 2.7GHz | ||
| Max Turbo (1C) | 3.9GHz | 3.9GHz | 3.9GHz | 3.5GHz | ||
| L3 Cache | 10MB | 12MB | 25MB | 30MB | ||
| TDP | 130W | 130W | 130W | 130W | ||
| Intel SRP | $294 | $583 | ? | $2614 | ||
| Apple Upgrade Cost (Base Config) | - | +$500 | +$2000 | +3500 | ||
| Apple Upgrade Cost (High End Config) | - | - | +$1500 | +3000 | ||
There are four CPU options, each with varying core counts. The more cores you get, the lower your base CPU frequency is. In the old days, that would be the end of the discussion - you either choose more cores or more frequency, a tradeoff that is ultimately determined by your workload. Starting with its Nehalem architecture back in 2008, Intel introduced two key technologies that changed the face of multicore on the desktop: power gating and turbo boost. The former is a technology that can almost entirely remove power to a core (both active and leakage) when idle, while the second takes advantage of that freed up thermal budget to drive any active core(s) at higher frequencies. Subsequent implementations of Intel’s Turbo Boost technology have scaled the aggressiveness of this opportunistic frequency scaling, but the basic principle remains the same.
Apple advertises core count and base frequency for all of the Mac Pro CPU options, but to really understand what you’re getting yourself into you need to look at each CPU’s max turbo states vs. number of active cores. Neither Apple nor Intel do a great job of publicly exposing this information, Apple avoids doing so in order to keep things clean/simple, and Intel avoids doing so because perhaps it’s fun? Either way I’ve compiled the data on the four CPU options into the charts below.
I've left base clocks out of the graphs although you can see them noted in the legend at the bottom of each chart.
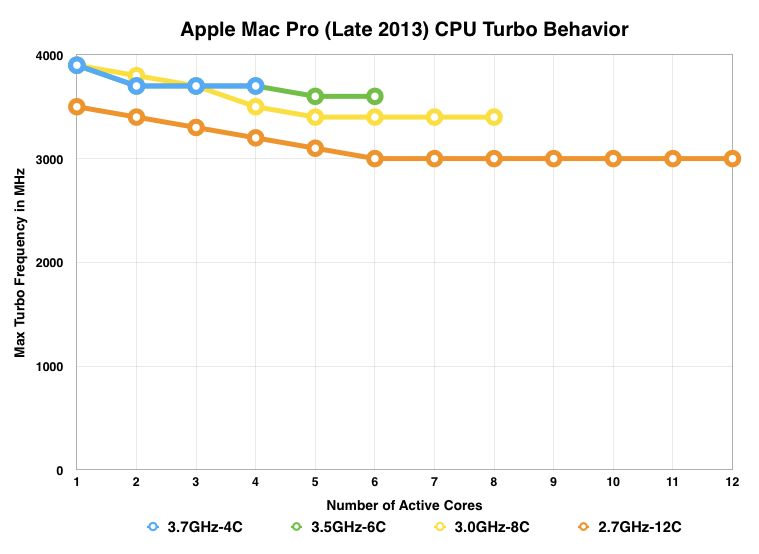
This first chart has the y-axis starting at 0MHz, but the next one is the more interesting as it starts at 2.7GHz and better illustrates/exaggerates the sort of frequency tradeoff you can expect vs. core count:

The 4, 6 and 8 core CPU options all offer the same peak single core frequency (3.9GHz). This is very important as single threaded performance remains the gate for system responsiveness outside of thread heavy applications. The 12-core CPU sacrifices around 10% of this peak single core performance.
Early on the 8-core CPU holds the advantage over the rest, being able to hit a higher 2-core max turbo. The octa-core’s crossover point happens at 3 active cores, beyond this point the quad and six core CPUs maintain a slight max turbo advantage.
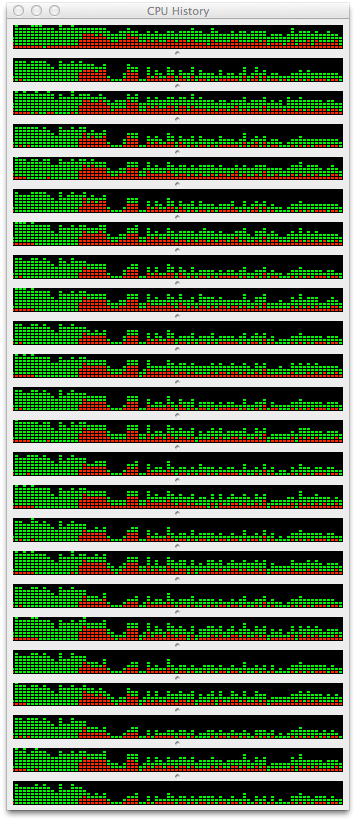
The key takeaway here is that more cores isn’t necessarily better. You need to weigh the needs of your applications against the number of cores in your system. There is no one-size-fits-all answer here. For kicks I looked at the CPU load for a handful of my benchmarks:
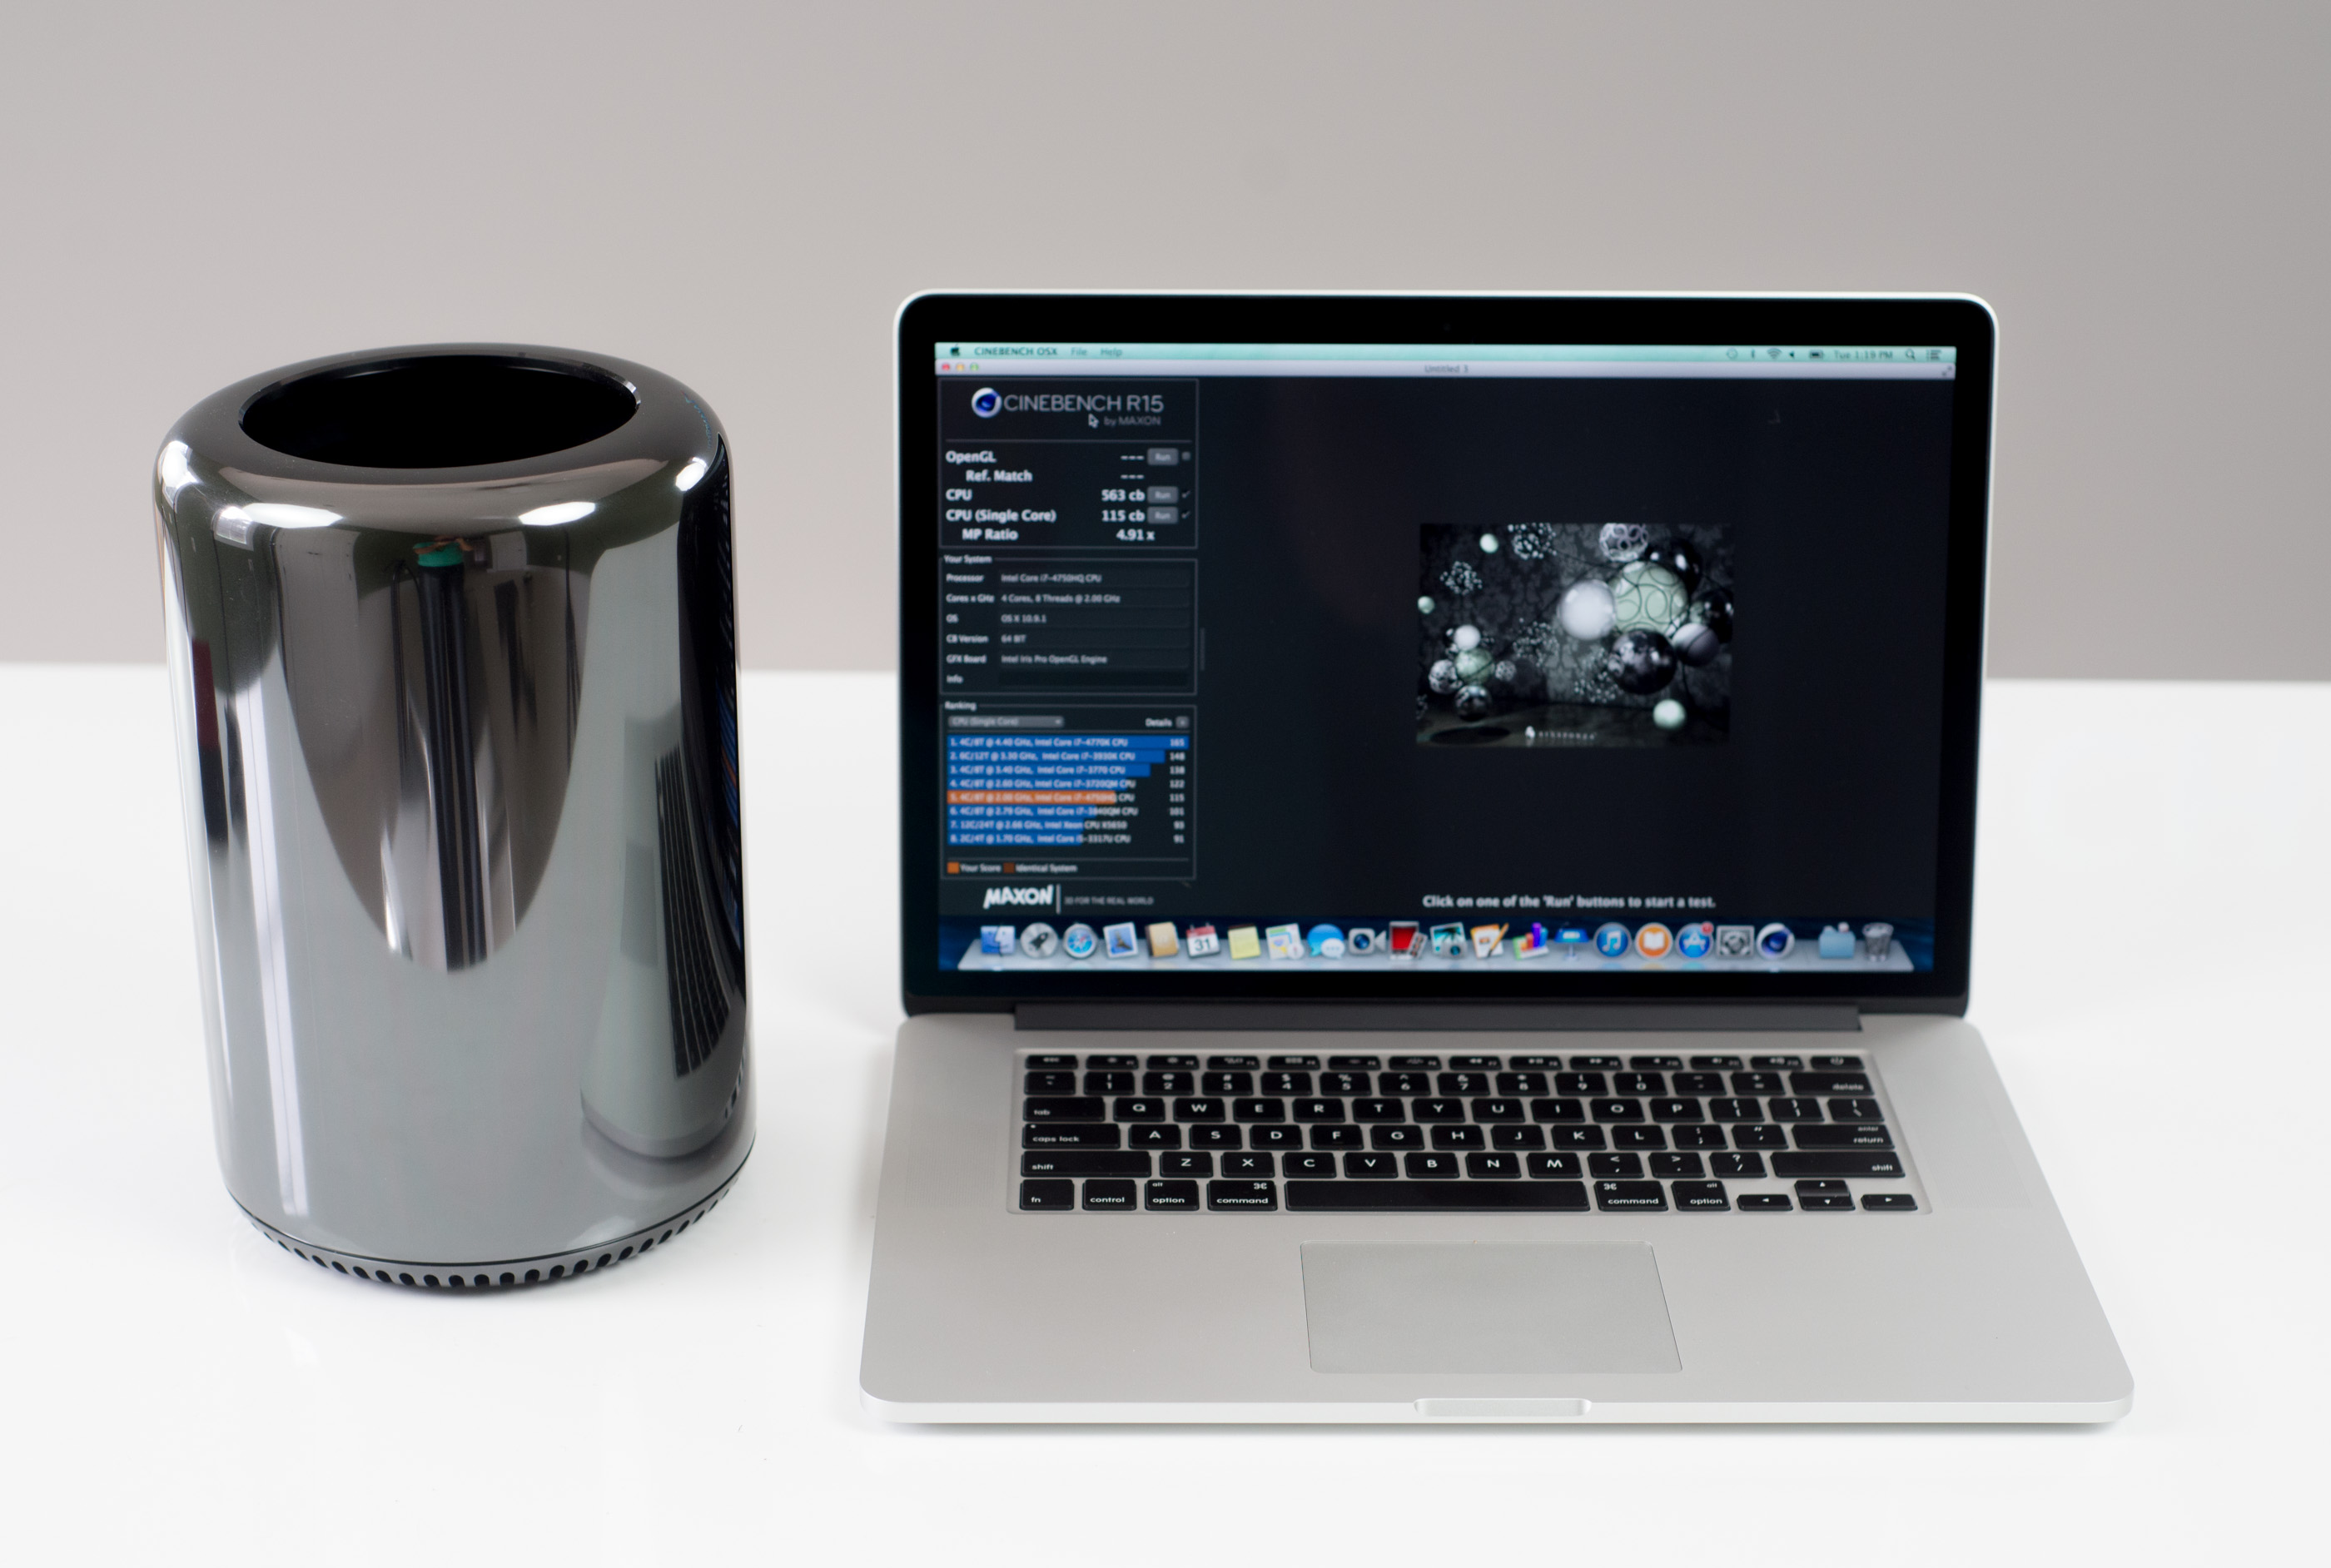
![]()
![]()
![]()
Application version seems to have a huge impact on threading. Running our Photoshop benchmark on CS5 vs. CS6 is the difference between loading 2 - 8 cores vs. 3 - 10. The same is true if I compare Final Cut Pro 10.0 vs. 10.1; the latest version from Apple (optimized for the new Mac Pro), makes great use of all 12 cores/24 threads. Workload also has an impact. I took our old Final Cut Pro 10.0 benchmark (1080p) and ran it on 10.1, saw a maximum of 1217% CPU usage. I ran our new 4K benchmark on 10.1 and saw nearly full virtual core utilization (2114% CPU usage).
![]()
Final Cut Pro 10.0 - 1080p Benchmark
![]()
Final Cut Pro 10.1 - 1080p Benchmark
![]()
Final Cut Pro 10.1 - 4K Benchmark
Offline 3D rendering applications typically have the easiest time of chewing up tons of cores, while many others are likely better suited by having fewer cores running at a higher frequency. There's also a serious multitasking benefit if you're the type of person that runs multiple thread heavy workloads in parallel. It's pretty nice having a fairly responsive system while rendering a beefy 4K project in Final Cut Pro. The responsiveness comes courtesy of having a ton of cores in addition to extremely fast IO. That PCIe SSD definitely comes in handy.
If you want the best balance of heavily threaded performance without sacrificing performance in lighter workloads, the 8-core configuration seems to be the best bet. There are definitely bragging rights associated with the 12-core system, but unless you absolutely need a ton of cores you’re likely better suited by the 8-core configuration.
CPU Performance
I like to have large historical databases of performance so I can put new products in perspective. The Mac Pro and its funny lineage make this a little difficult. For starters, I simply haven't reviewed all of the Mac Pro CPU combinations that have existed over the years. Then there's also the fact that not all of my Mac suite applies well to a 12-core/24-thread Mac Pro. I'm going to try my best to put the new Mac Pro's performance in perspective, but it's going to require a couple of subsections.
Let's first start with a look at the historical performance of the Mac Pro. I really have to thank @elfurberino and @tapbot_paul for lending their time (and their Mac Pros) to help flesh out this comparison. With their help I managed to put together performance data for almost every single generation of Mac Pro.
We'll start with Cinebench R10's single threaded test. Unfortunately the benchmark crashes on Macs with 16+ threads so single threaded performance is all we'll be able to look at:
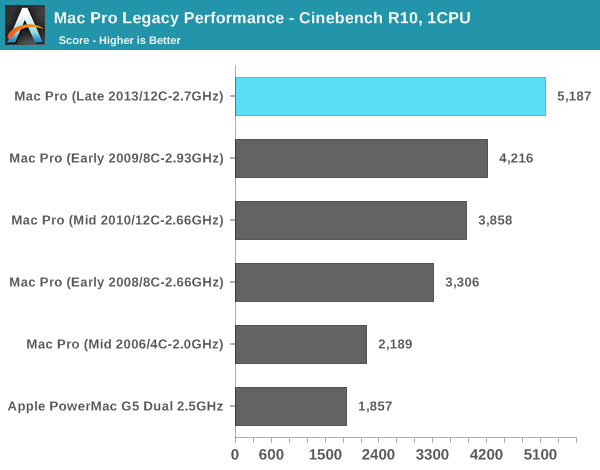
That's right, I still have my old PowerMac G5 Dual 2.5GHz (upgrade from my original 2.0 model). It's interesting to note that single threaded performance has only improved by 2.8x over that 2.5GHz dual G5 machine from around a decade ago. If we were able to also look at multithreaded performance we'd see a much larger gap. The dual G5's multithreaded performance is actually lower than the single threaded performance of the new Mac Pro's IVB-EP (3346 vs 5187). And the new Mac Pro has 12 of those cores.
Here you can see a very healthy increase in single threaded performance over the 2010/2012 12-core system. The 34% increase in performance is because the Mac Pro never got the Sandy Bridge bump. All previous Mac Pros topped out at Nehalem/Westmere. Couple all of the Sandy Bridge improvements with the much higher peak clock speeds (3.5GHz vs. 3.0GHz) and the performance gains make sense.
The 8C system from early 2009 gives us an example of how it's very possible to have a newer Mac Pro actually perform worse than its predecessor. Apple has done a relatively good job this round of keeping the core count/frequency tradeoffs sensible, but you still have to align your silicon choices to your workload.
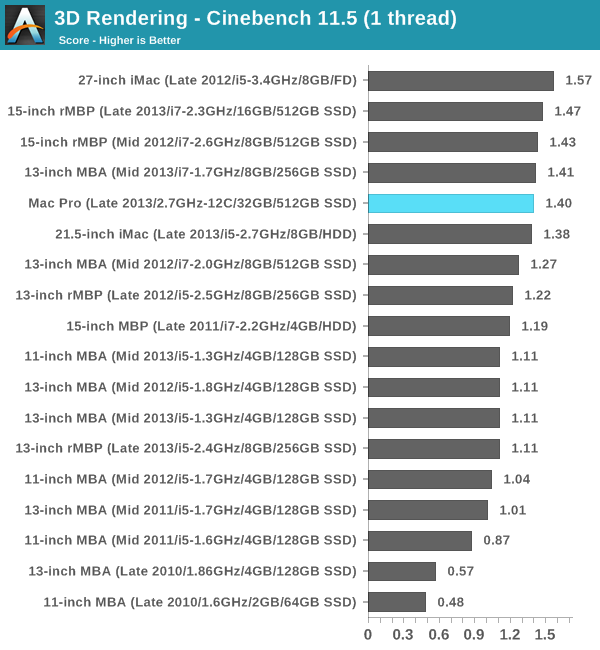
Moving on to Cinebench 11.5, we lose the PowerMac G5 comparison but we gain a more modern benchmark. Once again we'll start with the single threaded numbers:
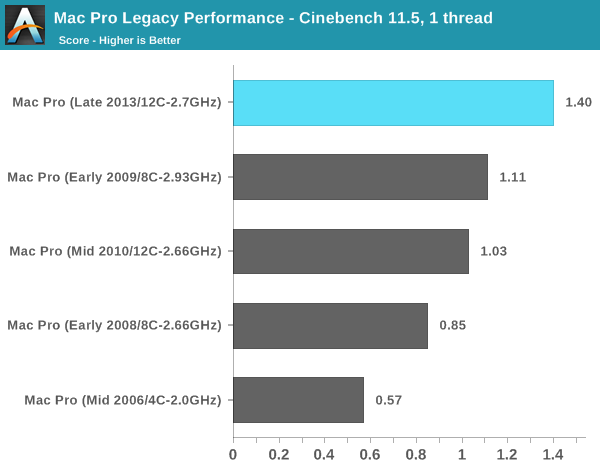
There's that healthy single threaded performance bump again. It is pretty incredible to me just how far we've come in single threaded performance since the mid-2000s. What's even crazier is that 2.0GHz Mac Pro from 2006 is only about 40% faster than a Bay Trail tablet with an Atom Z3770.
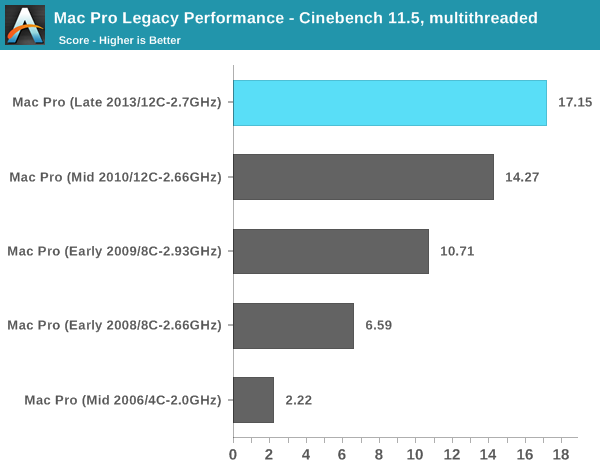
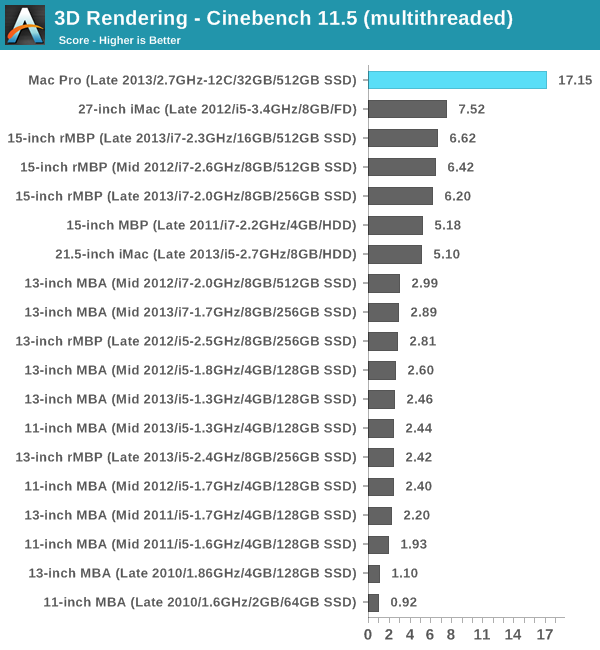
The multithreaded story is more evolutionary for sure, especially compared to the previous generation 12-core model. Here we're showing a 20% gain over the previous 12-core design. If you're migrating from a machine with fewer cores you can expect a corresponding increase in multithreaded performance. What is most surprising here is that a 2.3GHz 15-inch MacBook Pro with Retina Display (Late 2013) actually offers better multithreaded performance than the 8-core 2.66GHz Mac Pro from early 2008 in the chart above. The new 15-inch rMBP scores a 6.62 here compared to the 6.58 of that old Mac Pro.
I also shared my Firefox build test with Adam and Paul, who helped me fill out the chart below:
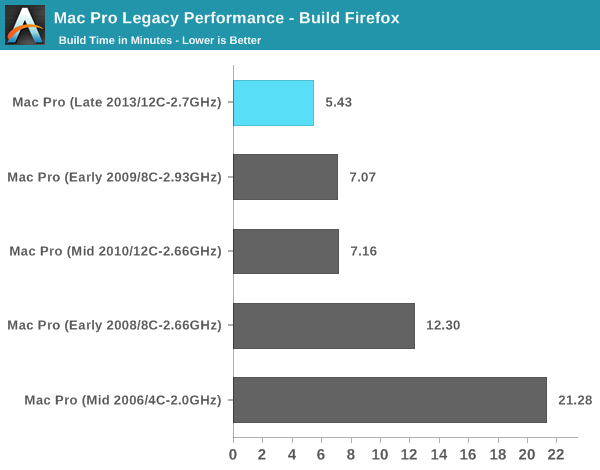
There isn't much of an advantage to having 12 cores here, but the new Mac Pro does deliver an amazingly quick build time compared to anything else. The new Mac Pro is good for around a 24% improvement in build performance compared to the outgoing 12-core model.
Putting Mac Pro Performance in Perspective: Professional Apps
With the legacy Mac Pro comparison out of the way, I wanted to put the Mac Pro's performance in perspective relative to other high-end, modern Macs. I grabbed the 2012 15-inch rMBP, the entry level and upgraded 2013 15-inch rMBPs as well as the new 27-inch Haswell iMac for comparison. I also included my 2009 8-core Mac Pro. I received a reader request to try running the Cycles benchmark in Blender (an open source 3D renderer), so I'll start with that:
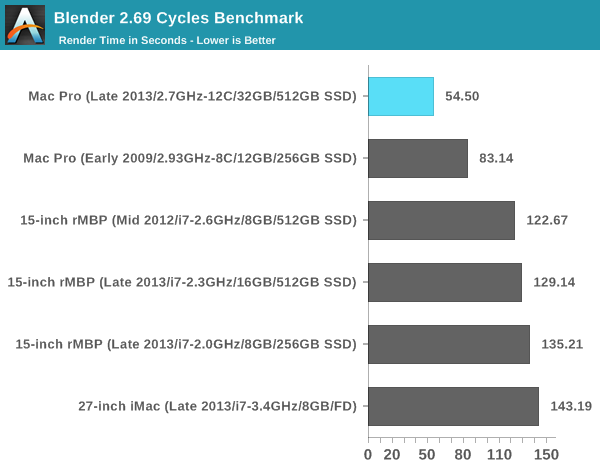
Under OS X, this is still a CPU test - the GPUs remain idle and out of the picture here. If you're wondering why the 27-inch iMac doesn't do so hot here, it's because I'm testing the 4 core/4 thread Core i5 version while the rMBPs all have Hyper Threading enabled and are thus 4 core/8 thread configs. The extra logical core per physical core definitely increases architectural utilization/efficiency in this well-threaded test.
Here we have an example where Haswell's IPC improvements don't do a whole lot, which is music to the ears of those considering buying a Mac Pro now vs. when Haswell EP hits in about a year. There's a clear benefit to opting for even the compact Mac Pro over any of Apple's other Macs. The improvement in performance, particularly with the 12-core configuration, is astounding. The Mac Pro completes the rendering work in less than half of the time of the rMBP.
For my next two tests I'm going to be looking at Final Cut Pro 10.1 performance. Given how much Apple is focused on 4K video editing as a usage model for the new Mac Pro, I went out and filmed a bunch of samples in 4K and created a couple of benchmarks to stress the new Mac Pro. As I mentioned earlier, most effects rendering in FCP 10.1 seems to take place on the GPU(s) while everything else seems more CPU bound. For my first test I wanted a project that was lighter on the GPU, so I had a minimal number of effects and no transitions. While the GPU still plays a role (as you'll see below), this should be a good CPU test. I confirmed that portions of the test had no problems keeping all 12 cores/24 hardware threads busy, while others stayed around the 5 - 8 core range.
You'll notice that I have two configurations of the early 2009 Mac Pro listed. One features the machine's stock NVIDIA GeForce GT 120, while the other has been upgraded to Sapphire's Radeon HD 7950 Mac Edition. The only other point I should make is the 2.0GHz 2013 15-inch rMBP configuration features no discrete GPU, it only has Intel's Iris Pro graphics. The 2.3GHz model does feature an NVIDIA GeForce GT 750M GPU.
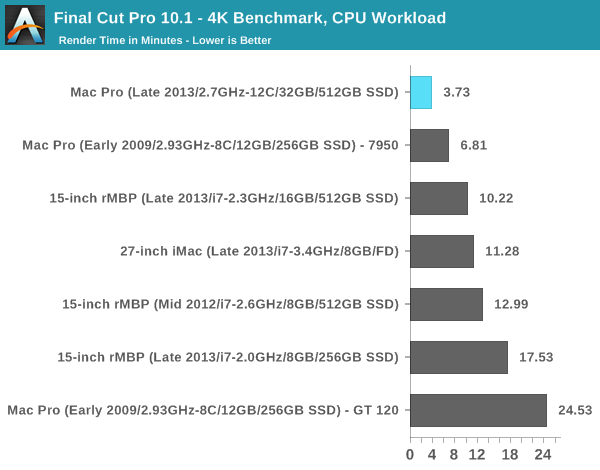
The first thing I noticed while running this test is how much the workload can impact CPU core utilization. Even though I was dealing with a substantial 4K project, only portions could spawn enough work to keep all 12 cores/24 threads busy. I suspect for video work the optimal cost/performance combination may be the 8-core/3.0GHz part. That being said, it is nice to have a handful of available cores to keep system responsiveness up even while working on rendering a big video project.
I made a point to talk about the GPU configurations before presenting the chart for a good reason: Final Cut Pro 10.1 appears to be incredibly dependent on GPU performance, especially when there's any sort of effects rendering going on. Note that simply moving to a lower clocked Haswell and ditching the discrete GPU causes the 15-inch rMBP to take more than 70% longer to complete this benchmark. I'm not sure how much of this has to do with Intel's graphics drivers just not being optimized for FCP's OpenCL workload, but if you're planning on doing any real work in the latest Final Cut Pro you're going to want a discrete GPU.
The new Mac Pro completed my first FCP 10.1 render test in around half the time of the older 2009 8-core Mac Pro with the upgraded GPU. Without the upgraded GPU, despite this being a very CPU bound test, the older Mac Pro is absolutely destroyed by the new config. The new Mac Pro manages to complete my 4K test in less than 1/6 of the time of the 2009 model without any ugprades.
The next FCP 10.1 benchmark adds in a significant number of effects and transitions to drive up GPU usage. I'm presenting two charts, one without the Iris Pro rMBP and GT 120 Mac Pro and one with them included:
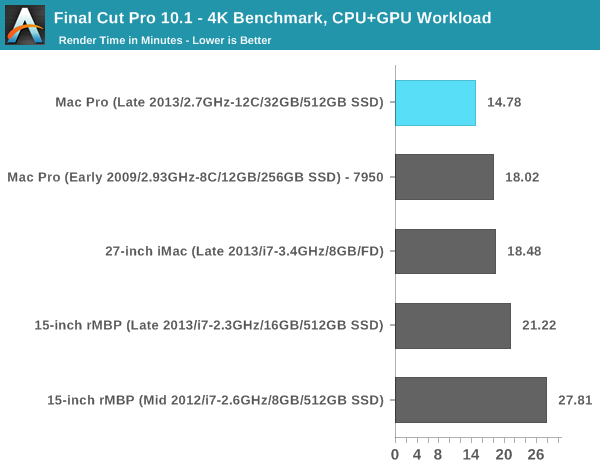
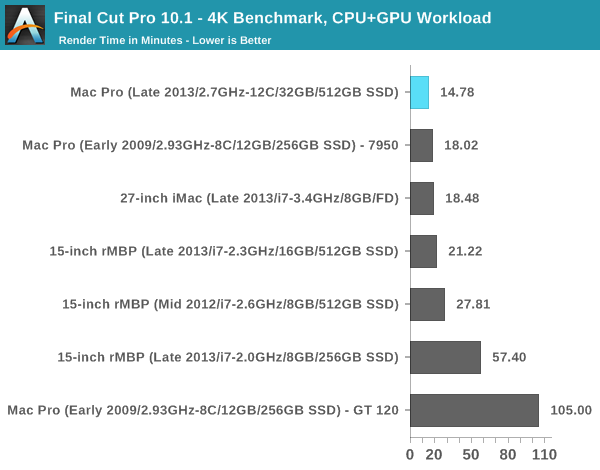
The difference in performance between Intel's Iris Pro graphics and NVIDIA's GeForce GT 750M is staggering. The Iris Pro rMBP15 configuration takes nearly an hour to complete my test, while the dGPU configuration does it in a little over 21 minutes. Here the 27-inch iMac's beefy GPU seems to help make it faster than the rMBP notebooks. The new Mac Pro pulls ahead of the upgraded 2009 model, though not by as much as I would've expected. The second GPU isn't being used as much as it could be it seems. Once again, a standard 2009 model wouldn't fare nearly as well here. Even with a Radeon HD 4870 I bet we'd be seeing significantly lower performance.
The default GT 120 GPU gives us a slight indication of what a slower GPU would do to FCP performance here. What took the new Mac Pro with its dual FirePro D700s under 15 minutes to do, took an hour and 45 minutes to do on the 2009 model with entry level GPU. The same system but with a Sapphire Radeon HD 7950 dropped its render time to 18 minutes.
It is really surprising just how big of an impact GPU performance can have on Final Cut Pro 10.1. It makes total sense that Apple went dual GPUs top to bottom with the new Mac Pro. It seems the latest version of Final Cut Pro was designed with the new Mac Pro in mind, which is unfortunate for anyone who was hoping to get by with an older Mac Pro with a far less capable GPU. It's very clear to me that the Mac Pro is really designed to be an upgrade on all fronts (CPU, GPU, SSD and external IO). The question is how many of those parts have existing Mac Pro users upgraded on their own. The answer to that will ultimately determine how big of a step forward the new Mac Pro really is.
Mac Pro vs. Consumer Macs
For my final set of CPU performance charts I put the new Mac Pro through the same set of tests I do all new Macs. There are definitely multithreaded components to these tests (some are indeed highly threaded), but the suite also values good single threaded performance. Here we'll get an idea of how the new Mac Pro, in its most expensive configuration, fares as a normal Mac.
I've already gone through Cinebench 11.5 results, but the following graphs should put in perspective the Mac Pro's performance relative to all consumer Macs:
If there's one graph that tells the story of why Intel's workstation roadmap is ridiculous, it's this one. The Mac Pro follows Intel's workstation roadmap, which ends up being cut down versions of Intel's server silicon, which happens to be a generation behind what you can get on the desktop. So while the latest iMac and MacBook Pro ship with Intel's latest Haswell cores, the Mac Pro uses what those machines had a year ago: Ivy Bridge. Granted everything else around the CPU cores is beefed up (there's more cache, many more PCIe lanes, etc...), but single threaded performance does suffer as a result.
Now part of this is exaggerated by the fact that I'm reviewing the 2.7GHz 12-core Mac Pro configuration. Single core turbo tops out at 3.5GHz vs. 3.9GHz for the rest of the parts. I suspect if you had one of the 8-core models you'd see peak single threaded performance similar to what the 2012 27-inch iMac delivers. The 2013 27-inch iMac with its fastest CPU should still be quicker though. We're not talking about huge margins of victory here, a matter of a handful of percent, but as a much more expensive machine it's frustrating to not see huge performance leadership in all areas.
The Mac Pro is designed to offer competitive single threaded performance, but really deliver for everyone who depends on great multithreaded performance:
If you need more cores, the Mac Pro is literally the only solution Apple offers that can deliver. We're talking about multiple times the performance offered by anything else in Apple's lineup with a Pro suffix.
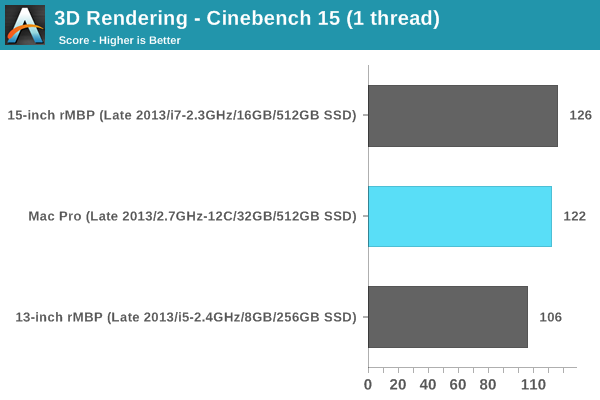
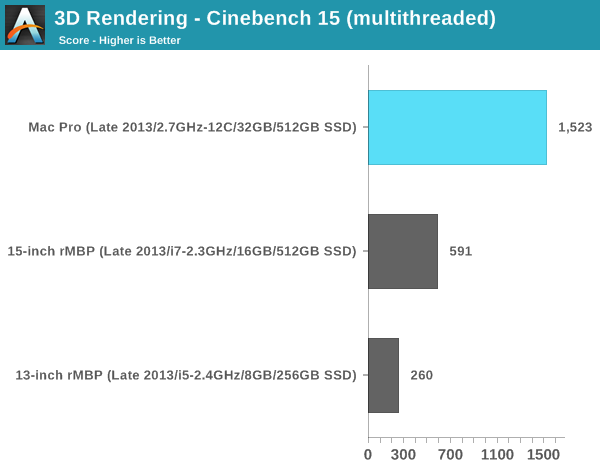
I'm slowly but surely amassing Cinebench 15 results. The story doesn't really change here, I just thought I'd publish the numbers in case anyone wants data using this new test:
The latest versions of iPhoto and iMovie break comparisons to my older benchmarks so I've had to drop them here. I still have our Photoshop CS5 and Lightroom 3 tests though:
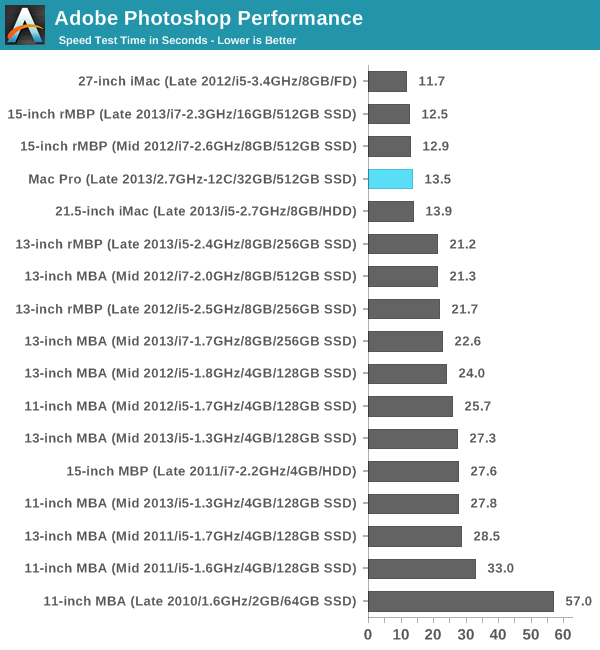
As I mentioned earlier, threading seems to have improved on newer versions of Photoshop. In CS5 our benchmark looks more like a lightly threaded test by comparison. Out of curiosity I ran the test under Photoshop CS6 and came away with a completion time of around 6 seconds.
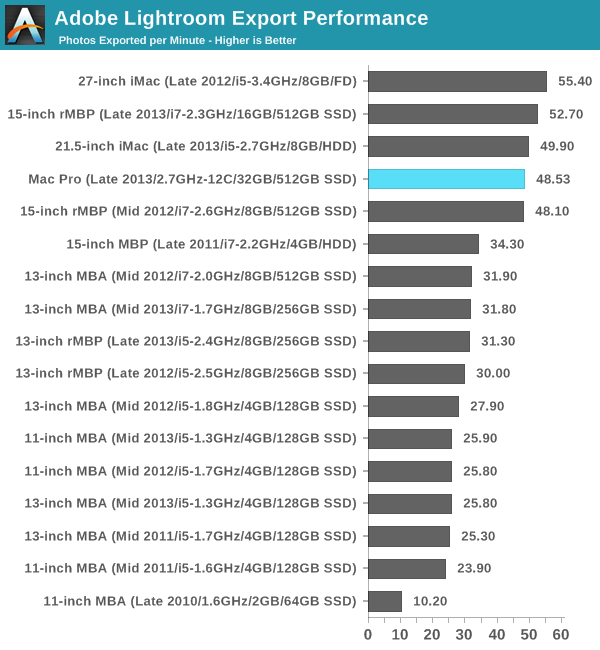
Our Lightroom 3 export test tells a very similar story. Anyone with lighter workloads looking for a huge performance increase thanks to the Mac Pro will have to look elsewhere. The Mac Pro is at least performance competitive, but in these lightly threaded workloads you won't see a huge uplift.
The PCIe Layout
Ask anyone at Apple why they need Ivy Bridge EP vs. a conventional desktop Haswell for the Mac Pro and you’ll get two responses: core count and PCIe lanes. The first one is obvious. Haswell tops out at 4 cores today. Even though each of those cores is faster than what you get with an Ivy Bridge EP, for applications that can spawn more than 4 CPU intensive threads you’re better off taking the IPC/single threaded hit and going with an older architecture that supports more cores. The second point is a connectivity argument.
Here’s what a conventional desktop Haswell platform looks like in terms of PCIe lanes:
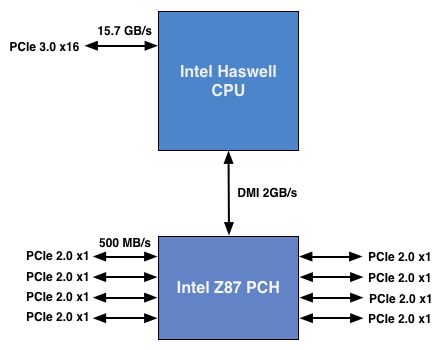
You’ve got a total of 16 PCIe 3.0 lanes that branch off the CPU, and then (at most) another 8 PCIe 2.0 lanes hanging off of the Platform Controller Hub (PCH). In a dual-GPU configuration those 16 PCIe 3.0 lanes are typically divided into an 8 + 8 configuration. The 8 remaining lanes are typically more than enough for networking and extra storage controllers.
Ivy Bridge E/EP on the other hand doubles the total number of PCIe lanes compared to Intel’s standard desktop platform:
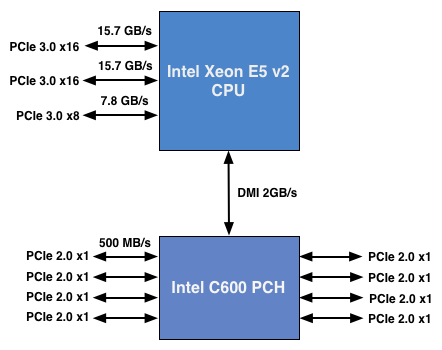
Here the CPU has a total of 40 PCIe 3.0 lanes. That’s enough for each GPU in a dual-GPU setup to get a full 16 lanes, and to have another 8 left over for high-bandwidth use. The PCH also has another 8 PCIe 2.0 lanes, just like in the conventional desktop case.
I wanted to figure out how these PCIe lanes were used by the Mac Pro, so I set out to map everything out as best as I could without taking apart the system (alas, Apple tends to frown upon that sort of behavior when it comes to review samples). Here’s what I was able to come up with. Let’s start off of the PCH:
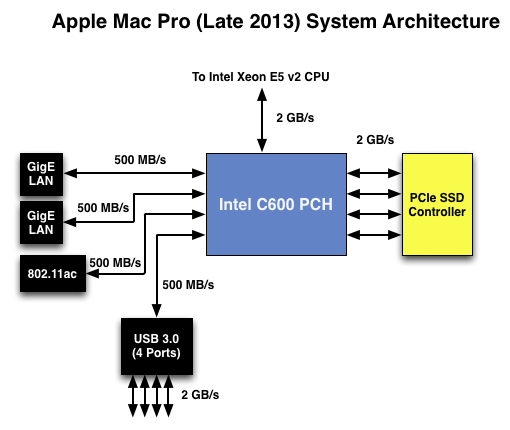
Here each Gigabit Ethernet port gets a dedicated PCIe 2.0 x1 lane, the same goes for the 802.11ac controller. All Mac Pros ship with a PCIe x4 SSD, and those four lanes also come off the PCH. That leaves a single PCIe lane unaccounted for in the Mac Pro. Here we really get to see how much of a mess Intel’s workstation chipset lineup is: the C600/X79 PCH doesn’t natively support USB 3.0. That’s right, it’s nearly 2014 and Intel is shipping a flagship platform without USB 3.0 support. The 8th PCIe lane off of the PCH is used by a Fresco Logic USB 3.0 controller. I believe it’s the FL1100, which is a PCIe 2.0 to 4-port USB 3.0 controller. A single PCIe 2.0 lane offers a maximum of 500MB/s of bandwidth in either direction (1GB/s aggregate), which is enough for the real world max transfer rates over USB 3.0. Do keep this limitation in mind if you’re thinking about populating all four USB 3.0 ports with high-speed storage with the intent of building a low-cost Thunderbolt alternative. You’ll be bound by the performance of a single PCIe 2.0 lane.
That takes care of the PCH, now let’s see what happens off of the CPU:
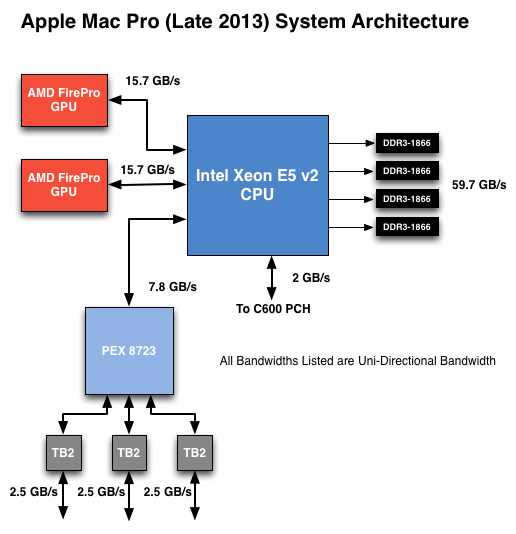
Of the 40 PCIe 3.0 lanes, 32 are already occupied by the two AMD FirePro GPUs. Having a full x16 interface to the GPUs isn’t really necessary for gaming performance, but if you want to treat each GPU as a first class citizen then this is the way to go. That leaves us with 8 PCIe 3.0 lanes left.
The Mac Pro has a total of six Thunderbolt 2 ports, each pair is driven by a single Thunderbolt 2 controller. Each Thunderbolt 2 controller accepts four PCIe 2.0 lanes as an input and delivers that bandwidth to any Thunderbolt devices downstream. If you do the math you’ll see we have a bit of a problem: 3 TB2 controllers x 4 PCIe 2.0 lanes per controller = 12 PCIe 2.0 lanes, but we only have 8 lanes left to allocate in the system.
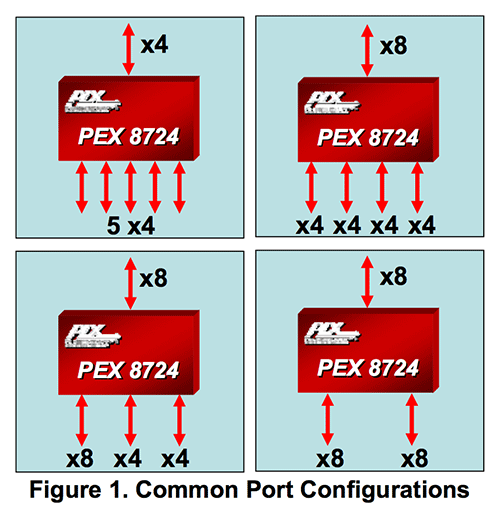
I assumed there had to be a PCIe switch sharing the 8 PCIe input lanes among the Thunderbolt 2 controllers, but I needed proof. Our Senior GPU Editor, Ryan Smith, did some digging into the Mac Pro’s enumerated PCIe devices and discovered a very familiar vendor id: 10B5, the id used by PLX Technology. PLX is a well known PCIe bridge/switch manufacturer. The part used in the Mac Pro (PEX 8723) is of course not listed on PLX’s website, but it’s pretty close to another one that PLX is presently shipping: the PEX 8724. The 8724 is a 24-lane PCIe 3.0 switch. It can take 4 or 8 PCIe 3.0 lanes as an input and share that bandwidth among up to 16 (20 in the case of a x4 input) downstream PCIe lanes. Normally that would create a bandwidth bottleneck but remember that Thunderbolt 2 is still based on PCIe 2.0. The switch provides roughly 15GB/s of bandwidth to the CPU and 3 x 5GB/s of bandwidth to the Thunderbolt 2 controllers.
Literally any of the 6 Thunderbolt 2 ports on the back of the Mac Pro will give you access to the 8 remaining PCIe 3.0 lanes living off of the CPU. It’s pretty impressive when you think about it, external access to a high-speed interface located on the CPU die itself.
The part I haven’t quite figured out yet is how Apple handles DisplayPort functionality. All six Thunderbolt 2 ports are capable of outputting to a display, which means that there’s either a path from the FirePro to each Thunderbolt 2 controller or the PEX 8723 switch also handles DisplayPort switching. It doesn’t really matter from an end user perspective as you can plug a monitor into any port and have it work, it’s more of me wanting to know how it all works.
GPU Choices
The modern Apple is a big fan of GPU power. This is true regardless of whether we’re talking about phones, tablets, notebooks or, more recently, desktops. The new Mac Pro is no exception as it is the first Mac in Apple history to ship with two GPUs by default.
AMD won the contract this time around. The new Mac Pro comes outfitted with a pair of identical Pitcairn, Tahiti LE or Tahiti XT derived FirePro branded GPUs. These are 28nm Graphics Core Next 1.0 based GPUs, so not the absolute latest tech from AMD but the latest of what you’d find carrying a FirePro name.
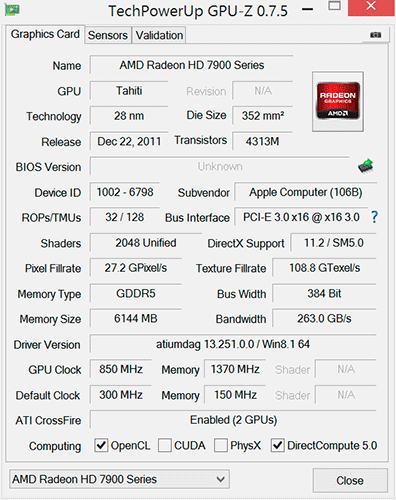
The model numbers are unique to Apple. FirePro D300, D500 and D700 are the only three options available on the new Mac Pro. The D300 is Pitcairn based, D500 appears to use a Tahiti LE with a wider 384-bit memory bus while D700 is a full blown Tahiti XT. I’ve tossed the specs into the table below:
| Mac Pro (Late 2013) GPU Options | ||||||
| AMD FirePro D300 | AMD FirePro D500 | AMD FirePro D700 | ||||
| SPs | 1280 | 1536 | 2048 | |||
| GPU Clock (base) | 800MHz | 650MHz | 650MHz | |||
| GPU Clock (boost) | 850MHz | 725MHz | 850MHz | |||
| Single Precision GFLOPS | 2176 GFLOPS | 2227 GFLOPS | 3481 GFLOPS | |||
| Double Precision GFLOPS | 136 GFLOPS | 556.8 GFLOPS | 870.4 GFLOPS | |||
| Texture Units | 80 | 96 | 128 | |||
| ROPs | 32 | 32 | 32 | |||
| Transistor Count | 2.8 Billion | 4.3 Billion | 4.3 Billion | |||
| Memory Interface | 256-bit GDDR5 | 384-bit GDDR5 | 384-bit GDDR5 | |||
| Memory Datarate | 5080MHz | 5080MHz | 5480MHz | |||
| Peak GPU Memory Bandwidth | 160 GB/s | 240 GB/s | 264 GB/s | |||
| GPU Memory | 2GB | 3GB | 6GB | |||
| Apple Upgrade Cost (Base Config) | - | +$400 | +$1000 | |||
| Apple Upgrade Cost (High End Config) | - | - | +$600 | |||
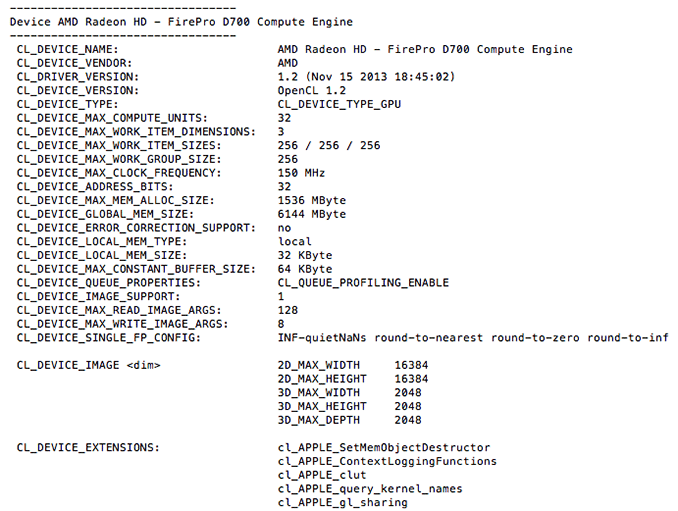
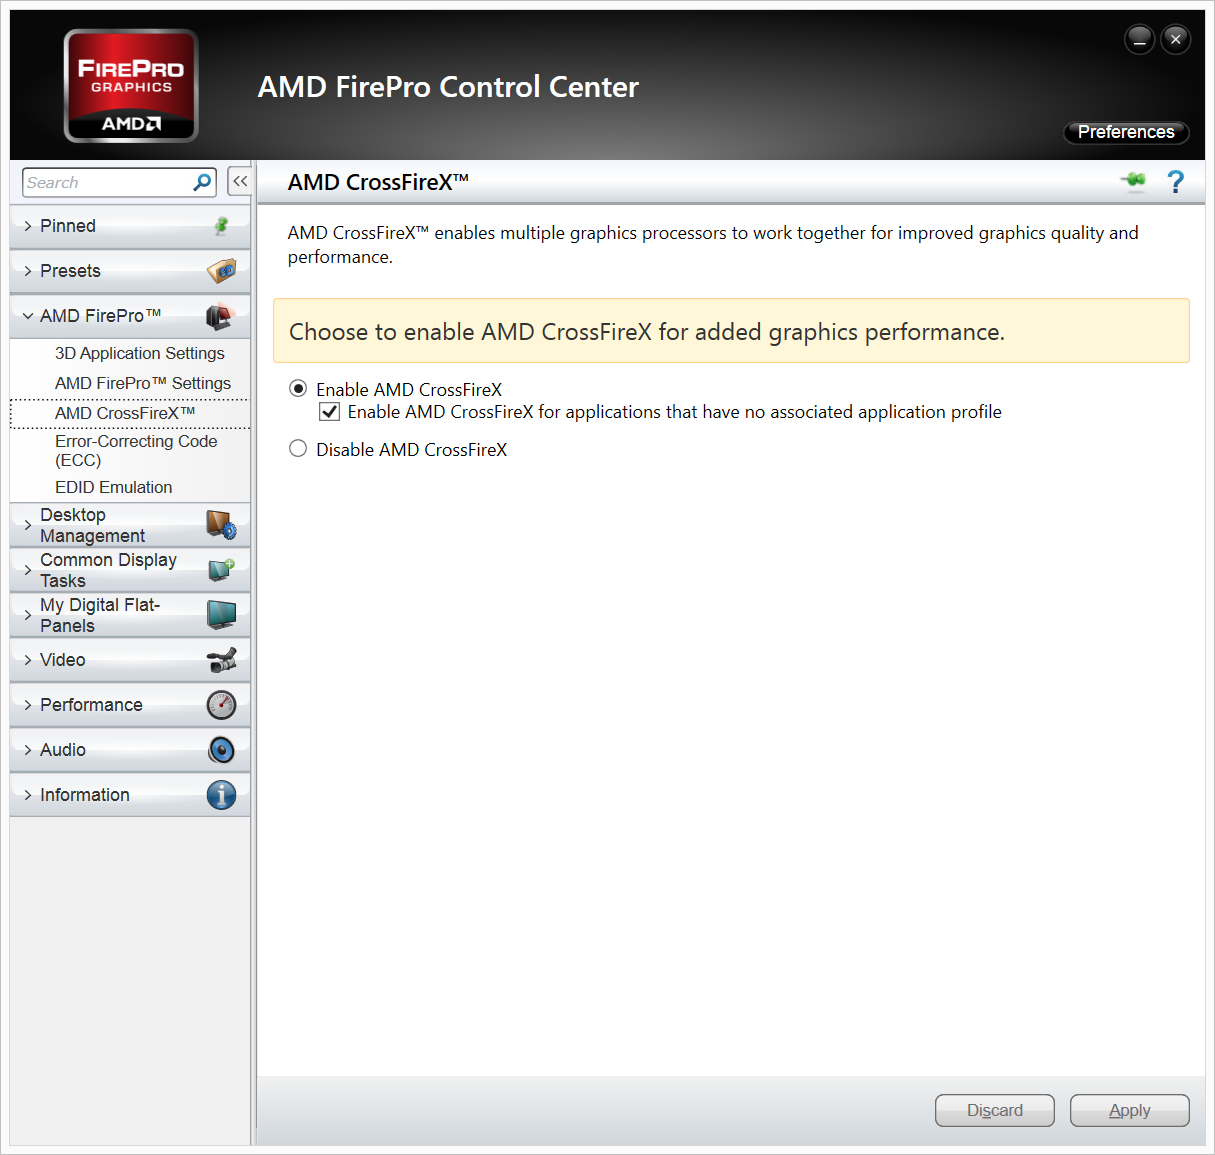
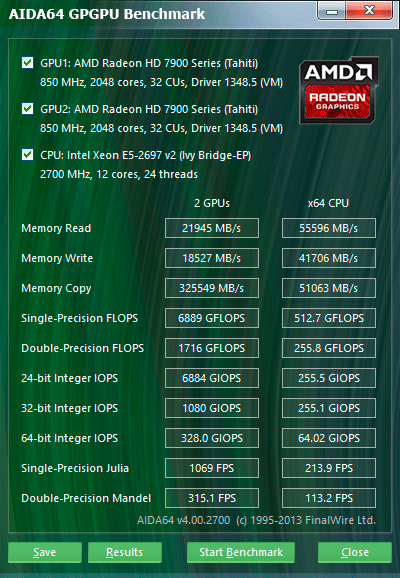
Despite the FirePro brand, these GPUs have at least some features in common with their desktop Radeon counterparts. FirePro GPUs ship with ECC memory, however in the case of the FirePro D300/D500/D700, ECC isn’t enabled on the GPU memories. Similarly, CrossFire X isn’t supported by FirePro (instead you get CrossFire Pro) but in the case of the Dx00 cards you do get CrossFire X support under Windows.
Each GPU gets a full PCIe 3.0 x16 interface to the Xeon CPU via a custom high density connector and flex cable on the bottom of each GPU card in the Mac Pro. I believe Apple also integrated CrossFire X bridge support over this cable.
With two GPUs standard in every Mac Pro configuration, there’s obviously OS support for the configuration. Under Windows, that amounts to basic CrossFire X support. Apple’s Boot Camp drivers ship with CFX support, and you can download the latest Catalyst drivers directly from AMD and enable CFX under Windows as well. I did the latter and found that despite the option being there I couldn’t actually disable CrossFire X under Windows. Disabling CFX would drop power consumption, but I didn't always see a corresponding decrease in performance.
Under OS X the situation is a bit more complicated. There is no system-wide CrossFire X equivalent that will automatically split up rendering tasks across both GPUs. By default, one GPU is setup for display duties while the other is used exclusively for GPU compute workloads. GPUs are notoriously bad at context switching, which can severely limit compute performance if the GPU also has to deal with the rendering workloads associated with display in a modern OS. NVIDIA sought to address a similar problem with their Maximus technology, combining Quadro and Tesla cards into a single system for display and compute.
Due to the nature of the default GPU division under OS X, all games by default will only use a single GPU. It is up to the game developer to recognize and split rendering across both GPUs, which no one is doing at present. Unfortunately firing up two instances of a 3D workload won’t load balance across the two GPUs by default. I ran Unigine Heaven and Valley benchmarks in parallel, unfortunately both were scheduled on the display GPU leaving the compute GPU completely idle.

The same is true for professional applications. By default you will see only one GPU used for compute workloads. Just like the gaming example however, applications may be written to spread compute workloads out across both GPUs if they need the horsepower. The latest update to Final Cut Pro (10.1) is one example of an app that has been specifically written to take advantage of both GPUs in compute tasks.
The question of which GPU to choose is a difficult one. There are substantial differences in performance between all of the options. The D700 for example offers 75% more single precision compute than the D300 and 56% more than the D500. All of the GPUs have the same number of render backends however, so all of them should be equally capable of driving a 4K display. In many professional apps, the bigger driver for the higher end GPU options will likely be the larger VRAM configurations.
![]()
I was particularly surprised by how much video memory Final Cut Pro appeared to take up on the primary (non-compute) GPU. I measured over 3GB of video memory usage while on a 1080p display, editing 4K content. The D700 is the only configuration Apple offers with more than 3GB of video memory. I’m not exactly sure how the experience would degrade if you had less, but throwing more VRAM at the problem doesn’t seem to be a bad idea. The compute GPU’s memory usage is very limited (obviously) until the GPU is actually in use. OS X reported ~8GB of usage when idle, which I can only assume is a bug and a backwards way of saying that none of the memory was in use. Under a GPU compute load (effects rendering in FCP), I saw around 2GB of memory usage on the compute GPU.
Since Final Cut Pro 10.1 appears to be a flagship app for the Mac Pro’s CPU + GPU configuration, I did some poking around to see how the three separate processors are used in the application. Basic rendering still happens on the CPU. With 4K content and the right effects I see 20 - 21 threads in use, maxing out nearly all available cores and threads. I still believe the 8-core version may be a slightly better choice if you're concerned about cost, but that's a guess on my part since I don't have a ton of 4K FCP 10.1 projects to profile. The obvious benefit to the 12-core version is you get more performance when the workload allows it, and when it doesn't you get a more responsive system.
Live preview of content that has yet to be rendered is also CPU bound. I don’t see substantial GPU compute use here, and the same is actually true for the CPU. Scrubbing through and playing back non-rendered content seems to use between 1 - 3 CPU cores. Even if you apply video effects to the project, prior to rendering this ends up being a predominantly CPU workload with the non-compute (display) GPU spending some cycles.
It’s when you actually go to render visual effects that the compute GPU kicks in. Video rendering/transcoding, as I mentioned earlier, is still a CPU bound affair but all effects rendering takes place on the GPUs. The GPU workload increases depending on the number of effects layered upon one another. Effects rendering appears to be spread over both GPUs, with the compute GPU taking the brunt of the workload in some cases and in others the two appear more balanced.
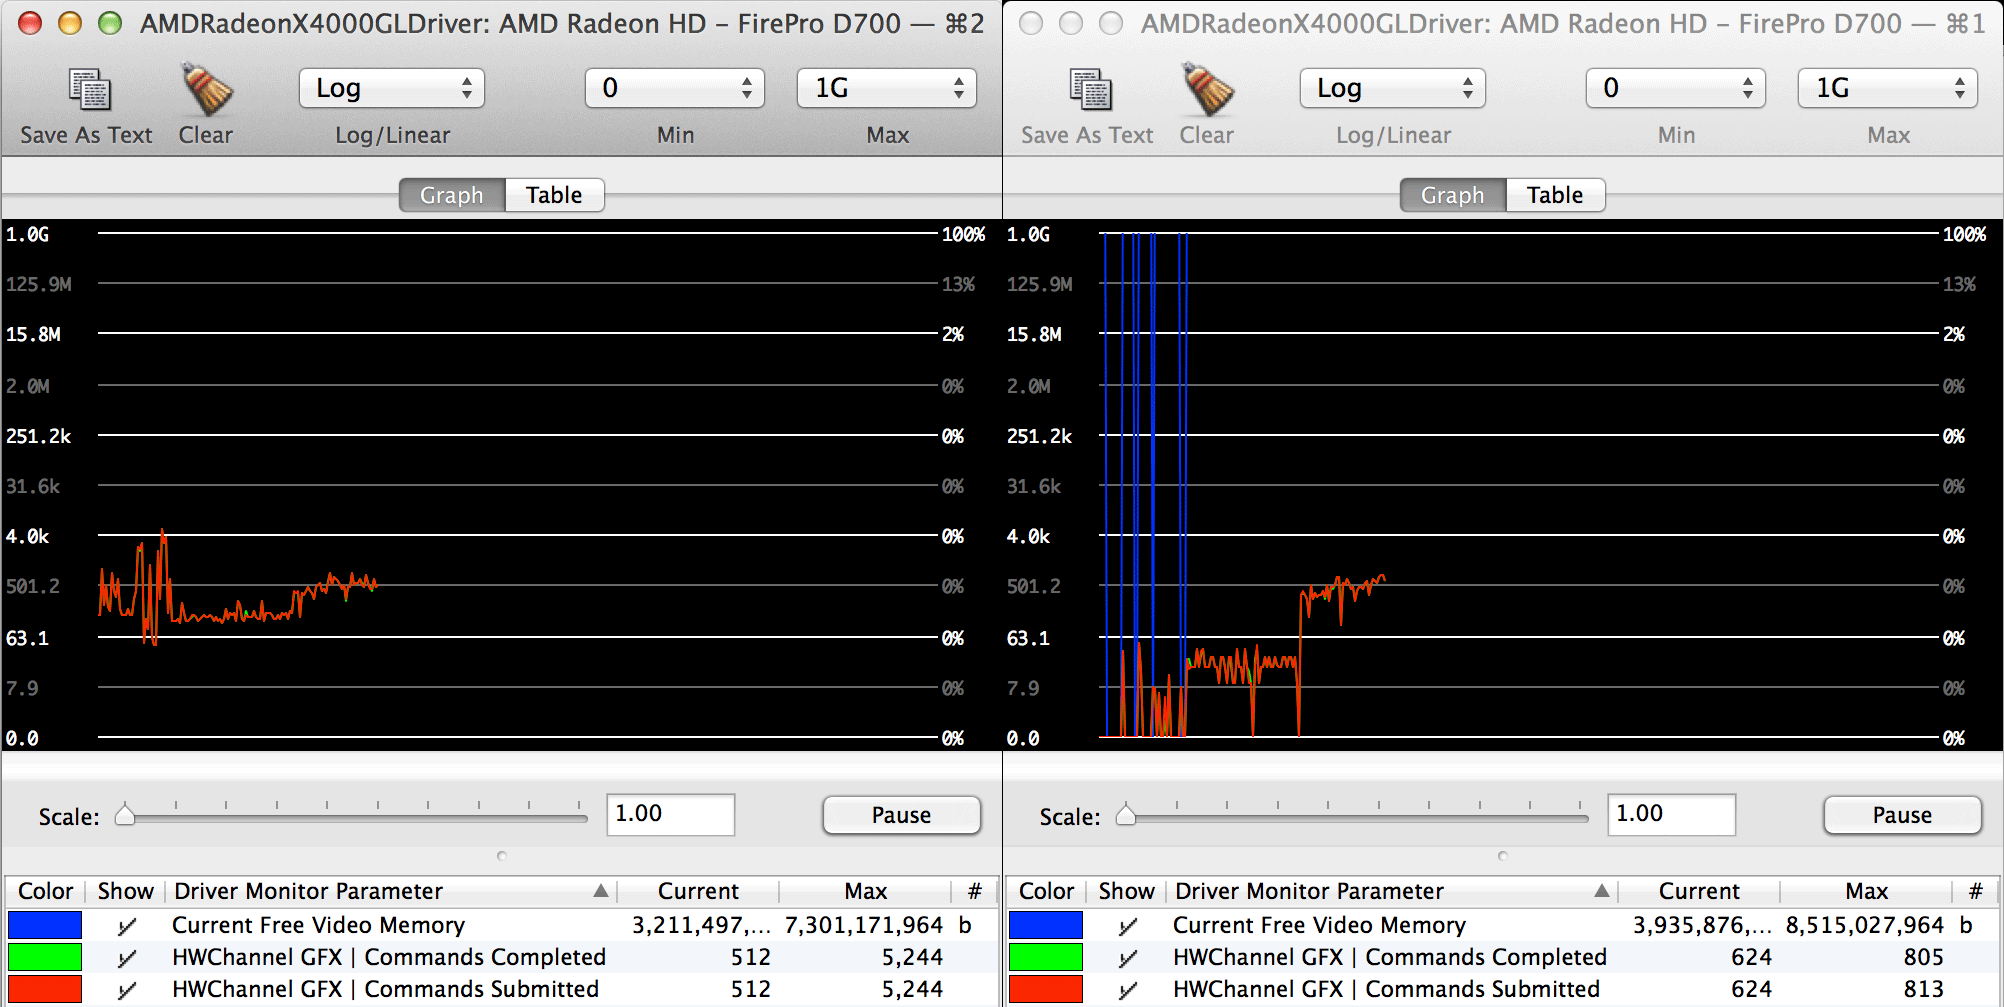
GPU load while running my 4K CPU+GPU FCP 10.1 workload
Final Cut Pro’s division of labor between CPU and GPUs exemplifies what you’ll need to see happen across the board if you want big performance gains going forward. If you’re not bound by storage performance and want more than double digit increases in performance, your applications will have to take advantage of GPU computing to get significant speedups. There are some exceptions (e.g. leveraging AVX hardware in the CPU cores), but for the most part this heterogeneous approach is what needs to happen. What we’ve seen from FCP shows us that the solution won’t come in the form of CPU performance no longer mattering and GPU performance being all we care about. A huge portion of my workflow in Final Cut Pro is still CPU bound, the GPU is used to accelerate certain components within the application. You need the best of both to build good, high performance systems going forward.
Gaming Performance
As I mentioned earlier, under OS X games have to specifically be written to use both GPUs in the new Mac Pro. Under Windows however it's just a matter of enabling CrossFire X. I ran the new Mac Pro with dual FirePro D700s through a few of Ryan's 2014 GPU test suite games. The key comparison here is AMD's Radeon R9 280X CF. I've put all of the relevent information about the differences between the GPUs in the table below:
| Mac Pro (Late 2013) GPU Comparison | ||||||
| AMD Radeon R9 280X | AMD FirePro D700 | |||||
| SPs | 2048 | 2048 | ||||
| GPU Clock (base) | 850MHz | 650MHz | ||||
| GPU Clock (boost) | 1000MHz | 850MHz | ||||
| Single Precision GFLOPS | 4096 GFLOPS | 3481 GFLOPS | ||||
| Texture Units | 128 | 128 | ||||
| ROPs | 32 | 32 | ||||
| Transistor Count | 4.3 Billion | 4.3 Billion | ||||
| Memory Interface | 384-bit GDDR5 | 384-bit GDDR5 | ||||
| Memory Datarate | 6000MHz | 5480MHz | ||||
| Peak GPU Memory Bandwidth | 288 GB/s | 264 GB/s | ||||
| GPU Memory | 3GB | 6GB | ||||
Depending on thermal conditions the 280X can be as little as 17% faster than the D700 or as much as 30% faster, assuming it's not memory bandwidth limited. In the case of a memory bandwidth limited scenario the gap can shrink to 9%.
All of the results below are using the latest Radeon WHQL drivers at the time of publication (13-12_win7_win8_64_dd_ccc_whql.exe) running 64-bit Windows 8.1. Keep in mind that the comparison cards are all run on our 2014 GPU testbed, which is a 6-core Ivy Bridge E (i7-4960X) running at 4.2GHz. In other words, the other cards will have a definite CPU performance advantage (20 - 30% depending on the number of active cores).
You'll notice that I didn't run anything at 4K for these tests. Remember CrossFire at 4K is still broken on everything but the latest GCN 1.1 hardware from AMD.
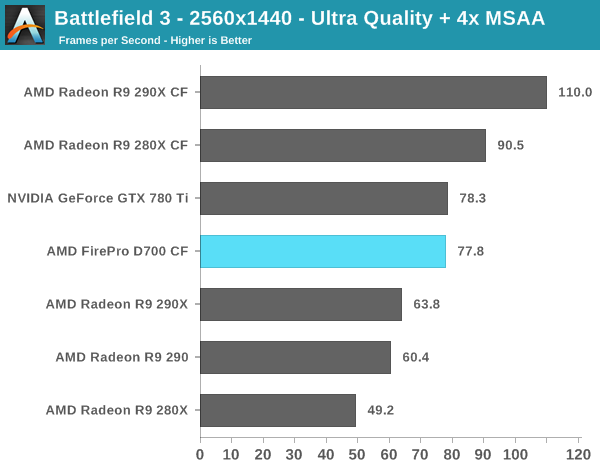
Battlefield 3 starts out telling the story I expected to see. A pair of 280Xes ends up being 16% faster than the dual FirePro D700 setup in the Mac Pro. You really start to get an idea of where the Mac Pro's high-end GPU configuration really lands.
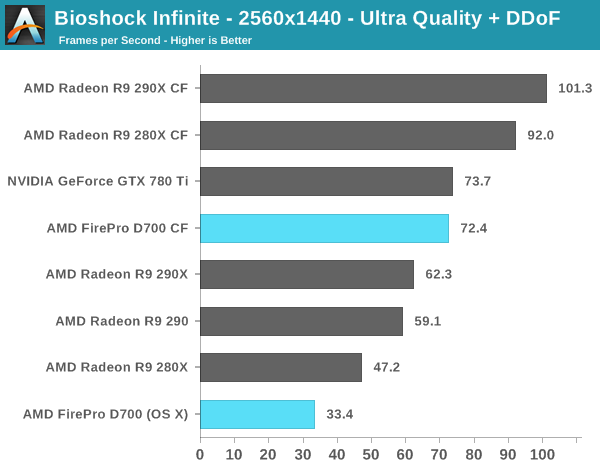
Bioshock ends up at the extreme end of what we'd expect to see between the 280X and D700. I tossed in a score from Bioshock under OS X, which obviously doesn't have CF working and ends up at less than half of the performance of the D700. If you're going to do any heavy 3D gaming, you'll want to do it under Windows still.
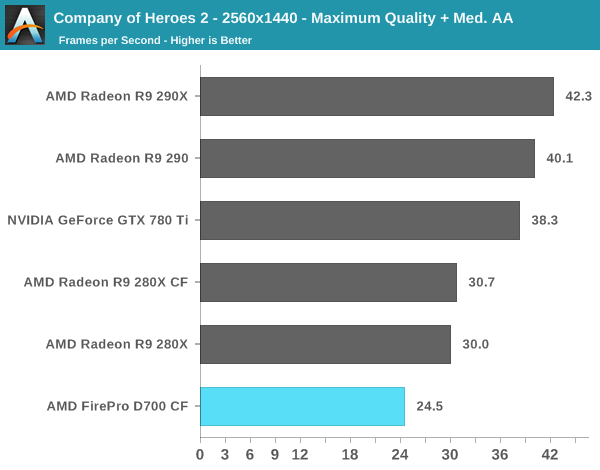
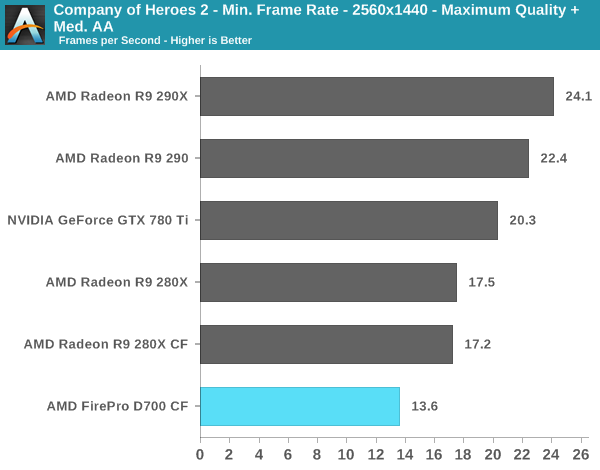
Not all games will scale well across multiple GPUs: Company of Heroes 2 is one of them. There's no performance uplift from having two 280Xes and thus the D700 performs like a slower single GPU R9 280X.
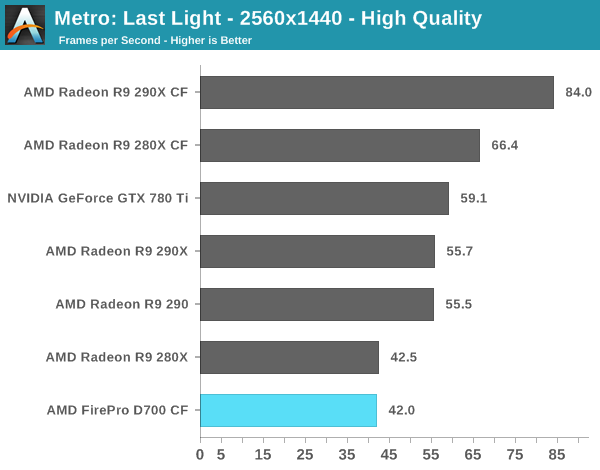
Metro is the one outlier in our test suite. Although CrossFire is clearly working under Windows, under Metro the D700 behaves as if it wasn't. I'm not sure what's going on here, but this does serve as a reminder that relying on multi-GPU setups to increase performance does come with a handful of these weird cases - particularly if you're using non-standard GPU configurations.
4K Support
A huge part of the Mac Pro revolves around its support for 4K displays. You can connect two 4K displays via Thunderbolt 2/DisplayPort, and the third 4K display over HDMI. Alternatively you can connect up to six 2560 x 1440 displays using the Thunderbolt 2 ports at the back of the machine.
While the 2013 MacBook Pro with Retina Display can presently support outputting to either an 3840 x 2160 or 4096 x 2160 external panel, the maximum supported refresh rate is only 30Hz under OS X (and only 24Hz in the case of a 4096 x 2160 display). That’s acceptable for use as a video preview display, but extremely frustrating for anything else (try watching a mouse cursor animate at 30Hz). Contrary to what Apple’s own support documentation lists, these 4K resolutions at limited refresh rates are supported via both HDMI and Thunderbolt 2/DisplayPort 1.2 on the new rMBPs.
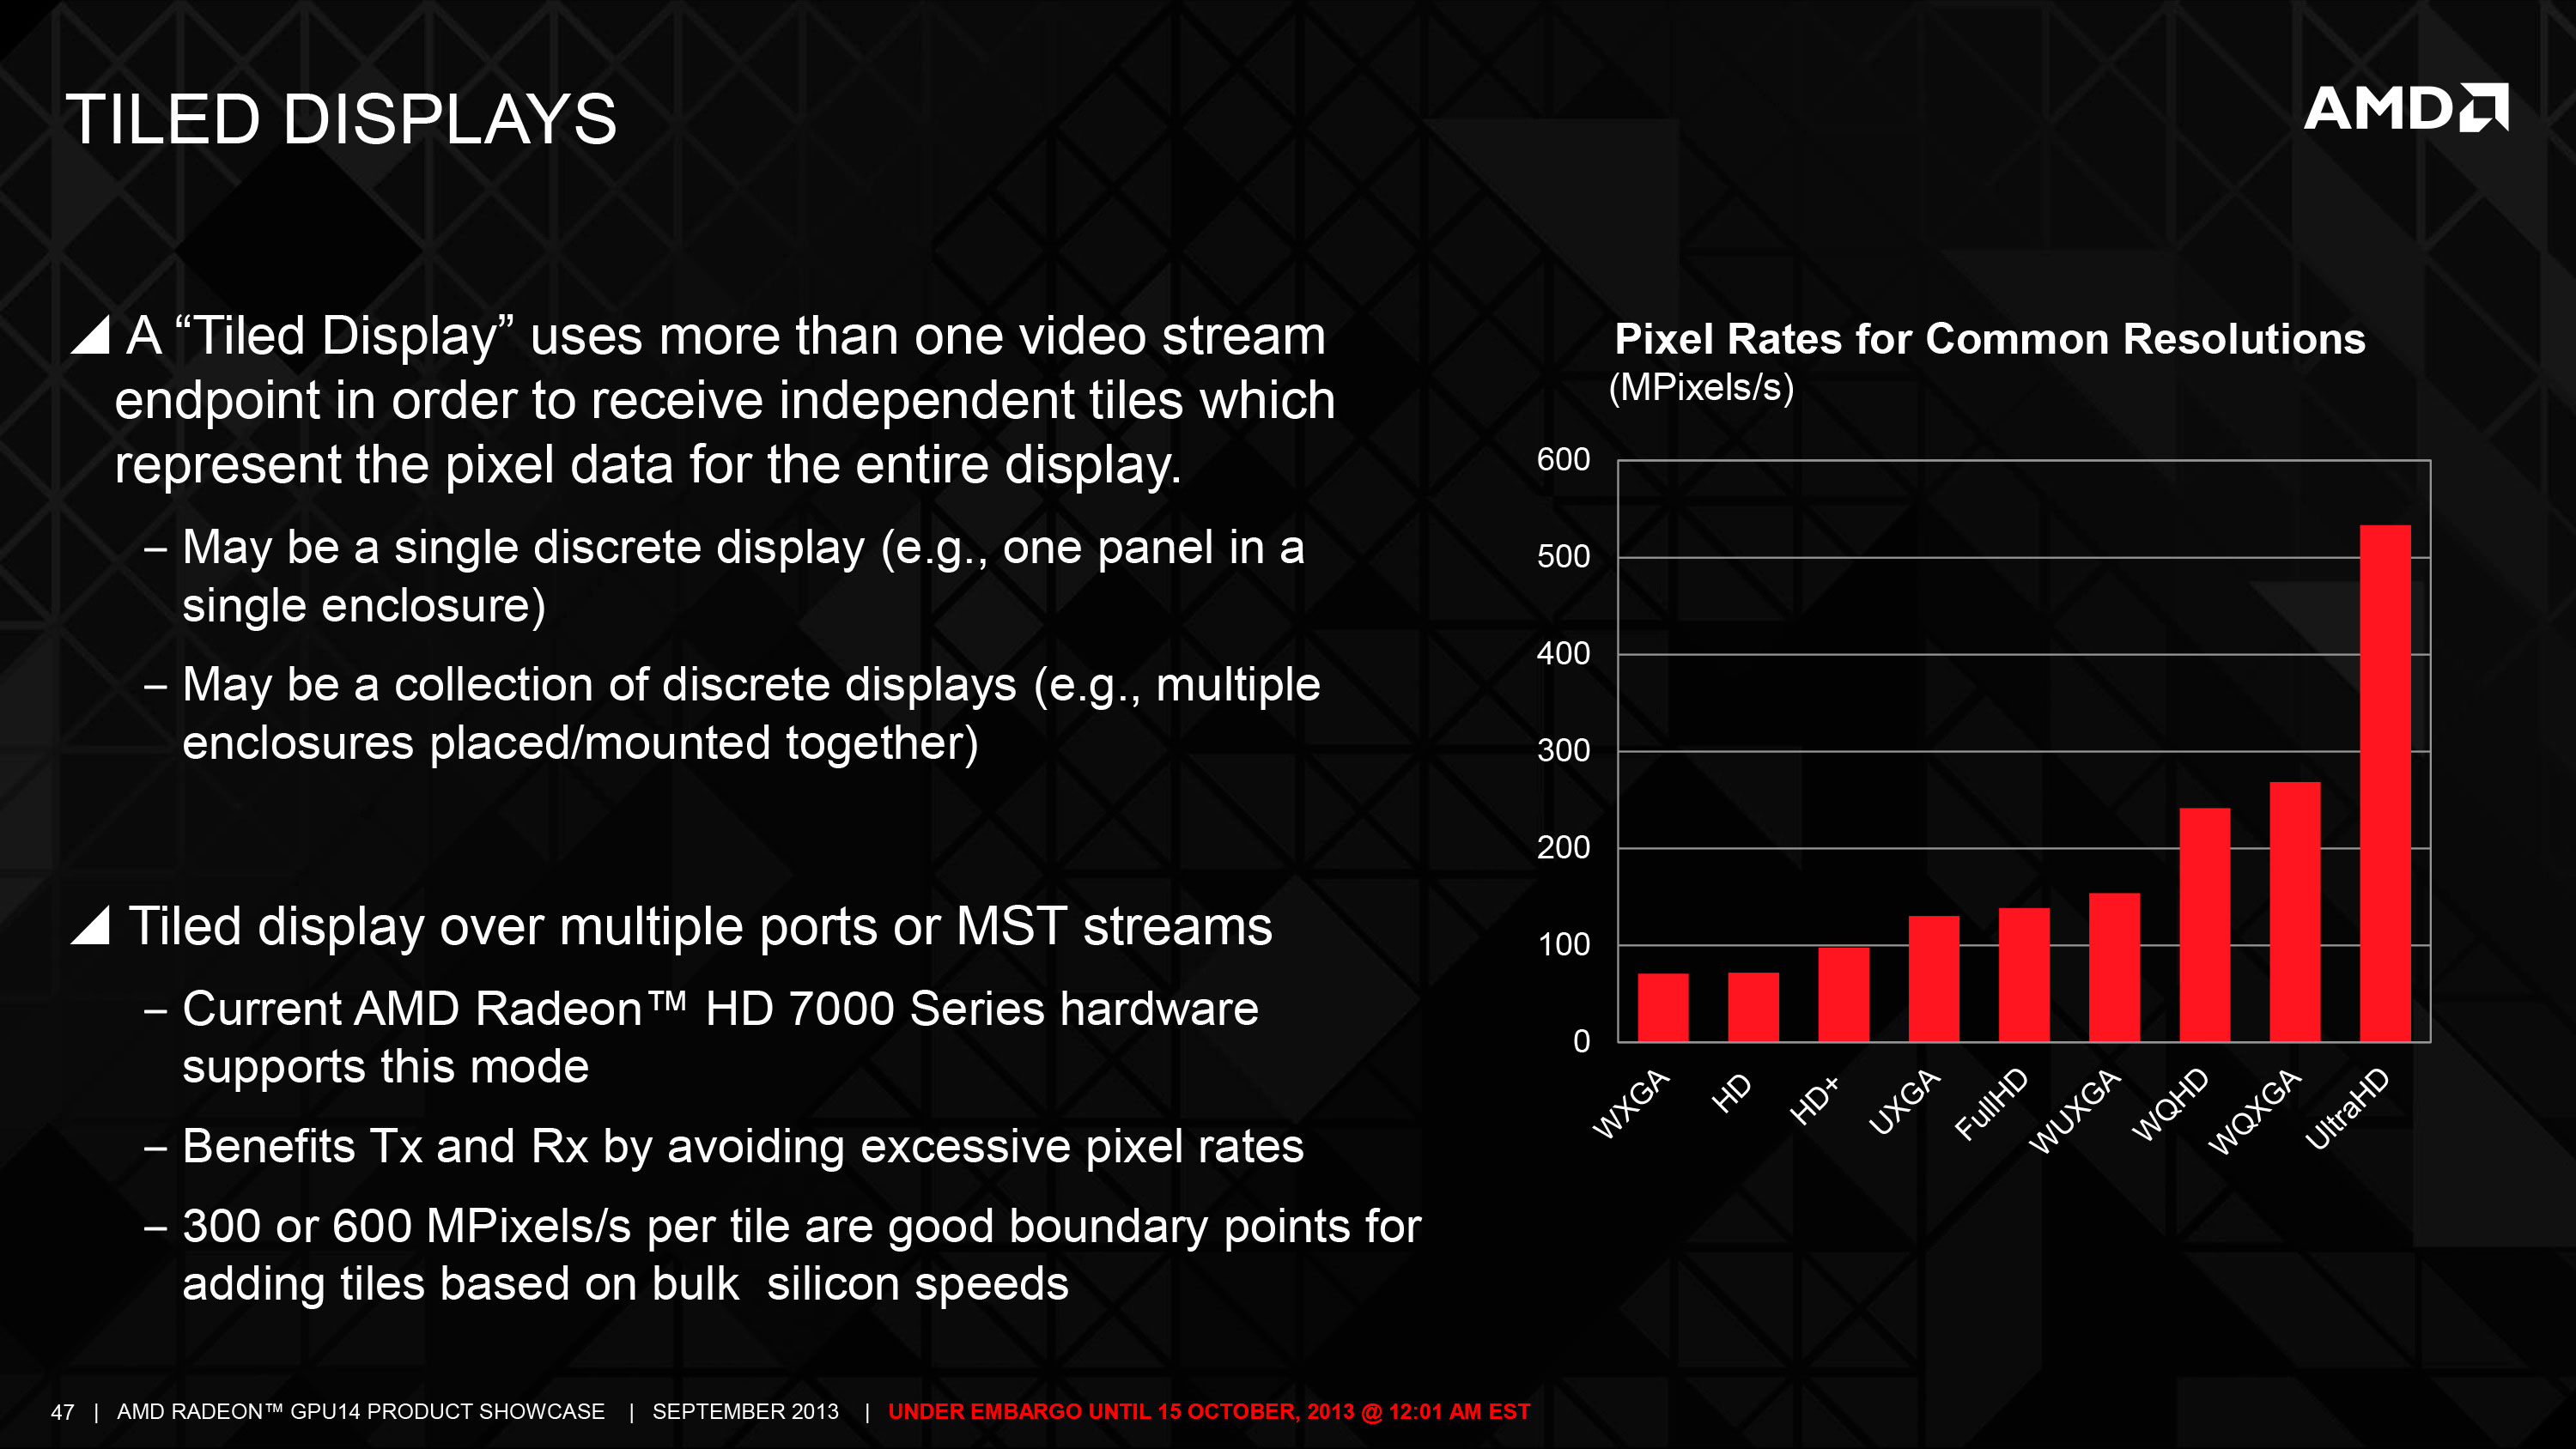
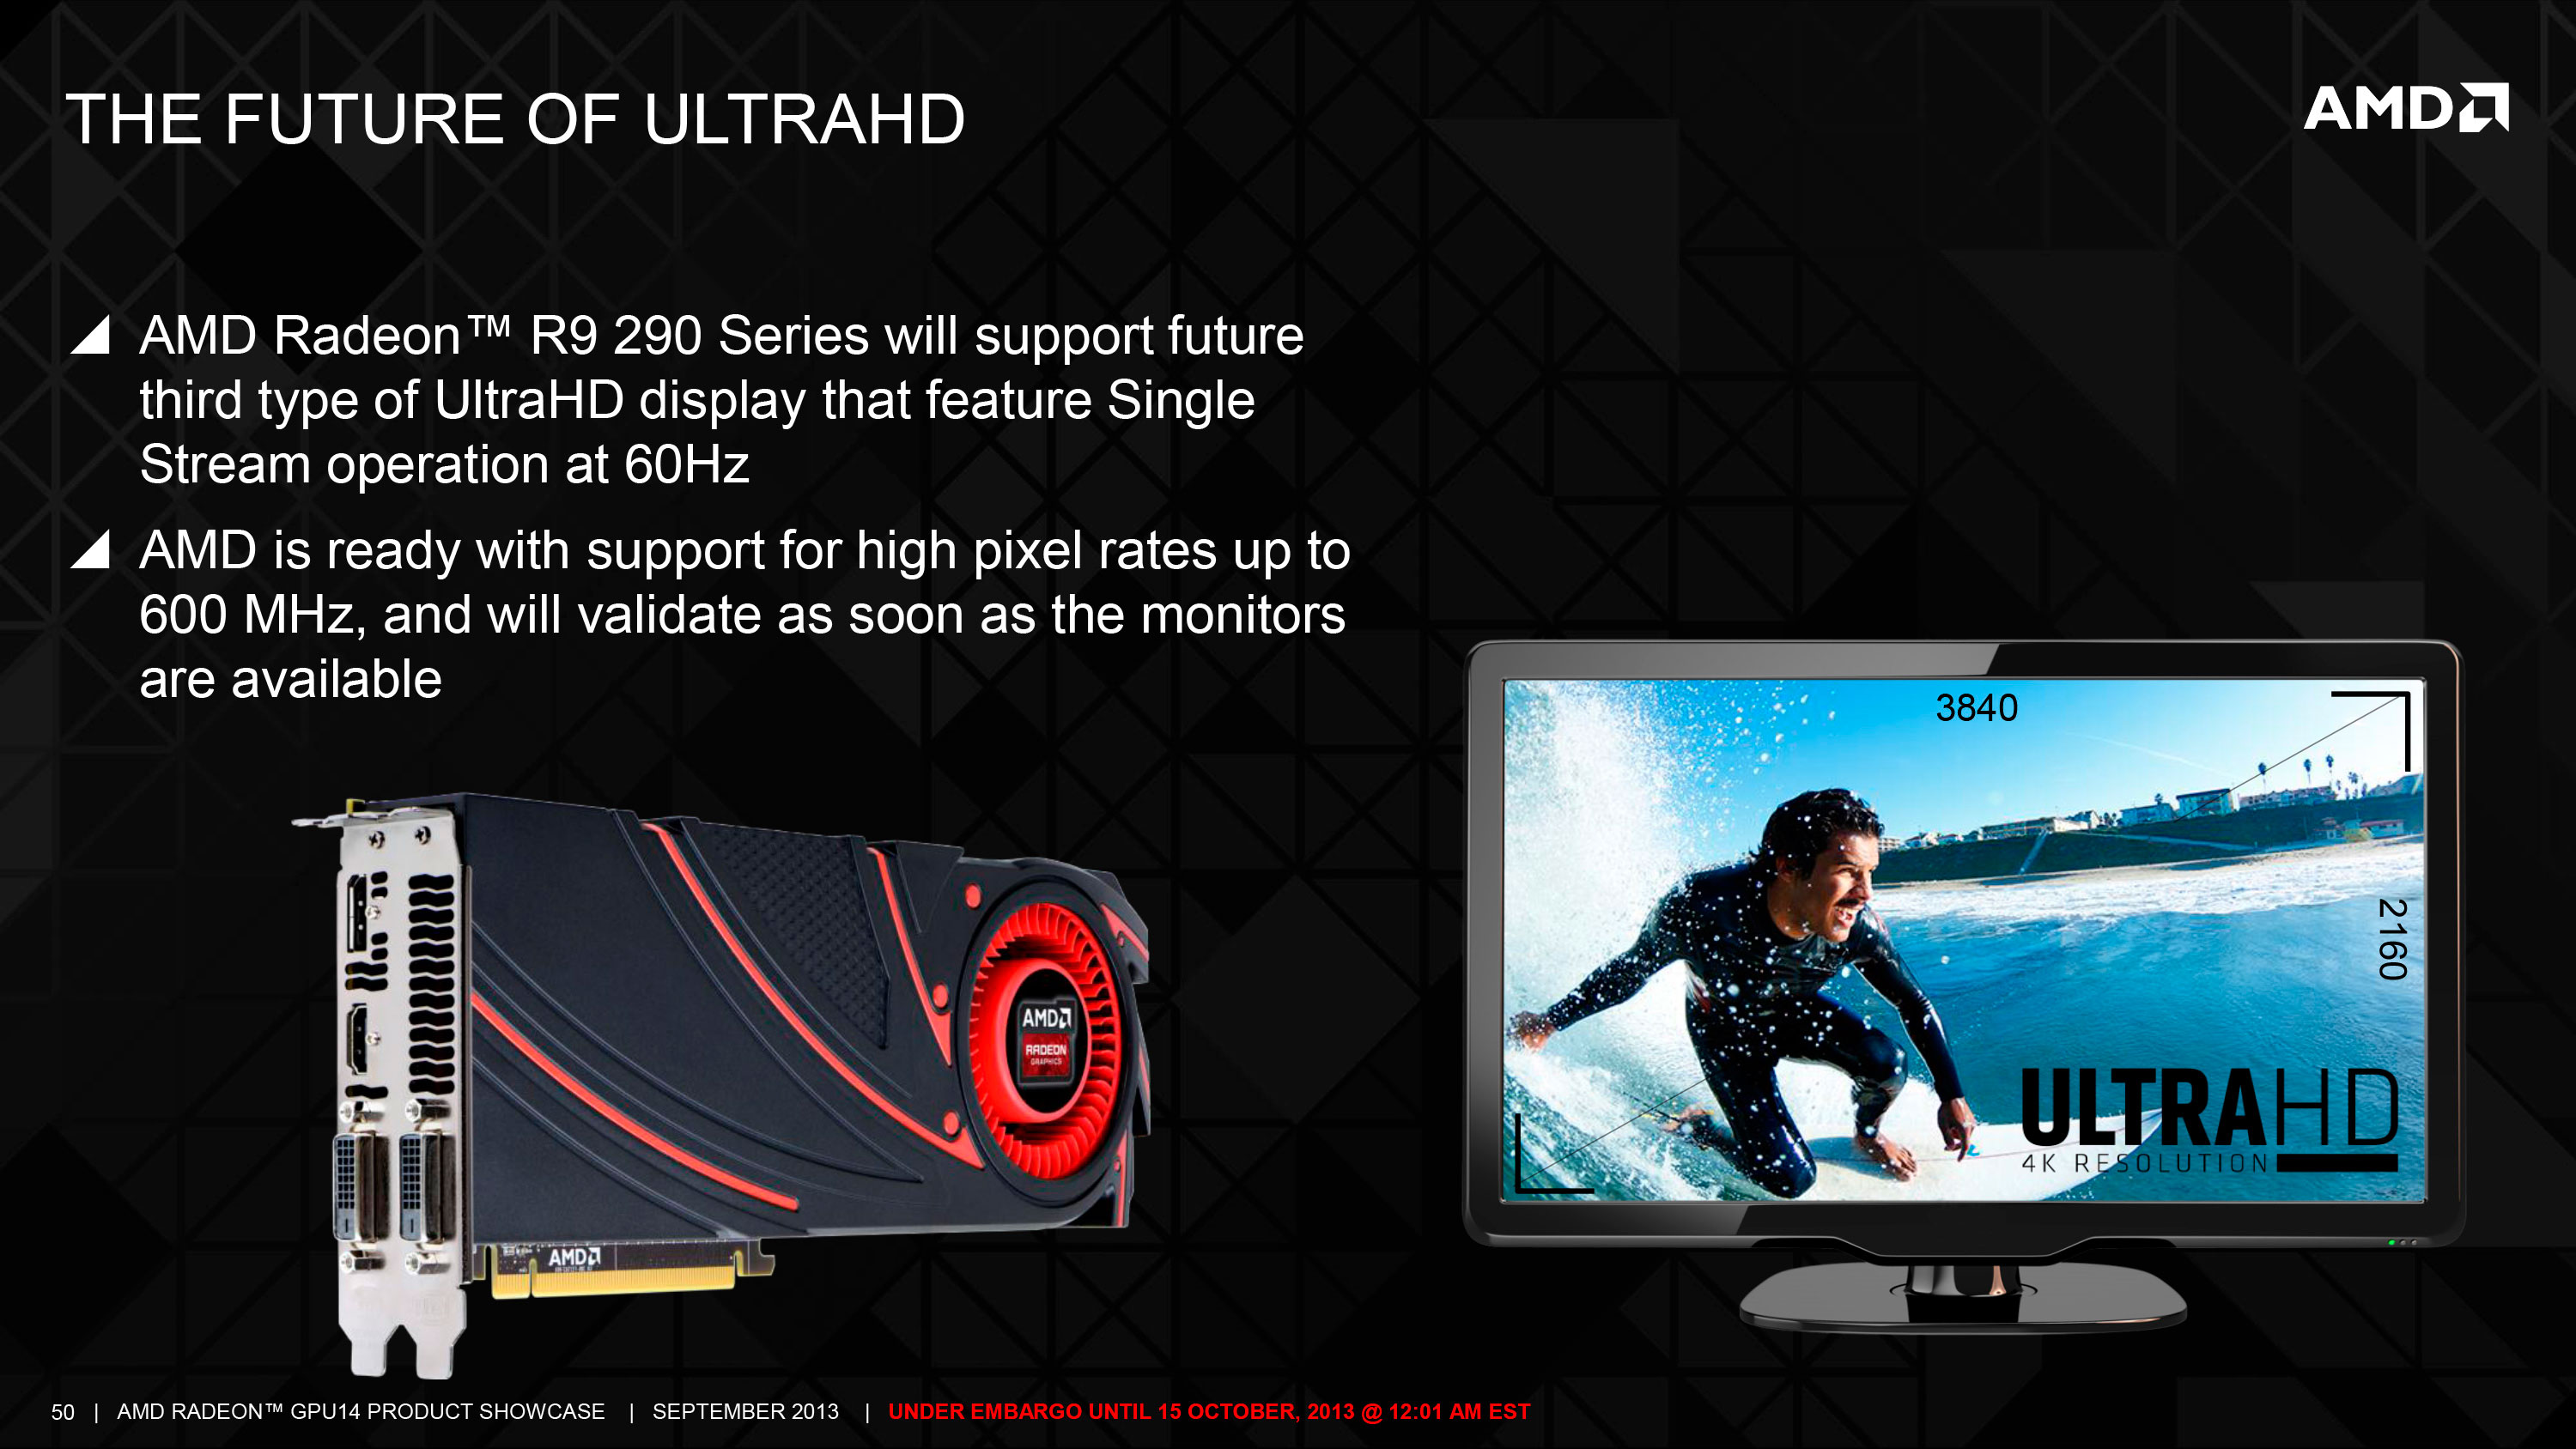
To support 4K at 60Hz, you need to properly enable support for DisplayPort 1.2’s Multi-Stream Transport (MST) feature. Originally conceived as a way of daisy chaining multiple displays together off of a single DP output, the current crop of 4K displays use MST to drive a single display. By sending two tiles, each behaving like a 1920 x 2160 display (one half of 3840 x 2160), you can get around the bandwidth limitations of the current crop of display hardware. Note that it is possible to drive a 4K display at 60Hz using a single DisplayPort 1.2 stream, the limitation today appears to be entirely on the monitor side. The first generation of 4K displays appear to be a bit of a hack. I’m not sure if the Mac Pro’s GPU hardware can drive upcoming 4K single stream panels or not as AMD specifically lists that as a feature of the new Radeon R9 series.
The 4K/MST support requires a software component as well. The GPU driver needs to know how to divide its frame buffer for output to the individual tiles, which can vary between monitors. MST topologies for single-display/4K60 support aren’t standardized unfortunately. Apple handles this by maintaining some sort of a whitelist for various displays they’ve tested. The Sharp PN-K321 that Apple sells alongside the Mac Pro (as well as the ASUS clone of it) ships with 4K60 support configured out of the box. All you need to do is ensure that DisplayPort 1.2 MST is enabled on the display itself (something that appears off by default) and plug it into the Mac Pro. OS X will automatically recognize the display, configure it for 3840 x 2160 at 60Hz and you’re good to go.
The same isn’t true, unfortunately, for other 4K displays on the market. Dell sent along its UltraSharp 24 Ultra HD display (UP2414Q) for this review, and unfortunately that appears to be a display that’s not supported by the Mac Pro/OS X at this point. You can get it working in SST mode at 3840 x 2160 30Hz, but forcing MST results in a 1920 x 2160 display spread across both tiles with a mess of garbled colors.
Update: Apple addressed many of my 4K issues with OS X 10.9.3.
The 4K Experience
For years I used a 30” 2560 x 1600 panel, but when the first wave of 27” 2560 x 1440 displays hit I was instantly hooked. I appreciated the reduction in desktop footprint and didn’t mind horribly the reduction in vertical resolution. I’m a big fan of Apple’s 27” Cinema, Thunderbolt and iMac Displays as they integrate nicely with the Mac (hooray for brightness controls on the keyboard), and I’ve grown to be ok (and maybe even prefer?) the look of the glossy cover glass. Moving to Sharp’s 32” 4K PN-K321 brought back memories of my 30” days. The display is absolutely huge. OS X (and Windows 8.1) running at 3840 x 2160 is incredible, but I find that text, menus and UI elements can be too small. My eyesight isn’t what it used to be and 3840 x 2160 on a 32” panel is just past the borderline of comfortable for me. For editing photos and videos it’s great, but for everything else the ~30% increase in pixel density was just too much.
Apple actually created a solution to this problem with the MacBook Pro’s Retina Display. On a 13 or 15-inch MacBook Pro with Retina Display Apple renders the screen at full panel resolution (e.g. 2880 x 1800), but renders things like text, menus and UI elements at 4x their normal resolution (2x in each dimension). In supported apps, photos and videos are rendered at a 1:1 ratio with pixels on screen. The combination of the two results in a display that’s both incredibly high res and usable. In the case of the 15-inch MacBook Pro, you get the screen real estate (and corresponding text/widget size) of a 1440 x 900 panel, with the exception of any photo/video/other-special content that can treat the display like a full 2880 x 1800 panel.
For those users who still need more screen real estate and don’t mind trading off UI element size, Apple offers scaling modes that render the screen at an even higher resolution and then scale it down to fit the 2880 x 1800 panel. For example you can select a 1920 x 1200 equivalency mode, which gets rendered at 3840 x 2400 with text/menus/UI elements at 4x res and then scaled down to 2880 x 1800. Apple even wrote their own scaling and filtering algorithms to ensure a consistent user experience regardless of what GPU was active at the time (Intel and NVIDIA scaling/filtering algorithms apparently produce slightly different quality output).
I was fully expecting all of this to be available on the Mac Pro when connected to a 32” 4K display. By default, there’s only a single supported scaled resolution: 2560 x 1440. Unfortunately it doesn’t look like Apple is running the same supersampling routines when you pick this resolution, instead you get a 2560 x 1440 desktop scaled up to 3840 x 2160 (rather than a 5120 x 2880 screen scaled down). The result is a bit of a blurry mess.
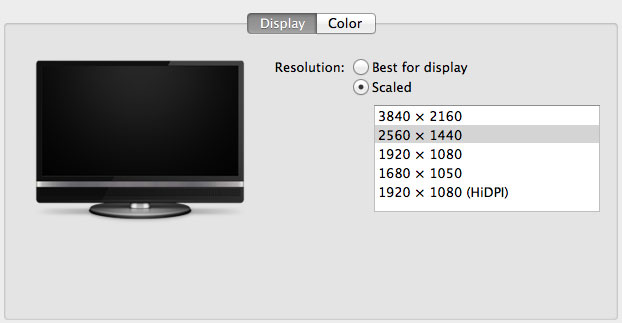
You can use tools like SwitchResX (or Quartz Debug or the necessary Terminal command) to enable a 1080p HiDPI mode, but then you end up with insanely low point density of around 68 PPI. Unfortunately it doesn’t appear to be possible to define your own HiDPI modes in OS X, you have to rely on those that Apple officially supports. I tried creating a 5120 x 2880 (2560 x 1440 HiDPI) mode but I couldn't get it working under Mavericks. I'm not sure if I was limited by the OS or if Sharp's EDID-specified max resolution of 3840 x 2160 prevented OS X from accepting what I was trying to do.
Apple tends to be very focused on controlling the user experience so it can ensure a good one. Given that Apple hasn’t yet thrown its hat into the 4K display race, it’s not surprising that we don’t have a plethora of HiDPI scaled resolutions available for 3rd party 4K displays.
If Apple decides to stick to its traditional method of scaling resolution in pursuit of a desktop Retina Display I would expect to see a 27” 5120 x 2880 panel, and perhaps a 24” 3840 x 2160 option. The latter already exists in the form of Dell’s UP2414Q but my guess is Apple is waiting on panel readiness to do a 27” version before pulling the trigger.
The rest of the 4K experience under OS X was pretty good. The PN-K321 display seemed far more compatible with the Mac Pro setup than the UP2414Q. Wake from sleep wasn't an issue the vast majority of the time. I did have one situation where I had to disconnect/reconnect the DisplayPort cable after the display wouldn't wake up.
SSD
The new Mac Pro does the right thing and abandons internal hard drives in favor of high-speed PCIe based storage. You could argue wanting more internal PCIe storage, but hard drives don’t belong inside this machine - for that there’s Thunderbolt 2.
There’s a single proprietary Apple PCIe SSD connector and module inside the new Mac Pro. The connector looks similar to what’s in the new MacBook Pro but I haven’t verified compatibility. Unlike the new MacBook Pros, the Mac Pro SSDs only ship in a x4 PCIe configuration. The result is faster peak sequential speeds.

Custom SSD behind the GPU board on the left
My review sample had a 512GB Samsung XP941 based drive. I believe this is a 2-bit-per-cell MLC design with a 512MB LPDDR2-1066 DRAM. Samsung’s SSD architectures have evolved pretty well over the years. As long as you’re careful not to completely fill the drive you should be ok from an IO consistency standpoint as well. I continue to recommend keeping around 15 - 20% of the SSD free if you want to keep performance at a relatively high level. Definitely keep this in mind if you’re torn about what capacity drive you should outfit your system with.
| Mac Pro (Late 2013) SSD Options | ||||||
| 4-Core Config | 6-Core Config | |||||
| 256GB | Included | Included | ||||
| 512GB | +$300 | +$300 | ||||
| 1TB | +$800 | +$800 | ||||
Apple offers three SSD capacities with the new Mac Pro: 256GB, 512GB and 1TB. Both default configurations come with a 256GB drive. Upgrades to 512GB/1TB cost the same regardless of your starting point: $300 and $800, respectively. Chances are you’re going to depend fairly heavily on external storage for media, which leaves you the flexibility of sticking with the base 256GB configuration. Personally I’d use the Mac Pro just as much as a regular PC (including gaming) as I would for photo/video work, so I’d push for the highest capacity SSD possible. Since Apple isn’t using a standard connector or form factor here, you can’t necessarily count on anyone offering a decent aftermarket solutions (although OWC has done so in the past). If OWC or anyone else was brave enough to produce an aftermarket Mac Pro SSD, it might come with fewer tradeoffs compared to what we’ve seen in the portable Mac space. I’m primarily talking about ultra low idle power not being as much of an issue for an SSD in the Mac Pro. Last time I looked, OWC’s aftermarket MacBook Air/Pro SSDs consumed more power at idle compared to the Apple OEM drives. The same issues wouldn’t matter in a Mac Pro.
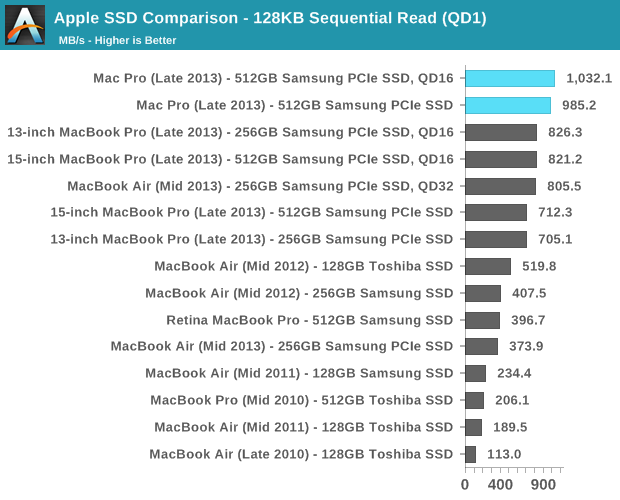
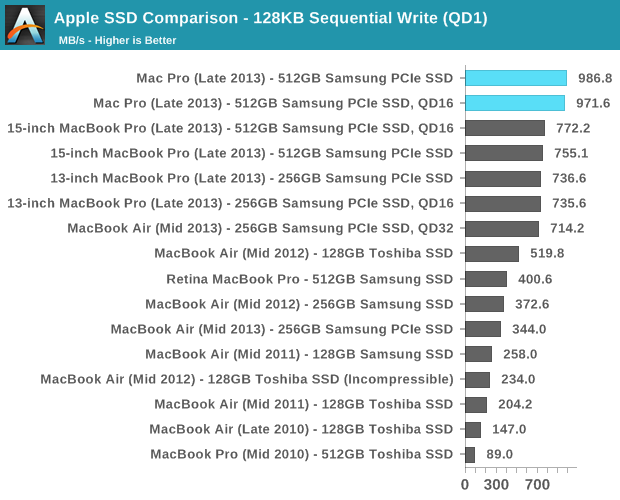
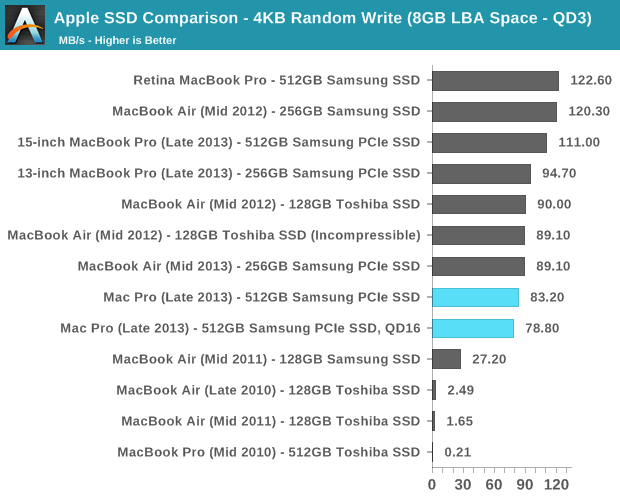
I ran the 512GB SSD through our standard four-corners Iometer test suite. The numbers were expectedly a bit higher than what I measured on the 15-inch Haswell rMBP and the 21.5-inch Haswell iMac thanks to the drive’s PCIe x4 interface. Random write performance takes a step backwards but all of the results we're showing here are more than enough for single user workstation use. Although Mavericks itself seems to have issues that can cause high latency IO (particularly around quicklook), the SSD in the Mac Pro performed quite well.

I’m beyond pleased to see that Apple has moved its Mac lineup virtually top to bottom to PCIe SSDs. This is absolutely the right approach, and one that all other OEMs should follow.
Gigabit Ethernet & WiFi
Broadcom won all of the networking sockets in the new Mac Pro. Each machine ships with two BCM57762 Gigabit Ethernet controllers and a BCM4360 802.11ac controller. Each controller is connected to its own PCIe 2.0 x1 lane, guaranteeing it more than enough bandwidth to operate at full speed. The GigE ports on the back of the Mac Pro are thus independent and can sustain full bandwidth in tandem.
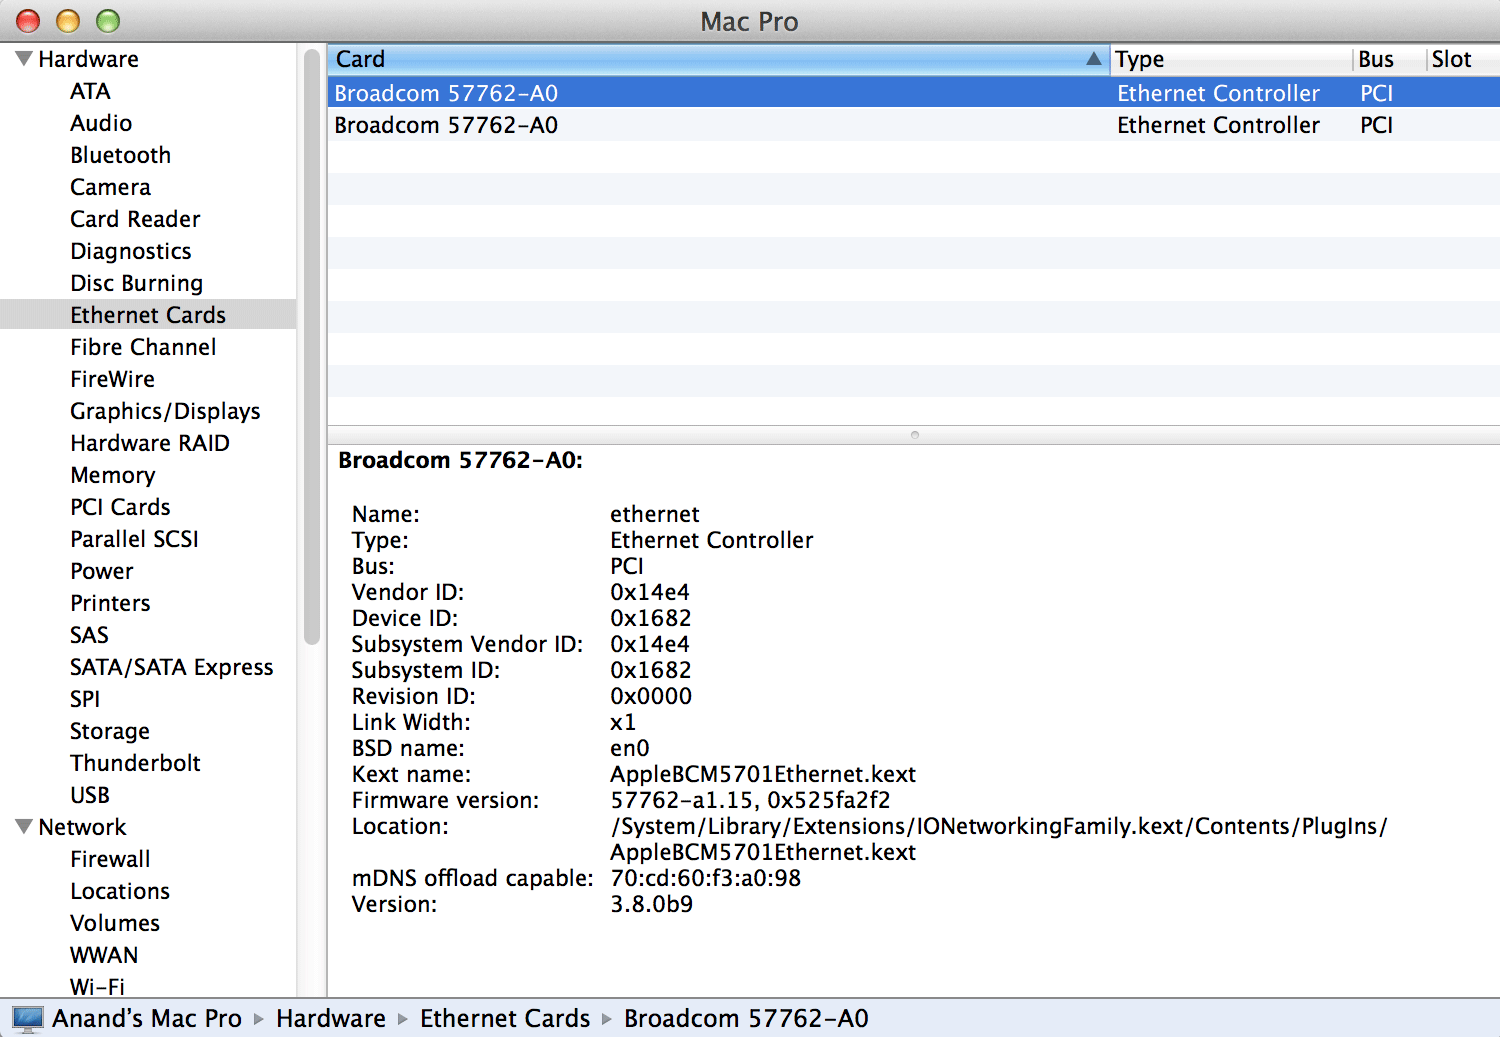
The 802.11ac solution is the same 3-stream BCM4360 you’ll find in the new Haswell MacBook Pros. The Broadcom controller supports 80MHz wide channels and 256 QAM, resulting in a peak theoretical data rate of 433Mbps per stream. With three streams that works out to be a max negotiated PHY rate of 1.3Gbps.
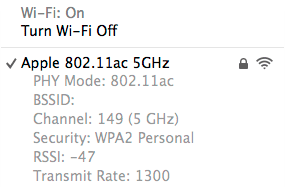
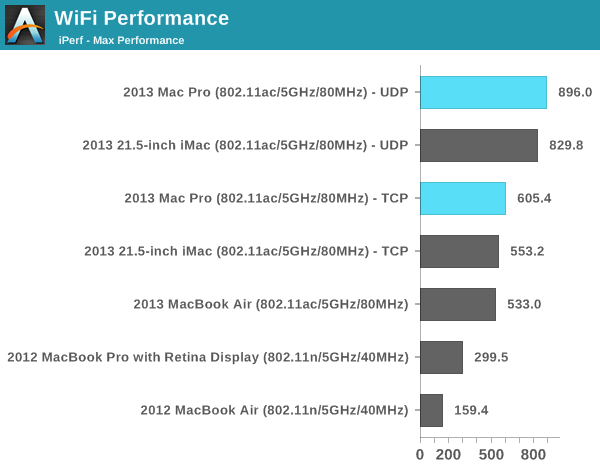
In practice I found the Mac Pro’s WiFi performance in best conditions to be similar to that of the 21.5-inch 2013 iMac, which ships with the same hardware. Over UDP that amounts to just under 900Mbps, and a bit over 600Mbps over TCP. You’re still better off using GigE if you can, but 3-stream 802.11ac is arguably good enough if you can’t get a cable down to your Mac.
Thunderbolt 2
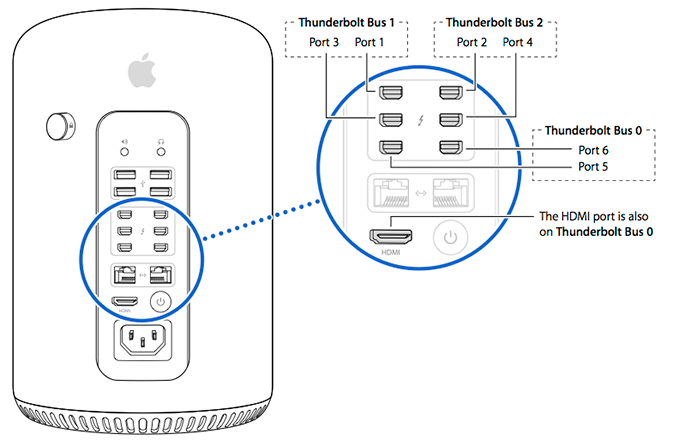
The new Mac Pro integrates three Intel Falcon Ridge Thunderbolt 2 controllers. These are the fully configured controllers, each supporting and driving two Thunderbolt 2 connectors on the back of the Pro for a total of 6 ports.
Pairing Thunderbolt 2 with Ivy Bridge EP is a bit tricky as Apple uses Thunderbolt 2 for display output as well as data. Typically you’d route all display through processor graphics, but in the case of IVB-EP there is no integrated graphics core. On a DIY PC you enable display output over Thunderbolt 2 by running an extra cable out of the discrete GPU and into a separate input that muxes the signal with PCIe and ships it out via another port as Thunderbolt. Here’s where Apple’s custom PCB work comes in handy as all of this is done internal to the Mac Pro. The FirePro’s display outputs are available via any two of the six Thunderbolt 2 ports, as well as the lone HDMI port on the back of the Mac Pro.
How does Thunderbolt 2 differ from the original? For starters, it really would’ve been more accurate to call it Thunderbolt 4K. The interface is fully backwards compatible with Thunderbolt 1.0. You can use all previous Thunderbolt peripherals with the Mac Pro. What’s new in TB2 is its support for channel bonding. The original Thunderbolt spec called for 4 independent 10Gbps channels (2 send/2 receive). That meant no individual device could get access to more than 10Gbps of bandwidth, which isn’t enough to send 4K video.
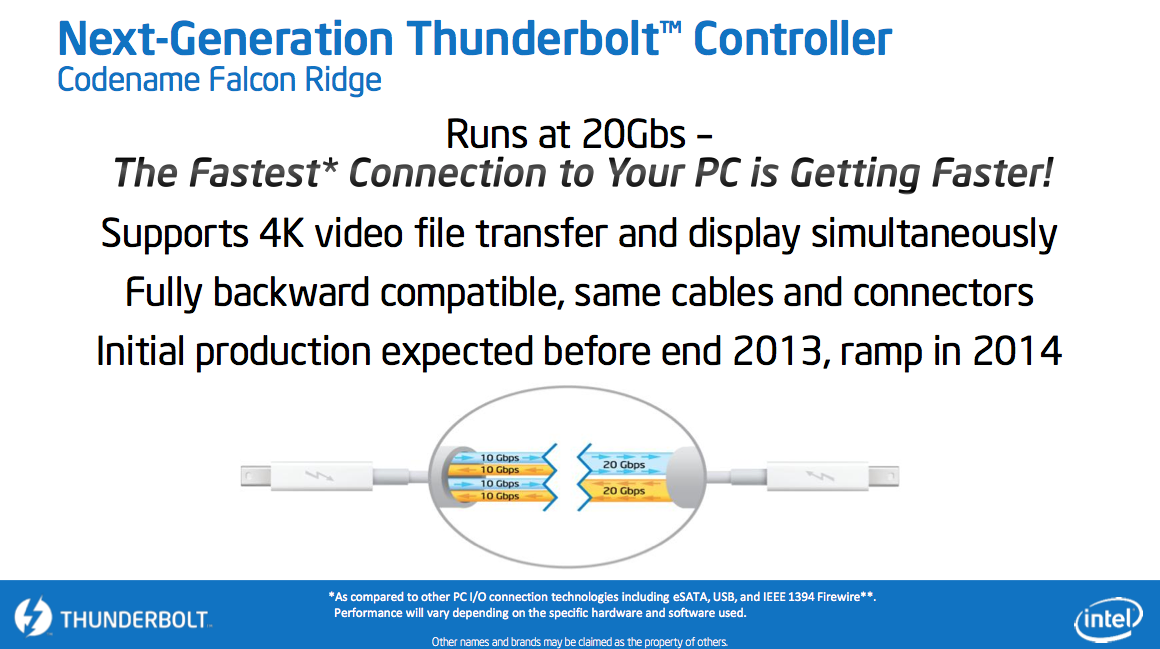
Thunderbolt 2 bonds these channels together to enable 20Gbps in each direction. The total bi-directional bandwidth remains at 40Gbps, but a single device can now use the full 20Gbps. Storage performance should go up if you have enough drives/SSDs to saturate the interface, but more importantly you can now send 4K video over Thunderbolt. Given how big of a focus 4K support is for Apple this round, Thunderbolt 2 mates up nicely with the new Mac Pro.
So far I’ve been able to sustain 1.38GB/s of transfers (11Gbps) over Thunderbolt 2 on the Mac Pro. Due to overhead and PCIe 2.0 limits (16Gbps) you won’t be able to get much closer to the peak rates of Thunderbolt 2.

The impact of chaining a 4K display on Thunderbolt 2 downstream bandwidth
Here’s where the six Thunderbolt 2 and three TB2 controllers come into play. Although you can daisy chain a 4K display onto the back of a Thunderbolt 2 storage device, doing so will severely impact available write bandwidth to that device. Remember that there’s only 20Gbps available in each direction, and running a 3840 x 2160 24bpp display at 60Hz already uses over 14Gbps of bandwidth just for display. I measured less than 4Gbps of bandwidth (~480MB/s) available for writes to a Thunderbolt 2 device downstream from the Mac Pro if it had a 4K display plugged in to it. Read performance remained untouched since display data only flows from host to display, leaving a full 20Gbps available for reads. If you’re going to connect Thunderbolt 2 devices to the Mac Pro as well as a 4K display, you’ll want to make sure that they aren’t on the same chain.
If we start numbering in the top left corner of the 2 x 3 array of Thunderbolt ports and go left to right down the stack, you'll want to first populate ports 1, 2 and 5 before filling in the rest. The diagram below should help simplify:
Power Consumption & Noise
The Mac Pro’s thermal core makes a lot of sense from an area efficiency standpoint as the chances that you have all three processors in the system (Xeon CPU + dual AMD FirePro GPUs) running at max speed at the same time is highly unlikely. By having all three players share one large heatsink Apple can optimize for the most likely usage scenarios where at most one processor is running at close to max TDP. From the moment the system was introduced however I was curious to see if its thermal design could deal with all three processors going full tilt. I decided to test both scenarios out.
The vast majority of the time the Mac Pro’s single fan spins at a paltry 769 RPM. At this speed the Mac Pro is virtually silent. I have a Promise Pegasus R6 Thunderbolt chassis with four 3.5” 7200 RPM hard drives inside. The Pegasus sits four feet away from my Mac Pro and at idle the hum of its drives drowns out the idle fan noise of the Mac.
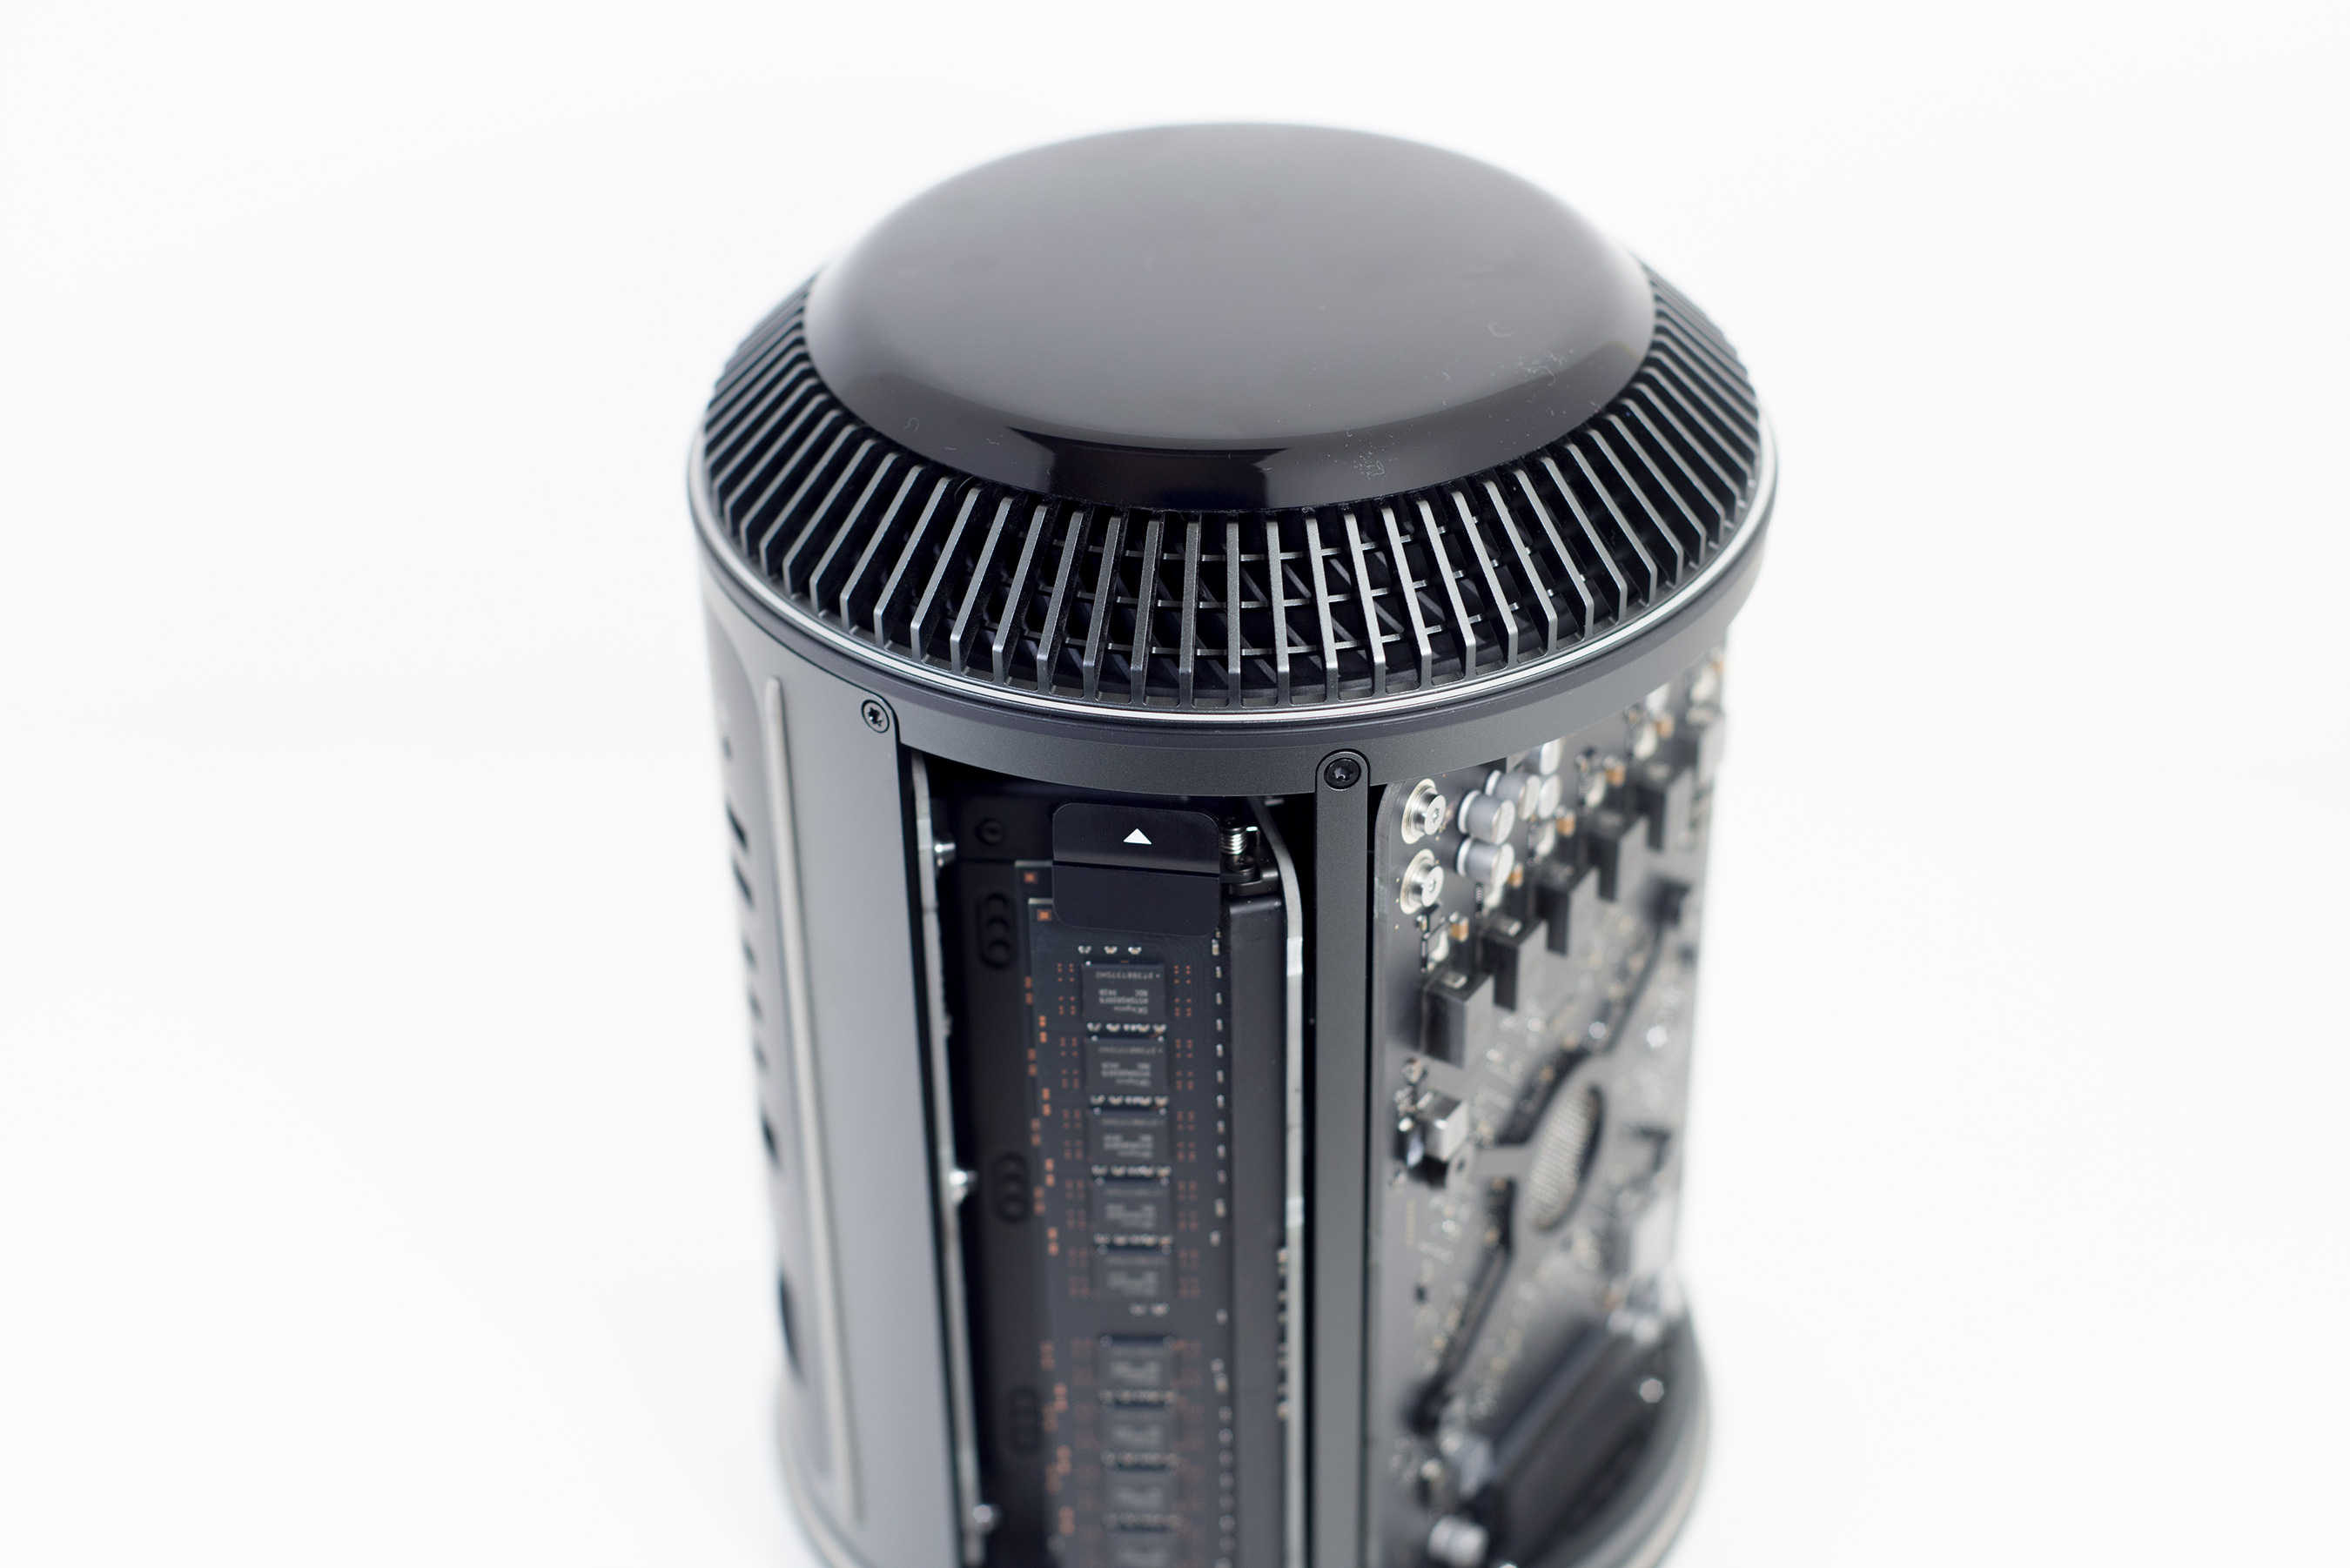
Even running heavily threaded CPU benchmarks does nothing to impact fan speed. It's not until you run a prolonged workload that you can hear an increase in noise from the Mac Pro. I ran FurMark under OS X in parallel with a relatively heavy 4K render in Final Cut Pro. I was rendering a 20 minute 4K project with two effects applied across the entire timeline. The basic render used up 4 - 8 threads, while the effects ensured the compute GPU had some work to do. FurMark obviously kept the display GPU busy. After around 25% of the rendering task was complete the Mac Pro’s fan smoothly scaled up to 1400 RPM, then 1600 RPM and finally stopping at what I believe is full speed: 1900 RPM.
I crudely measured noise sitting at my desk, approximately 18” away from the Mac Pro at all of these points:
| Mac Pro (Late 2013) Fan Noise vs. RPM | ||||||
| Fan Speed (RPM) | Measured Sound Pressure Level @ 18" | |||||
| Off | 32.2 dBA | |||||
| 770 RPM | 32.4 dBA | |||||
| 890 RPM | 32.8 dBA | |||||
| 1097 RPM | 34.1 dBA | |||||
| 1193 RPM | 35.2 dBA | |||||
| 1440 RPM | 38.6 dBA | |||||
| 1500 RPM | 39.4 dBA | |||||
| 1900 RPM | 44.7 dBA | |||||
System noise isn’t an issue the vast majority of the time. Even if you’re running for short bursts with everything cranking away on a problem. It’s only under prolonged use of the CPU + both GPUs that the fan has to spin up this high. I quit FurMark and kept the FCP render going, which brought system power down from ~380W to ~326W. It also slowly dropped fan speed from 1900 RPM down to 1500 RPM before smoothly alternating between 1200 RPM and 1450 RPM. The way the Mac Pro’s fan ramps is actually just as important as its ability to remove heat. There are no dramatic increases in speed, just an incredibly smooth curve that the Pro’s fan moves up and down.
The system never gets annoyingly loud, it just varies between silent and calmly reminding you that there’s a large fan inside. Even at full bore the Mac Pro’s fan noise is more pleasant than harsh. It’s not magic, just good system design coupled with the fact that even with a pair of D700s Apple went a bit conservative on GPU speed. Had this been a system capable of pulling 800W at the wall, we’d be having a different discussion about noise.
My next task was to see what actually happens in this worst case scenario. If you’re running all of the parts at full tilt, are any of them going to throttle? I have to work pretty hard to get the fan to spin up under OS X, but in Windows it’s a lot easier since I can just toss a single multi-GPU workload at the problem.
I started out by running LuxMark, an OpenCL workload, on both GPUs as well as a multithreaded 7-Zip benchmark on all of the CPU cores. I monitored both CPU and GPU frequencies. The result was no throttling across the board:
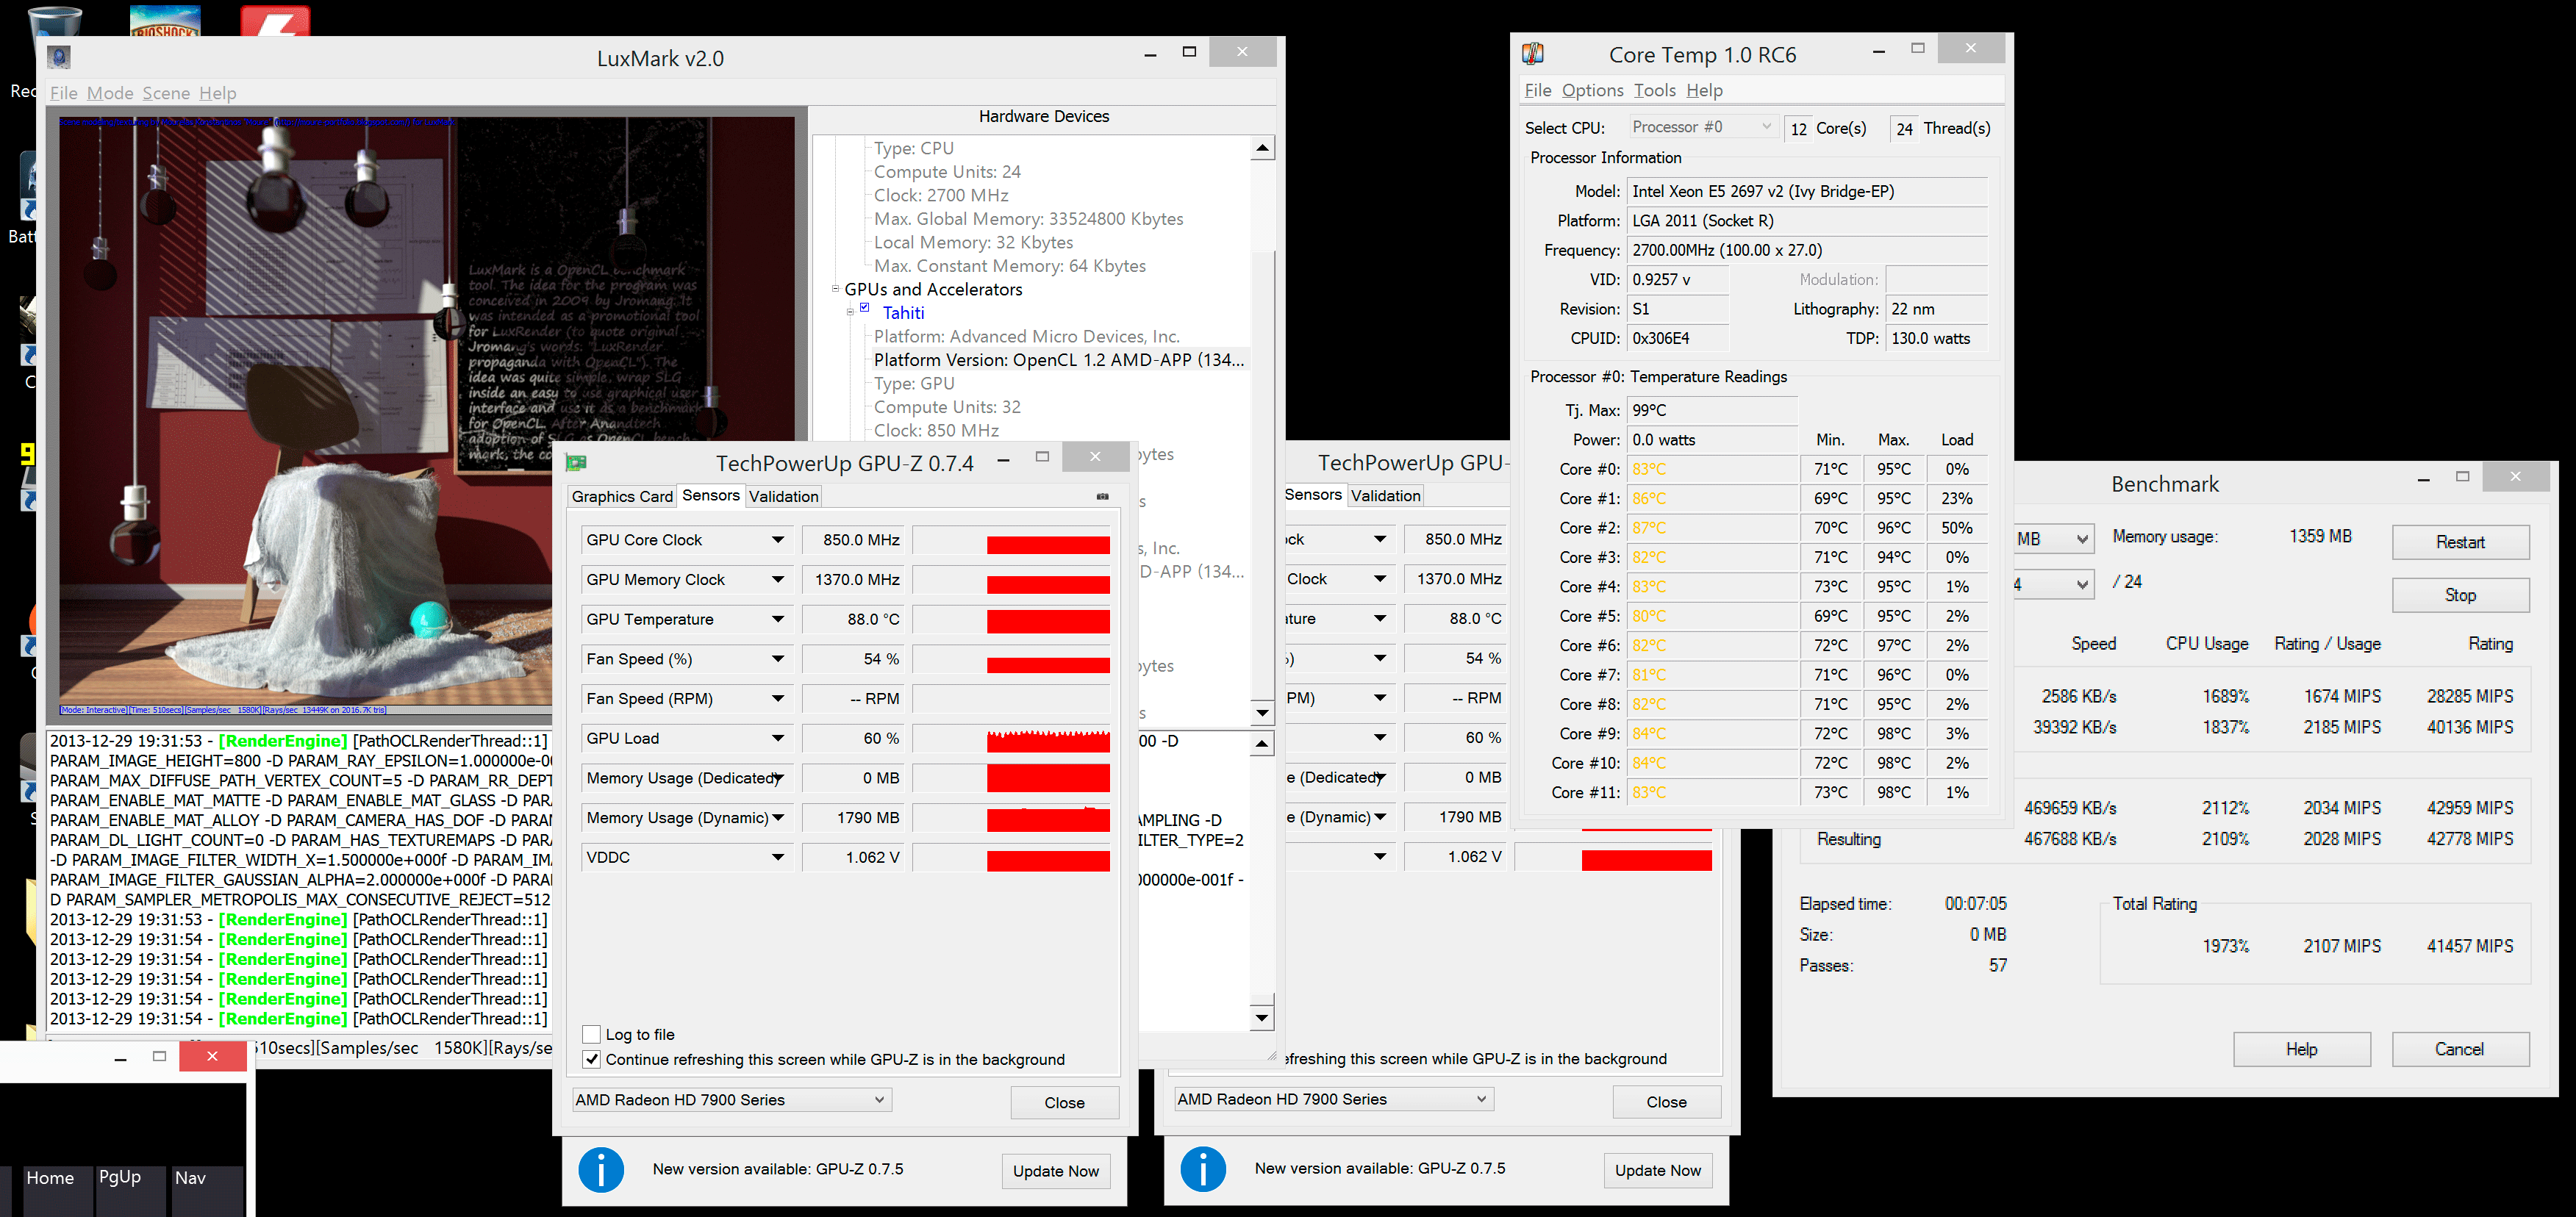
Getting an accurate reading on GPU frequencies from Tahiti based GPUs ends up being harder than I expected, but I saw what Ryan reminded me is typical behavior where the GPUs alternate between their 650MHz base clock and 850MHz max turbo. We don’t have good tools to actually measure their behavior in between unfortunately.
The same was true for the CPU. Even with all 12 cores taxed heavily, I never saw any drops below the CPU’s 2.7GHz base clock.
Next I tried a heavier workload on the CPU: a H.264 video encode. Here I just ran the x264 5.01 benchmark in parallel with the LuxMark workload. Once again, I saw no drop in CPU or GPU clocks although I believe I was approaching the limits of where that would hold true. The system was pulling an average of 410W at that point, with peak power draw at 429W.

If you’re wondering, there was little to no impact on the x264 benchmark from having LuxMark run in the background. The first rendering pass took about a 3% hit, likely due to the CPU not being able to turbo as high/at all, but the second heavily threaded pass was on par with my standalone run without LuxMark in the background. LuxMark on the other hand saw around a 14% reduction in performance, from 2040K samples per second down to 1750K when run in parallel with the x264 test. We’re still talking about two extremely compute intensive tasks, the fact that I can run both with little performance reduction is an example of the sort of performance scaling that’s possible if you leverage all of the compute in the Mac Pro.
So far I wasn’t surprised by the platform’s behavior. The Mac Pro’s thermal core and fan was enough to handle a real world workload without throttling. But what about a power virus? For this I ran a combination of FurMark at 2560 x 1440 and Prime95 (in-place large FFTs) across all GPUs and CPU cores.
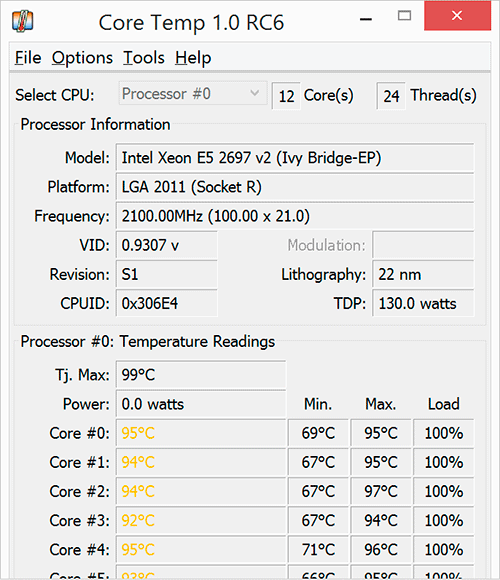
The GPUs peaked at 97C, which is pretty much as high as a 28nm Tahiti should ever go. The CPU hit a similar temperature, with most cores hovering around 95C. GPU clocks seemed ok, with both GPUs running between 650 - 850MHz (base - boost). The CPU on the other hand dropped down to 2.1GHz (I even saw a short excursion down to 2GHz). Average power while running this workload was 437W, peaking at 463W before CPU throttling kicked in. If you plot out a graph of power vs. time you can see the CPU throttling kick in during the workload.

I have to stress that I haven’t been able to get this to happen in any normal workload, only what’s effectively a power virus for the GPUs and something quite unrealistic for the CPUs. Either way it shows us the upper limit of what the thermal core can do.
Overall power consumption is down considerably compared to previous generation Mac Pros:
| Mac Pro Power Consumption | ||||||
| Idle | Multithreaded CPU Load | |||||
| Apple Mac Pro (Late 2013/2.7GHz-12C) | 85.5W | 190.7W (Cinebench 11.5) | ||||
| Apple Mac Pro (Early 2009/2.93GHz-8C) | 125.3W | 254W (Cinebench R10) | ||||
| Apple PowerMac G5 Dual 2.5GHz | 120.8W | 252.2W (Cinebench R10) | ||||
Idle power consumption is down and power efficiency under load is way better than the early 2009 Mac Pro I have here. As far as I can tell, max power consumption for either compute system (CPU alone or dual GPUs alone) is around 300 - 320W. With both subsystems combined you'll get the 437W figure I talked about earlier.
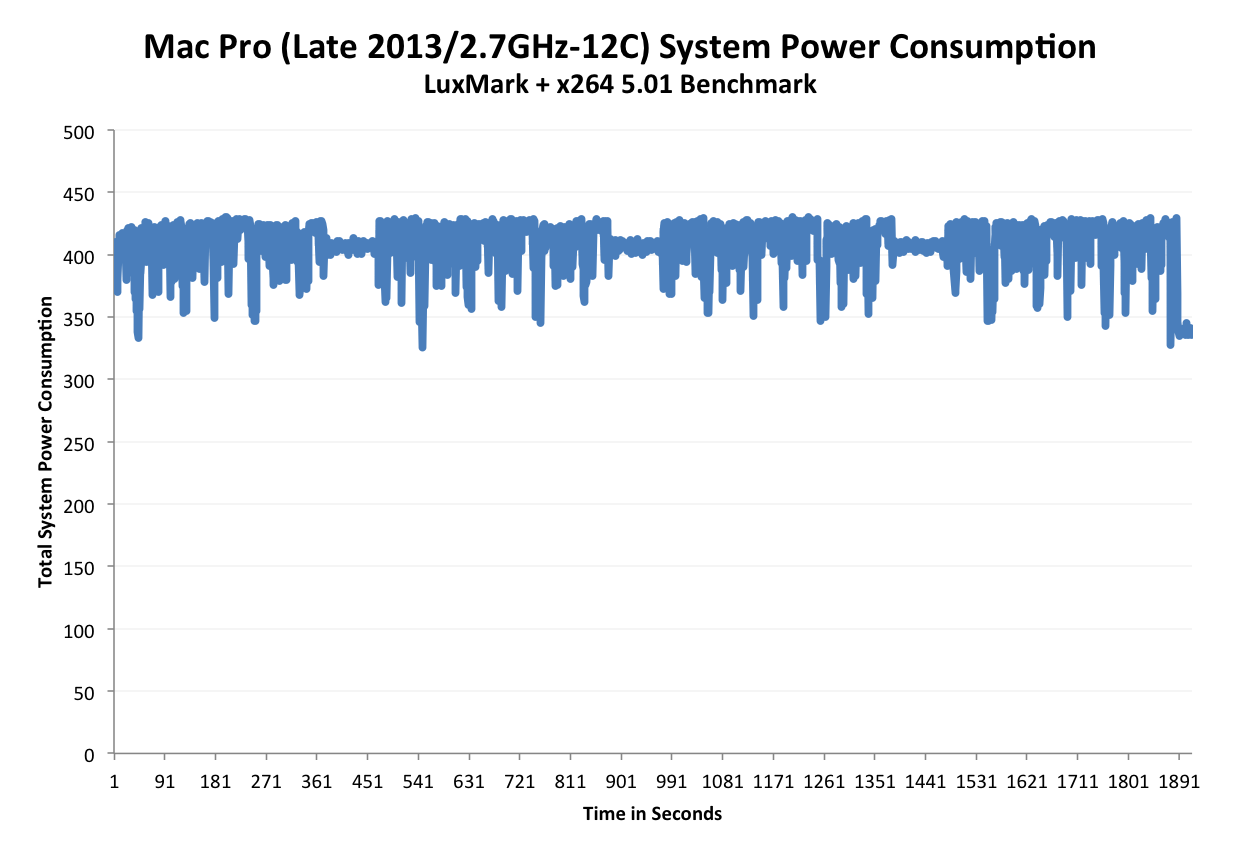
You don't even need a power virus to get there. Running two realistic workloads that are heavy enough won't get you up to the 463W point where I saw throttling, but it'll get you close to the max average power I recorded on the Mac Pro.
Final Words
I honestly never thought I’d go back to a Mac Pro. I appreciated the flexibility offered by my 15-inch MacBook Pro as a desktop, and there’s no way I was going to take two steps back in single threaded performance just to get a quieter system. Over the past year I spent a lot of time with the 27-inch iMac as I continued to evaluate Apple’s Fusion Drive. I appreciated the greater thermal headroom, the quieter operation and the better GPU performance (at least with the high-end config) that the iMac offered me above the 15-inch rMBP. Combine that with the fact that I’ve been on the road a lot more lately and have had to take the 13-inch rMBP more, and I quickly found myself in a situation where I was back to using a desktop again.
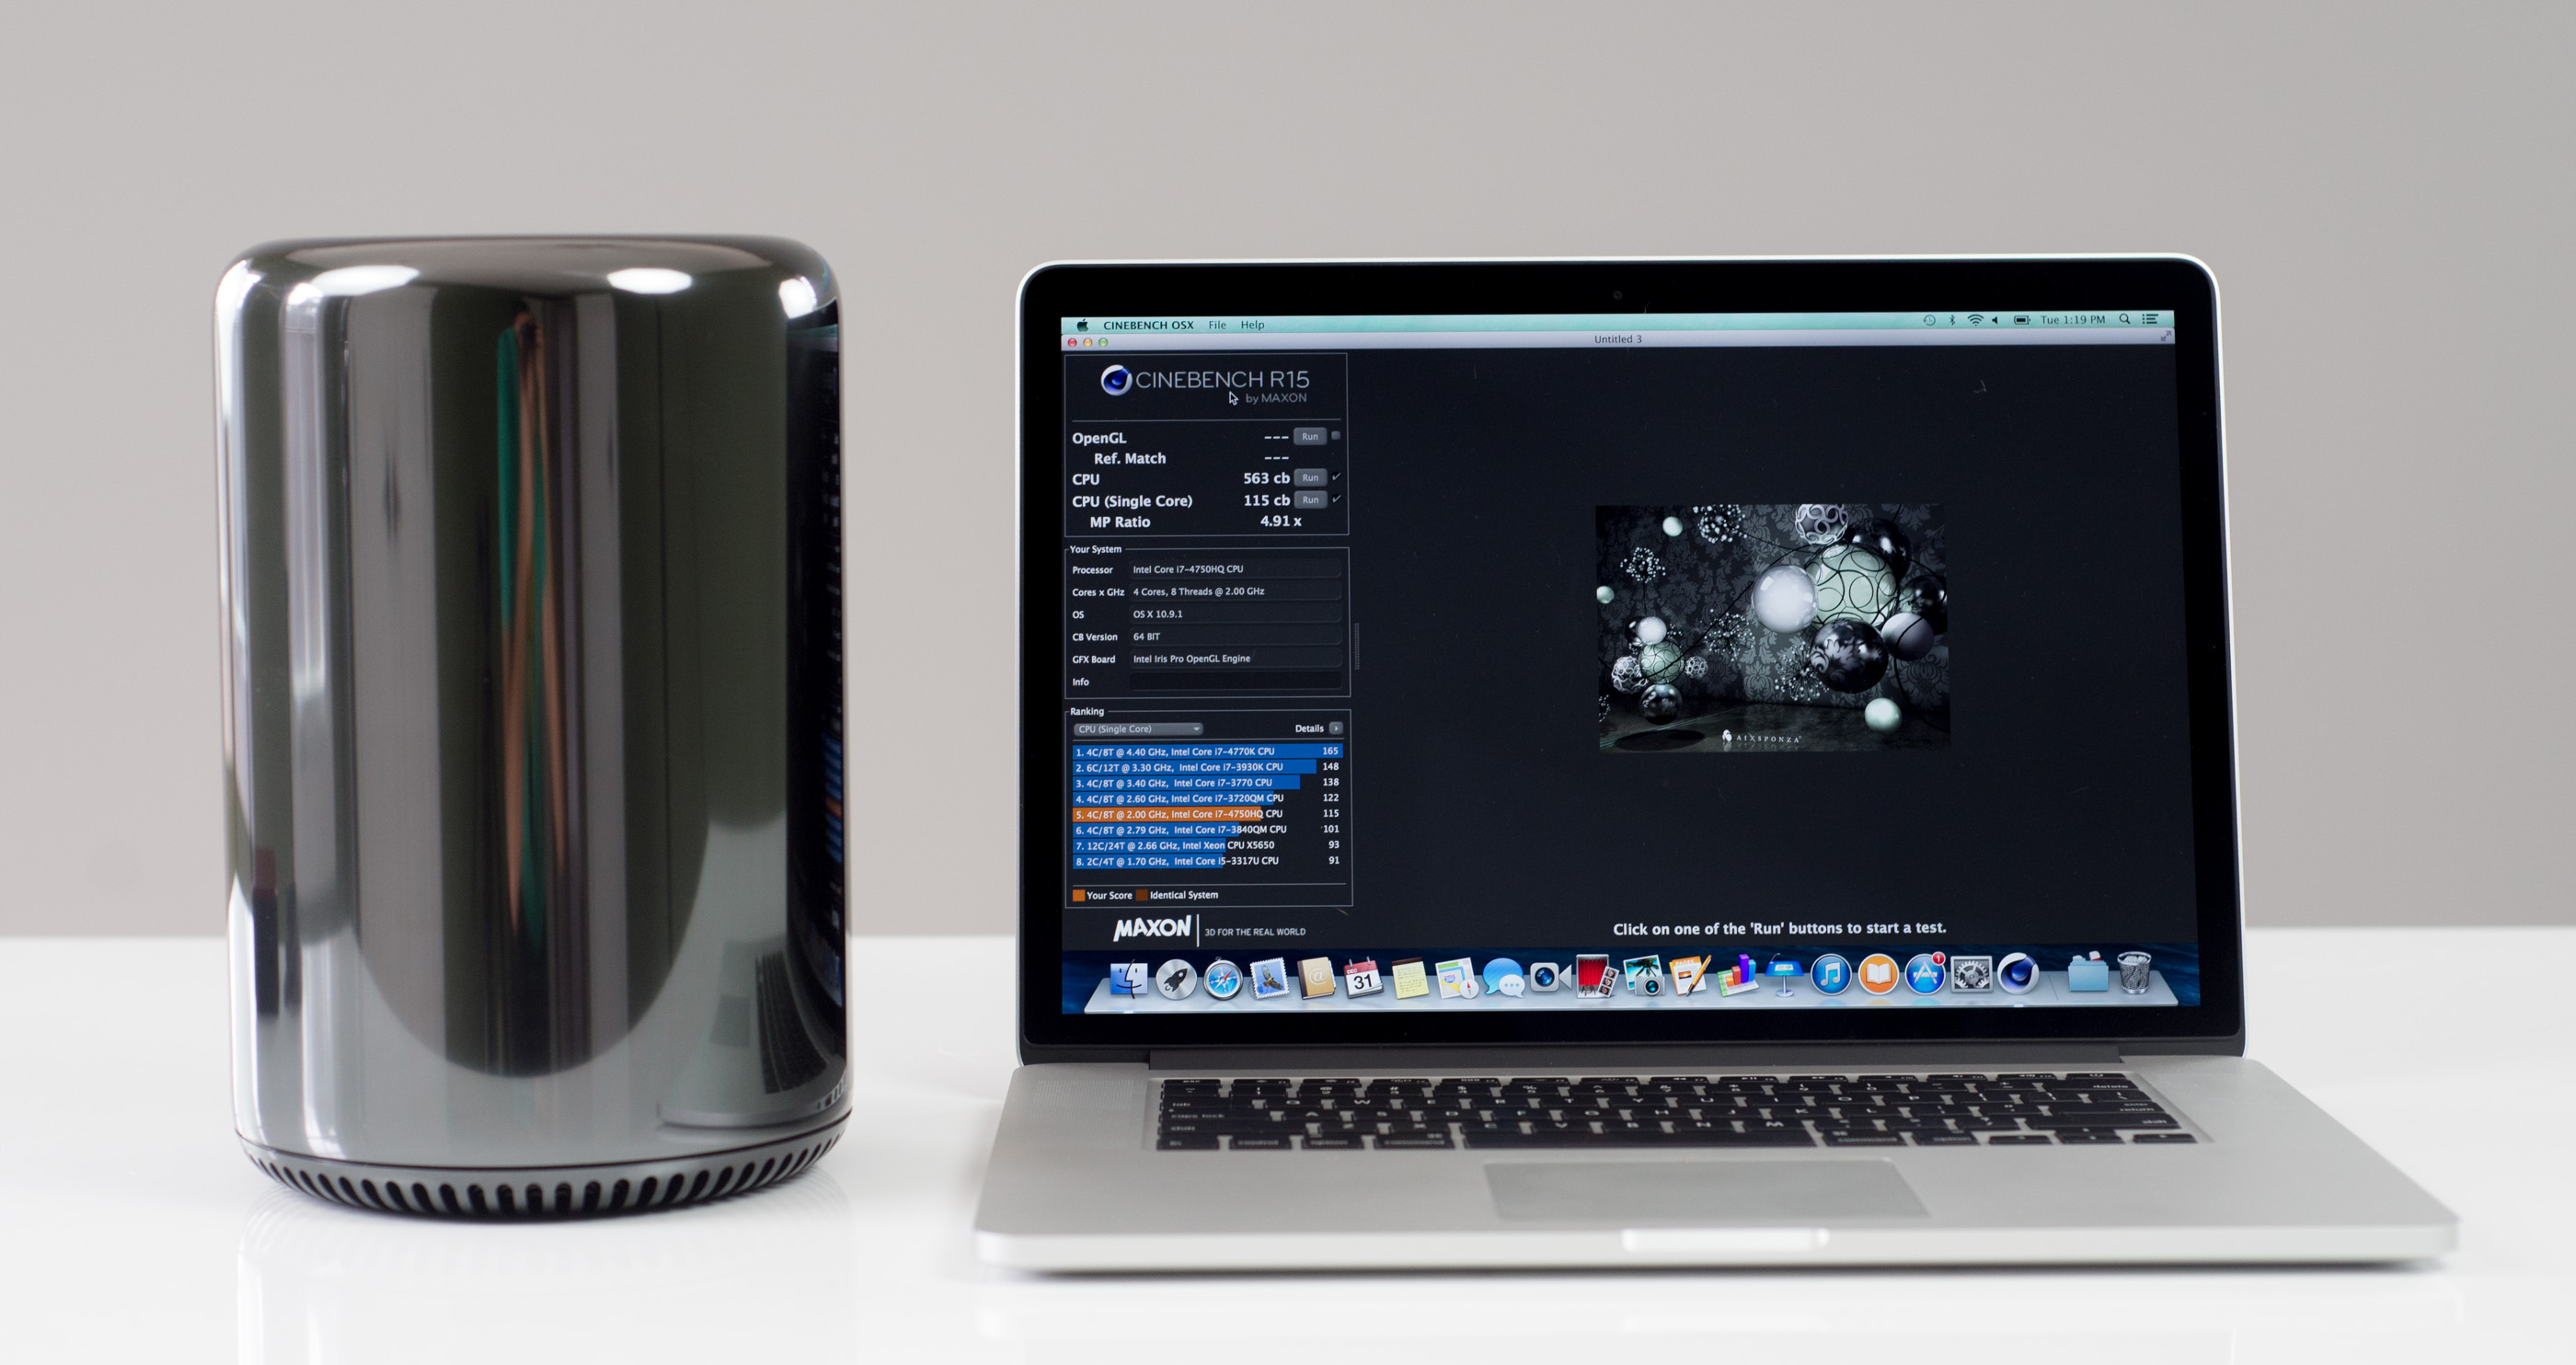
The new Mac Pro offers an option for those users whose workloads can benefit from having more cores, memory and GPU performance. The latest version of Final Cut Pro as well as the rest of Apple’s professional apps do a great job of splitting their work across multiple CPU cores. Even simple tasks like importing photos into iPhoto or Lightroom is extremely well threaded these days. It’s in these workloads where a 6, 8 or 12-core Mac Pro can offer a healthy performance advantage.
Apple’s big bet with the new Mac Pro however is on GPU computing becoming even more relevant in the future. Relying on CPU scaling alone the Mac Pro is doomed to moderate speed increases going forward. By leveraging a pair of high-end GPUs, including one more or less dedicated for compute work, Apple hopes to realize the sort of huge performance gains it has enjoyed in its phones/tablets over the years. The modern Apple is a company that values GPU performance, investing heavily in the GPUs used in all of its products. Even those that leverage Intel’s integrated graphics are pushed as far as possible within thermal constraints. It makes total sense that Apple would choose to outfit its highest end Mac with two GPUs.
It's actually shocking how poorly Final Cut Pro 10.1 runs on older Mac Pros without an upgraded GPU (or even newer Macs with integrated graphics). It's not uncommon to see an 8-core Mac Pro have the vast majority of its cores remain idle, waiting for effects to finish rendering on the GPU in some of these older configurations. If you haven't upgraded the GPU in your Mac Pro you'll likely see a tremendous performance increase when going to the new Pro.
When they’re used, the dual-GPU approach makes a lot of sense. Leaving one dedicated for compute work by default makes for a much better compute environment. Allowing the flexibility to use both however enables apps to take advantage of the power, should they need it. When not used, the user doesn’t pay a penalty for the second GPU. Modern GPUs have no issues driving down to ultra low power states when idle, and since the GPUs share a heatsink there’s no wasted space either.
The ability to support up to 64GB of RAM and a nice PCIe x4 SSD complete the package, making the Mac Pro flexible enough to deal with a different class of workloads compared to the rest of Apple's lineup.

I like the new Mac Pro’s chassis a lot. It’s a risk, but one that absolutely must be taken if the desktop is to continue to exist and thrive. In the 2000s it was all about building something that wasn’t the beige box, now it’s about building something that isn’t the big tower. The new Mac Pro is compact, quiet, powerful all while looking and feeling great. You can argue that some of these things don’t really matter in a desktop, but at the prices you pay for a high-end workstation, they sure are nice to have.
The Mac Pro’s thermal design makes a tremendous amount of sense, especially given the relative maturity of heterogeneous computing applications. Apple’s obsession with delivering big performance improvements each generation drove it to really beefing up GPU performance in the new Mac Pro. The reality however is that with the exception of some of Apple’s core Pro apps (e.g. Final Cut Pro, Motion), compute workloads divided up among both GPUs are few and far between. Furthermore, for those present-day applications that do leverage the GPU, it’s rare that you’re going to see aggressive CPU use as well (Final Cut Pro being somewhat of an exception there). Designing a system with three independent heatsinks only to have most of that space wasted for the majority of the time seems silly - particularly if you’re trying to build a more compact, more modern desktop.
The new Mac Pro’s thermal core works extremely well in practice. The single, shared heatsink and large fan keep the system cool and quiet. Real world workloads that I threw at the machine weren’t enough to throttle any of the processors (CPU or GPU). Despite its compact proportions, the Mac Pro’s cooling solution is appropriately sized for the silicon it serves. I don't see much room for Apple to move to more powerful GPUs though. If the next generation of GPUs aren't significantly more power efficient, Apple may have to wait for 14/16nm FinFET based silicon before it can substantially upgrade the graphics power of the Mac Pro.
Apple did a good job of hiding most of Intel’s Ivy Bridge EP platform faults from the end user. Both USB 3.0 and Thunderbolt 2 are present, with the latter capable of driving up to 6 displays without any funny cable trickery.
I continue to appreciate Apple’s embracing of Thunderbolt, and in the case of the Mac Pro, Thunderbolt 2. Apple really did use every single PCIe lane offered by Intel’s Ivy Bridge EP CPU and chipset, and built a system that’s as balanced as possible from a bandwidth perspective.
As the first Mac with proper 4K support (meaning not only resolution but 60Hz refresh rate as well), the Mac Pro does a reasonable job - assuming you pick the right monitor. It turns out there’s a very good reason Apple only offers the Sharp PN-K321 via the Apple Store: 4K display compatibility under OS X is still a bit like the wild west at this point. I do expect that Apple will quickly fix things (and likely offer their own 3840 x 2160 and/or 5120 x 2880 panels) in the near future, but early adopters beware.
I am disappointed that Apple didn’t enable any HiDPI modes on the 32” Sharp display. While I found 3840 x 2160 a great resolution for video work, for everything else it made on-screen menus and text a bit too small. I would love to see a 2560 x 1440 HiDPI option (rendering offscreen at 5120 x 2880 and but scaling down to 3840 x 2160 for display) but it looks like I may have to wait for Apple’s own display before I get something like that.
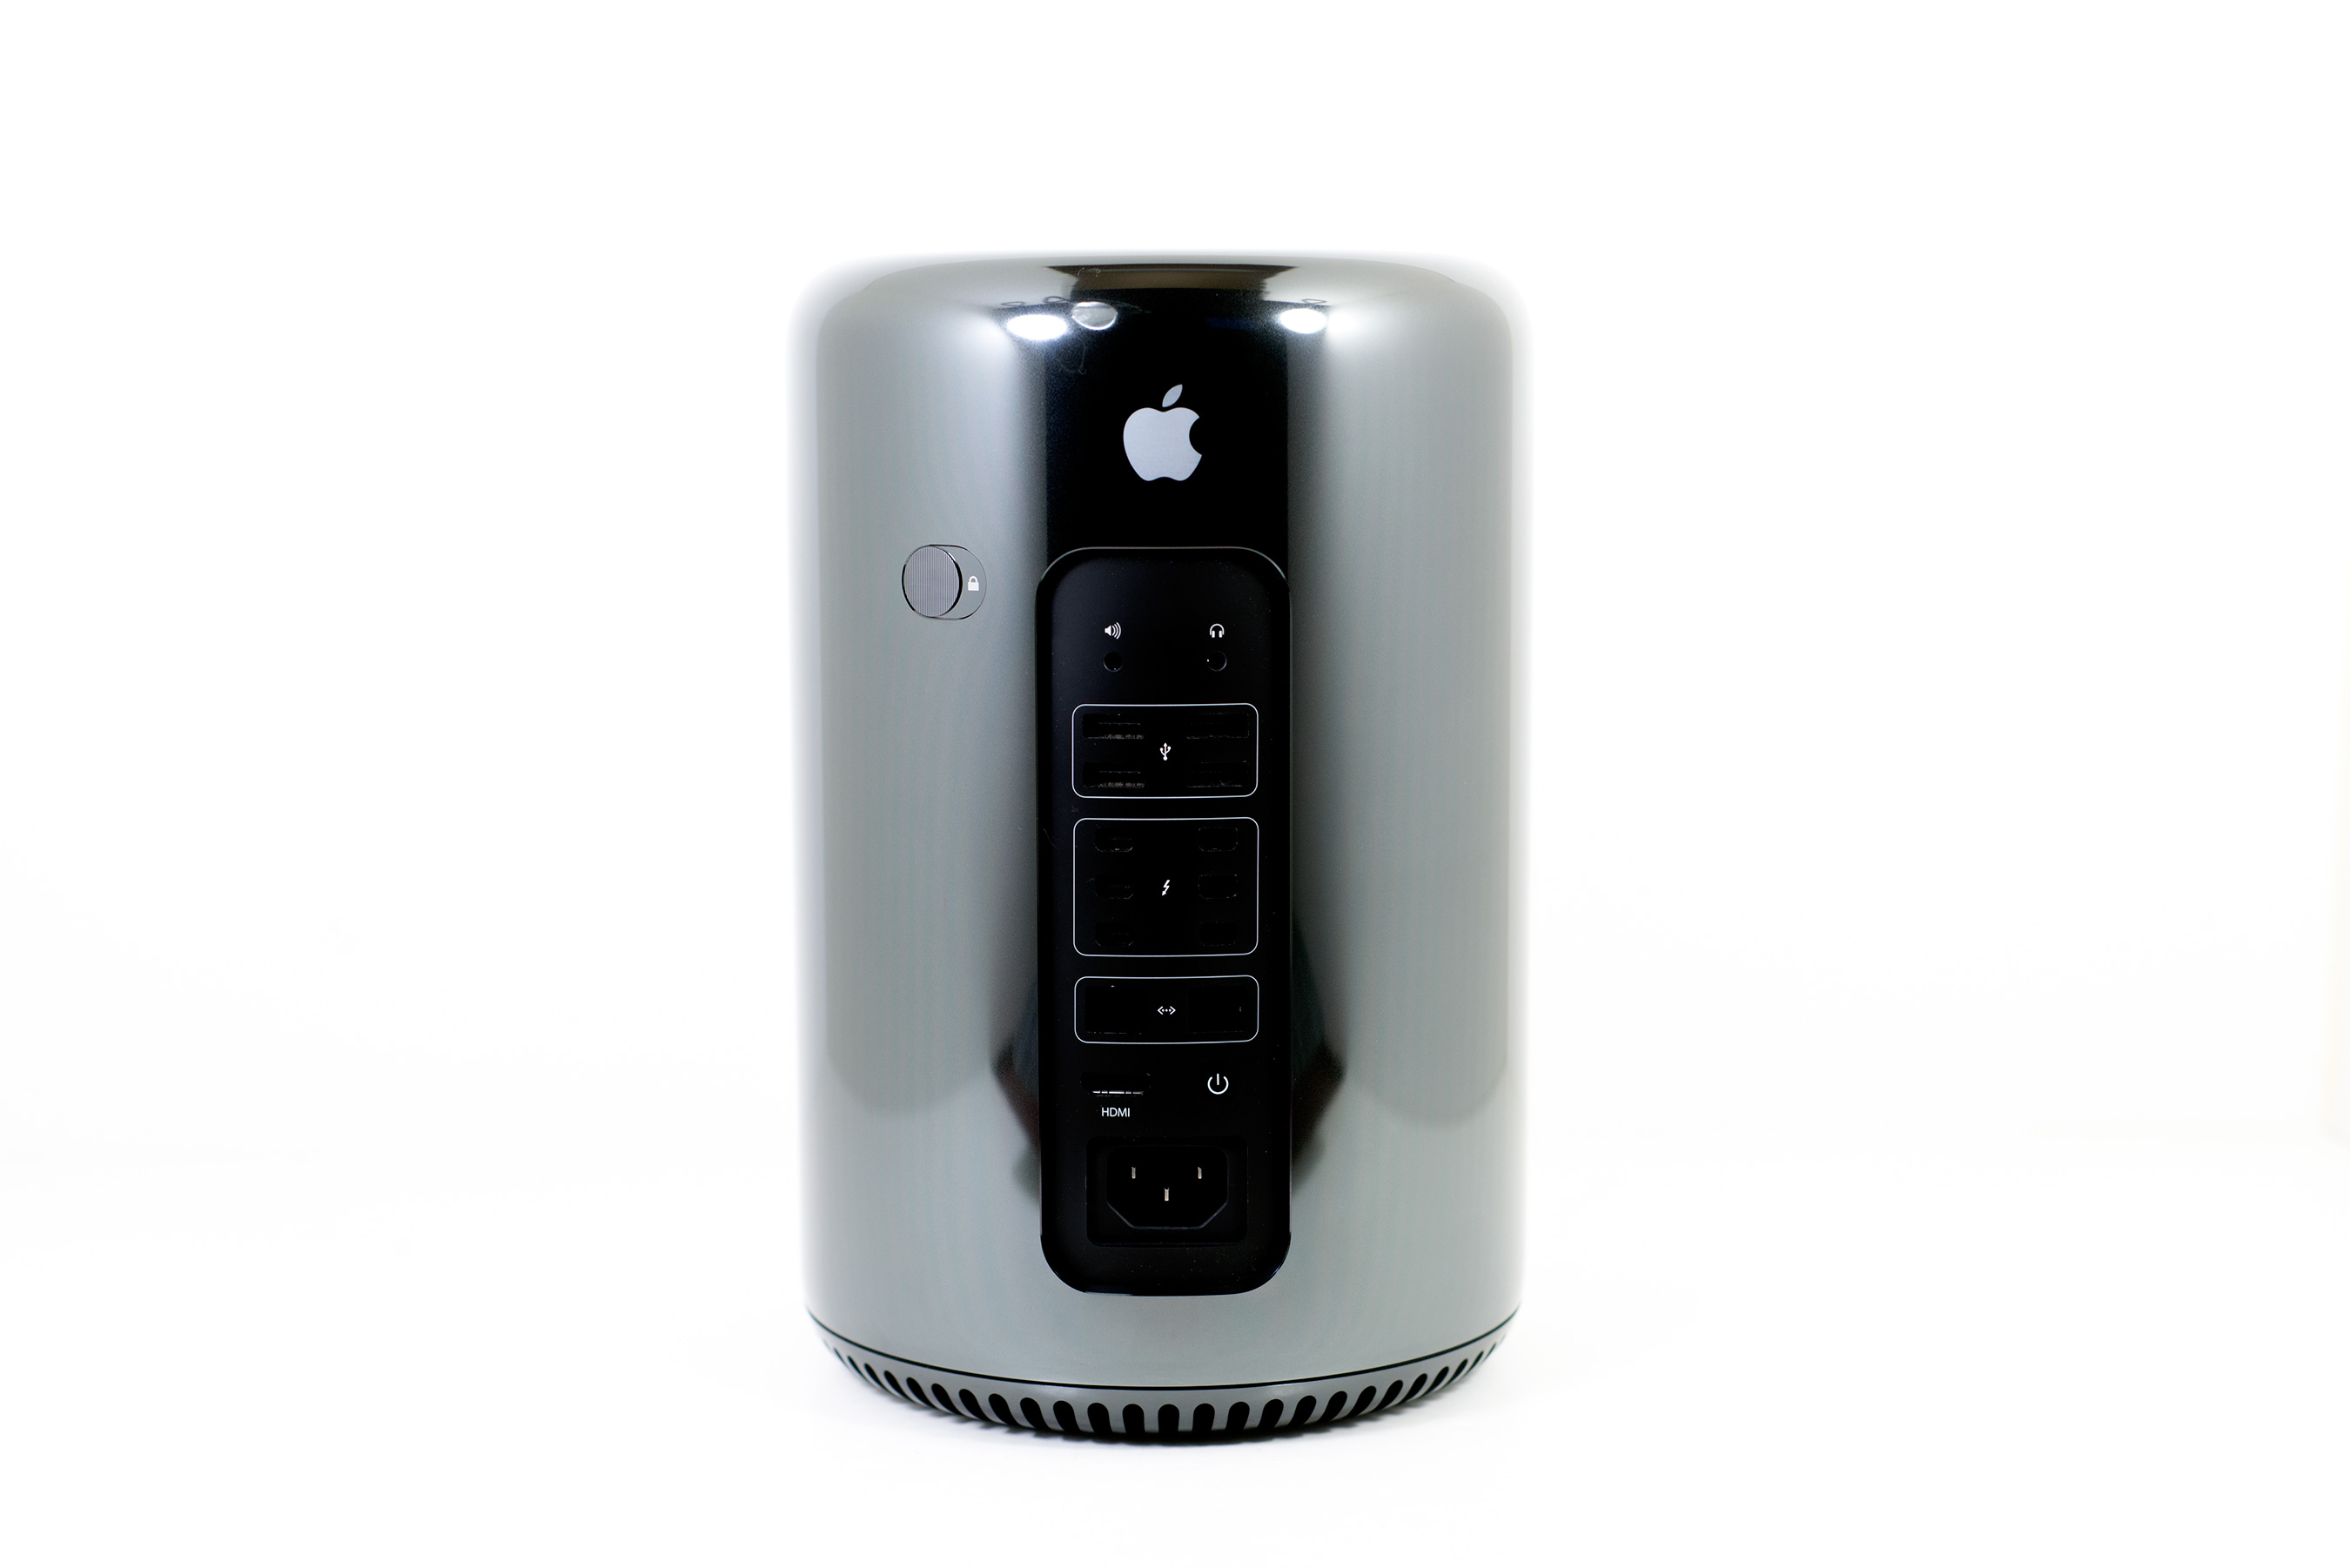
My one hope is that Apple won’t treat the new Mac Pro the same way it did its predecessor. The previous family of systems was updated on a very irregular (for Apple) cadence. Apple pushes its partners and suppliers to meet aggressive schedules with the rest of its products, I would hope that its flagship Mac eventually gets the same treatment. Given how hard Apple pushed Intel to improve the performance of its integrated graphics, I hope Apple can do the same to fix Intel’s workstation roadmap. Even though the Mac Pro with the lowest single threaded performance gets close to the fastest desktop Haswell Apple offers today, I hate that you have to choose. Intel does its highest paying desktop customers a disservice by always selling them a previous generation micro architecture in exchange for more cores and PCIe lanes. In the case of the Mac Pro, especially given the lackluster OS X adoption of QuickSync and how well the Mac Pro makes use of PCIe lanes, I’m actually ok with the tradeoff. You end up with a far better platform as a result.
All in all the new Mac Pro is a good update to its aging predecessor. Apple did a great job with the new chassis and build a desktop that's extremely dense with compute. When I had to dust off the old Mac Pros to prepare them for this comparison I quickly remembered many of the reasons that frustrated me about the platform. The old Mac Pro was big, bulky, a pain to work on and was substantially behind the consumer Macs in single threaded performance. The new Mac Pro fixes literally all of that. If you have a workload that justifies it and prefer OS X, the Mac Pro is thankfully no longer just your only solution, it's a great solution.


